|
|
| Vintage and Classic Roadster Kit Car Builds For Vintage and Classic era kit cars. Post your build reports, problems and progress here |

28th March 2020, 20:55
|
|
Senior Member
|
|
Join Date: Jun 2015
Posts: 1,401
|
|
looks fantastic!
|
3rd April 2020, 18:35
|
 |
Senior Member
Enthusiast
|
|
Join Date: Mar 2005
Posts: 3,079
|
|
 Bonnet stay - take 2....
Quote:
Originally Posted by peterux

...... my current design causes the stay to rest on the engine cover which doesn't seem right to me as the engine moves slightly.
I need to rethink the bottom mount...  |
So the issue with the first version of my bonnet stays is that there is nowhere to clip it when not in use....
 Bonnet stay issue Bonnet stay issue by Sabrebuilder, on Flickr
To solve the problem, I have replaced the lower fixing point with an m5 stainless steel ball joint.
 Bonnet stay - version 2 Bonnet stay - version 2 by Sabrebuilder, on Flickr
Which means it can swing across and be clipped on a bracket fixed to the side bonnet.
 Bonnet stay clip Bonnet stay clip by Sabrebuilder, on Flickr
The bracket for the bonnet stay clip was a bit of a challenge.
 Bonnet stay clip bracket Bonnet stay clip bracket by Sabrebuilder, on Flickr
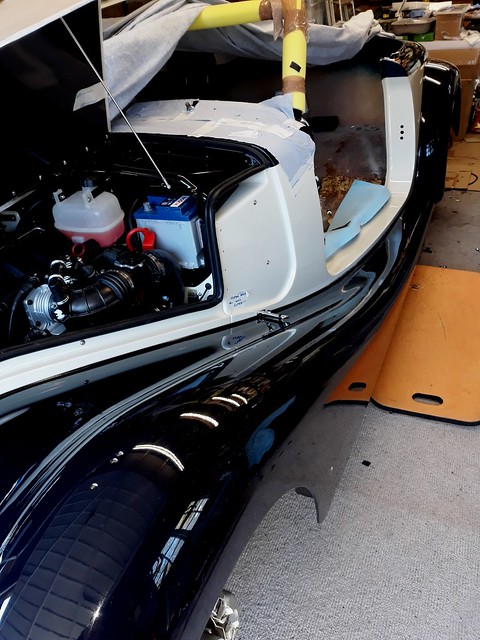
Moving on, I've been fitting the numerous bolts in the front wing (I think there are 15 or so) which takes some ingenious yoga positions to reach some of the nuts and bolts.
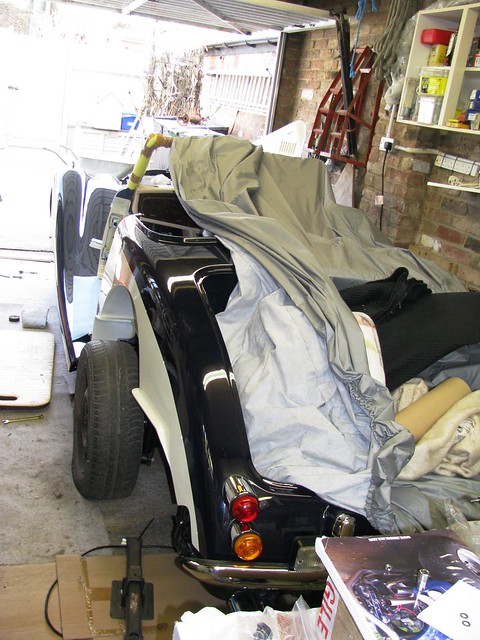 Wing fitting Wing fitting by Sabrebuilder, on Flickr
Then I can wire up the front lights. More on that next week.
Stay safe everyone....
....peter

|
4th April 2020, 17:01
|
 |
Senior Member
|
|
Join Date: Nov 2011
Location: Exeter
Posts: 187
|
|
Quote:
Originally Posted by peterux
Moving on, I've been fitting the numerous bolts in the front wing (I think there are 15 or so) which takes some ingenious yoga positions to reach some of the nuts and bolts.
....peter
|
A dodge that I have used to good effect in the past is to use Evo Stik! Option 1 is to put a smear of it in a socket, then pop the nut or bolt in the socket and wait 5 minutes. You can the manoeuvre it into position, even downwards, while fitting the opposite bolt / nut into position. Option 2 is to Evo Stik the nut / bolt, plus washer if there is one, into position on the body, if neccessary using a dummy mandrel and again wait for the glue to set a bit.
The advantage is this method is that the Evo Stik is strong enough for the fitting operation but easily shears away if you later strip down. Any remnants of glue in the socket spanner can easily be scraped out. Peter. |
4th April 2020, 20:04
|
|
Senior Member
|
|
Join Date: Oct 2013
Location: norfolk
Posts: 695
|
|
Quote:
Originally Posted by peterux
So the issue with the first version of my bonnet stays is that there is nowhere to clip it when not in use....
Bonnet stay issue by Sabrebuilder, on Flickr
To solve the problem, I have replaced the lower fixing point with an m5 stainless steel ball joint.
Bonnet stay - version 2 by Sabrebuilder, on Flickr
Which means it can swing across and be clipped on a bracket fixed to the side bonnet.
Bonnet stay clip by Sabrebuilder, on Flickr
The bracket for the bonnet stay clip was a bit of a challenge.
Bonnet stay clip bracket by Sabrebuilder, on Flickr
Moving on, I've been fitting the numerous bolts in the front wing (I think there are 15 or so) which takes some ingenious yoga positions to reach some of the nuts and bolts.
Wing fitting by Sabrebuilder, on Flickr
Then I can wire up the front lights. More on that next week.
Stay safe everyone....
....peter |
Very nice indeed  |
5th April 2020, 08:59
|
|
Senior Member
Enthusiast
|
|
Join Date: Mar 2005
Posts: 3,079
|
|
Quote:
Originally Posted by Grey V8 Pete
A dodge that I have used to good effect in the past is to use Evo Stik! Option 1 is to put a smear of it in a socket, then pop the nut or bolt in the socket and wait 5 minutes. You can the manoeuvre it into position, even downwards, while fitting the opposite bolt / nut into position. Option 2 is to Evo Stik the nut / bolt, plus washer if there is one, into position on the body, if neccessary using a dummy mandrel and again wait for the glue to set a bit.
The advantage is this method is that the Evo Stik is strong enough for the fitting operation but easily shears away if you later strip down. Any remnants of glue in the socket spanner can easily be scraped out. Peter.
|
Thanks Peter, that is a good tip i'll try next time on the other side of the car.
My tricks include putting a piece of PVC insulation tape across the head of the bolt and then wedging the bolt or nut in the socket. The tape thickness is just enough to hold the nut or bolt in the socket while you position it through the hole and the tape holds the washer in place. I also use all my socket set extensions joined together to give me about 18" extension to my arm. It's difficult to show in the pictures but the front wings are so large (and beautiful!) that you can't reach both sides of the nut and bolt.
All good fun though.......... 
|
8th April 2020, 19:54
|
|
Senior Member
Enthusiast
|
|
Join Date: Mar 2005
Posts: 3,079
|
|
Mid-week update...
Quote:
Originally Posted by Mitchelkitman
Very nice indeed |
Thanks for the feedback.
---------------------------------------------------------------------------------------
A midweek update.....at least I think it is midweek but during these strange times all days are alike and equal.
But every cloud has a silver lining so I'm cracking on with my re-build....
I've now finished fitting the nearside wings.
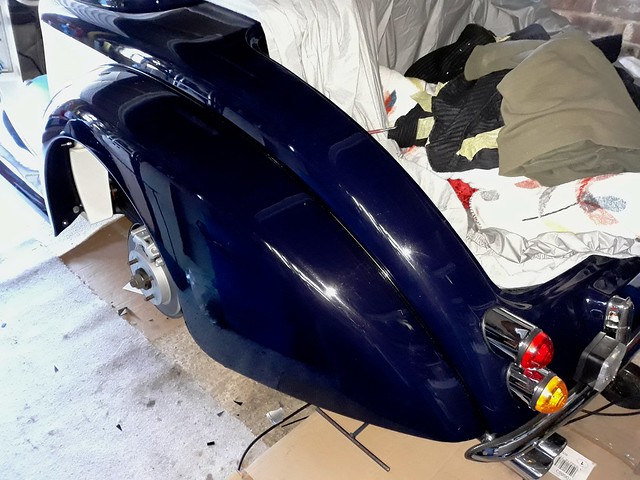 Rear Wing Rear Wing by Sabrebuilder, on Flickr
(the shiny blue paint is difficult to photograph inside my garage with reflections from the windows and the fluorescent tubes above)
 Rear Wing Rear Wing by Sabrebuilder, on Flickr
The wing piping was time consuming and the joint between the front and back wings was the trickiest bit to get a neat finish. I used patent look smooth PVC 'leathercloth' over a 6mm plastic cord. Eventually I figured out that you have to bolt the two wings together before tightening the bolts to the body. Obvious with hindsight.
 Wing Piping Wing Piping by Sabrebuilder, on Flickr
And another weird shot off my 'phone.
 Front and Rear wings Front and Rear wings by Sabrebuilder, on Flickr
Now I can finish wiring up the front lamps....
stay safe everyone,
......peter
|
9th April 2020, 00:17
|
|
Senior Member
|
|
Join Date: Jun 2015
Posts: 1,401
|
|
Outstanding! Nice...
|
9th April 2020, 20:14
|
 |
Senior Member
|
|
Join Date: Dec 2011
Location: Devon
Posts: 550
|
|
Looking terrific!!
|
13th April 2020, 21:03
|
|
Senior Member
Enthusiast
|
|
Join Date: Mar 2005
Posts: 3,079
|
|
More wiring.........
Jack and Froggy, cheers for the feedback.
------------------------------------------------------------------------------
With the nearside wings in place I could crack on with the front lights wiring. To meet the IVA requirements I needed to securely fix the wiring under the wings. To fix to the GRP wings I made up these pads......... I pop riveted these special cable ties to 4cm square pieces of aluminium. (I've had a packet of these cable ties in my box for years and never found a use before.)
 Cable tie mounts Cable tie mounts by Sabrebuilder, on Flickr
I then glued the cable tie mounts to the front wing with a good dollop of PU adhesive. This time I remembered to remove the black schultz coating and I roughened the surface with some sandpaper.
 Wiring pads Wiring pads by Sabrebuilder, on Flickr
I also bolted a cable tie mount to the side of the headlight shell.
 Headlight wiring Headlight wiring by Sabrebuilder, on Flickr
After painting the support pads and surrounding areas, i have completed the headlight and front indicator wiring.
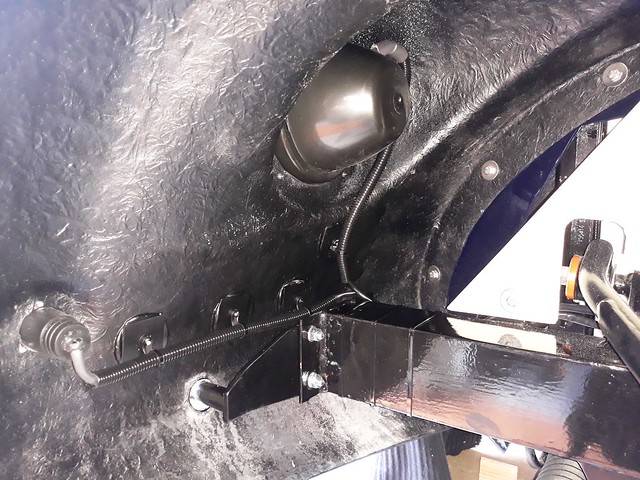 Headlight and indicator wiring Headlight and indicator wiring by Sabrebuilder, on Flickr
The side light wiring runs along the upper wing support.
 Side light wiring Side light wiring by Sabrebuilder, on Flickr
..and the side repeater wiring runs along the lower wing support.
 Side repeater wiring Side repeater wiring by Sabrebuilder, on Flickr
Now I need to do the same on the offside.......
.........peter
|
14th April 2020, 20:39
|
|
Senior Member
|
|
Join Date: Apr 2011
Posts: 282
|
|
Very smart and tidy!
|
21st April 2020, 19:10
|
|
Senior Member
Enthusiast
|
|
Join Date: Mar 2005
Posts: 3,079
|
|
More wings.....
Thanks Dpa
-------------------------------------------------------------------------
I've now finished fitting the front and rear offside wings. It took slightly longer than planned because I got distracted and started playing around with door locks and window winders, but more on that another time 
 Offside Front wing Offside Front wing by Sabrebuilder, on Flickr
 Fuel Filler flap Fuel Filler flap by Sabrebuilder, on Flickr
I had a small problem with the fuel filler flap hinge which fouled the fuel tank 'rollover' vent. I lowered the vent with an m5 hex spacer.
 Vent mounting change Vent mounting change by Sabrebuilder, on Flickr
Now I can get on with finishing the front lighting......
Stay safe everyone.
............peter |
21st April 2020, 22:20
|
|
Senior Member
|
|
Join Date: Jun 2015
Posts: 1,401
|
|
looking really good!
|
25th April 2020, 07:14
|
 |
Senior Member
|
|
Join Date: Feb 2012
Location: Wembley, London
Posts: 5,058
|
|
Peter - As always, great attention to detail on the small things. 
However, as more of the big pieces go back on, it is easier to see how good the overall result is going to be too.
Good luck, Paul. 
|
28th April 2020, 18:58
|
|
Senior Member
Enthusiast
|
|
Join Date: Mar 2005
Posts: 3,079
|
|
Another milestone completed
Thanks for the positive comments, Jack and Paul 
----------------------------------------------------------------------
I achieved another milestone this week by completing the external lighting!
 Offside wings and lights. Offside wings and lights. by Sabrebuilder, on Flickr
I was thinking of starting on re-assembling the doors but a bit worried I might damage them whilst working on the interior so I have decided to work on that first. At least that's today's plan .... 
Stay safe..
........peter |
28th April 2020, 20:11
|
|
Senior Member
|
|
Join Date: Jun 2015
Posts: 1,401
|
|
wise decision Peter. Looking great!
|
8th May 2020, 07:50
|
 |
Senior Member
Enthusiast
|
|
Join Date: Feb 2005
Location: Hampshire
Posts: 2,497
|
|
I've not checked in for a while - it looks fantasic |
14th May 2020, 08:06
|
|
Senior Member
Enthusiast
|
|
Join Date: Mar 2005
Posts: 3,079
|
|
Quote:
Originally Posted by Patrick
I've not checked in for a while - it looks fantastic |
Thanks, Patrick.
Yes, it's coming together nicely. But still lots to do on the interior. |
14th May 2020, 12:29
|
|
Member
|
|
Join Date: Jul 2014
Location: Ealing London
Posts: 54
|
|
Hi Peter, though I don't make too many comments, I am watching every step you are taking and I honestly have nothing but admiration for you. It is a pleasure seeing your posts, as every step you take I can't think of a better on. Keep up the good work.
|
23rd May 2020, 20:11
|
|
Senior Member
Enthusiast
|
|
Join Date: Mar 2005
Posts: 3,079
|
|
Quote:
Originally Posted by Amir Manzoori
Hi Peter, though I don't make too many comments, I am watching every step you are taking and I honestly have nothing but admiration for you. It is a pleasure seeing your posts, as every step you take I can't think of a better on. Keep up the good work.
|
Thanks, Amir. Glad you and all watches are enjoying my updates.
I'm currently working on the interior and specifically I'm making a centre console with an armrest to fit between the seats and hide the ugly Ford handbrake. It's taking a lot of time as it's evolving rather being designed and built. I'll post some pictures when its complete. |
23rd May 2020, 20:17
|
|
Senior Member
|
|
Join Date: Jun 2015
Posts: 1,401
|
|
With your level of detail the interior will be as beautiful
as the exterior. I'm sure! Well done.
|
|
Currently Active Users Viewing This Thread: 2162 (0 members and 2162 guests)
|
|
|
 Posting Rules
|
You may not post new threads
You may not post replies
You may not post attachments
You may not edit your posts
HTML code is Off
|
|
|
All times are GMT +0. The time now is 08:31.
|


 Linear Mode

