|
|
| Sammio Builds and discussions Sammio bodied car builds and specials |

9th March 2012, 13:35
|
 |
Senior Member
|
|
Join Date: Jan 2012
Location: Poole, Dorset
Posts: 615
|
|
 Radiators/Mountings...
I am hopefully about a week or so from getting my engine back in and I have been scouring the posts for ideas, innovations and experience on mounting the radiator. 
Mine is a 1600 vitesse engine, so it a little longer, so I am envisaging a challenge in getting the radiator to fit. 
If anyone can help with pictures of their radiator mountings and water pipework then I would be very grateful! 
My number 1 idea is to use the original Vitesse radiator and lower the mountings by drilling out the rivets and reconnecting further up the radiator, thus lowering it. I am not sure how that will work out with the pipework and exisiting pulley mounted fan, but I will have to wait and see. Unless anyone else has a brill idea I can copy/steal/imitate. Best idea wins a beer at the great Sammio informal not-an-owners-club bash!  IMG_0843x350w.jpg
|
9th March 2012, 15:29
|
 |
Senior Member
|
|
Join Date: May 2011
Location: Somerset
Posts: 1,671
|
|
I ended up moving the original brackets up a bit. But rather than drilling them out, i cut off the protruding bits with a 1mm cutting disk and then welded the bits i'd cut off back on higher up.
The way i cut them i left the parts with the rivets on the radiator as it gave me something substantial to weld them back on to.
I then used spacing washers to fine tune the final position.
It worked for me, but I'm sure there are other options |
9th March 2012, 15:51
|
|
Senior Member
|
|
Join Date: Jan 2012
Location: Poole, Dorset
Posts: 615
|
|
any pictures Dave?
How much clearance did you give yourself above the radiator to the bonnet? What does the pipework end up looking like? Does it foul the fan?
Sorry for all the questions!!
|
9th March 2012, 19:43
|
 |
Senior Member
|
|
Join Date: Jul 2011
Posts: 5,328
|
|
As luck would have it I'm addressing this very issue on my own build thread at the mo' but just in case someone's searching for ideas in the year 2030 for Sammio number 2,338 (or 2,339 as Gary never really seems that sure what number he's popping out of the mould) it's worth repeating myself.
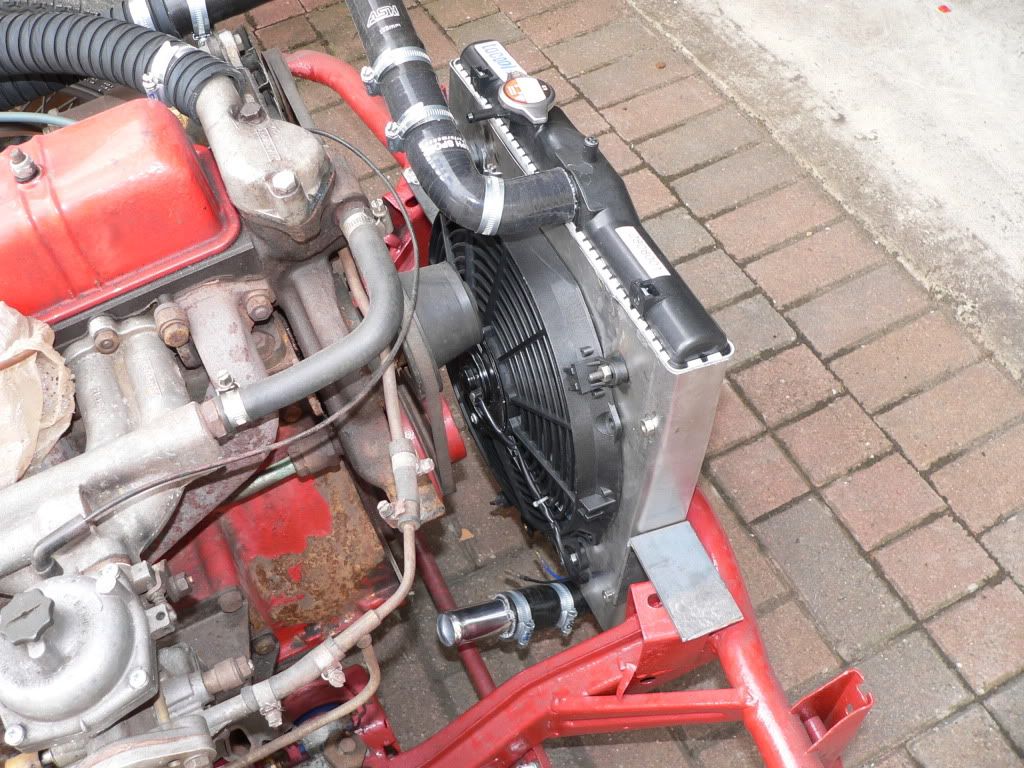
Early on in my build I elected to go for an electric fan. The reasons for this were many and varied: free up a couple of bhp to drive the wheels; faster warm up reduces engine wear; and the crank driven fan that came with the car being fu  ked being just three.
I bought a 14" electric fan and fitted it to the back of my Vitesse radiator. When I offered it up to the mounts I found that the centre of the motor fouled the bottom pulley due to the combined depth of the rad & fan. A bit of head scratching followed by some hacksawing of an old plastic coated, box section steel roof rack to make some spacers had that little problem solved by raising the radiator an inch, placing the back of the motor between top and bottom pulleys.
Then I collected my body from Gary and asked him if my raised rad would fit under the Spyder bonnet... 
So, fully committed to an electric fan arrangement I had to come up with an alternative solution.
I considered cutting into the front cross-member and moving the radiator forward but rejected that on the grounds that it might then need the dreaded and unnecessary SVA test due to chassis modification.
I considered moving the radiator ahead of the front cross-member but decided that it would stick out of the bottom too much and be too vulnerable to stone damage.
Which left me with the option of replacing the radiator with a smaller and thinner one. And that's what I've done. After some very unscientific rule-of-thumb measuring and sucking air in through teeth I stumped up forty quid for a brand new Honda Civic radiator. It's light, small and very, very thin, but it also has double the number of rows to the original rad and about ten times as many cooling fins, which should compensate for its tiny-ness (I hope).
It's currently at the trial fit stage and I haven't been able to test its efficiency yet but it's looking promising:
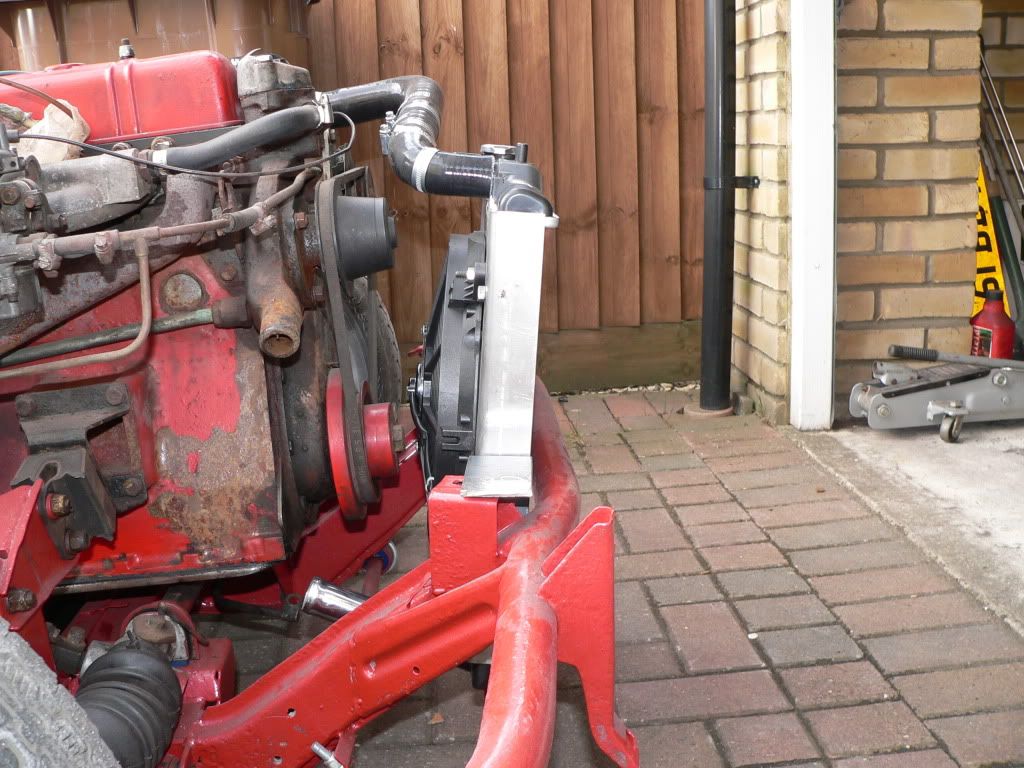
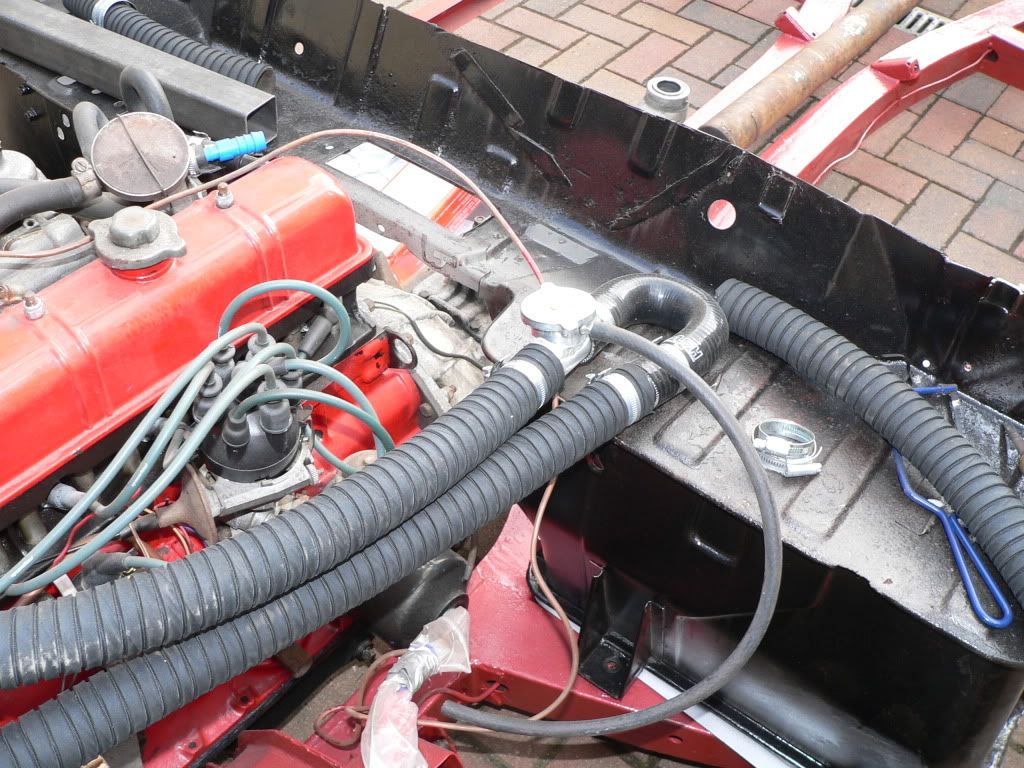
As for the plumbing I semi copied Patoune's setup on his Herald race engine, running mine back on the other side of the engine (so I can have the thermostat adjuster inside the cockpit) and using an in-line filler rather than a header tank just to simplify things:
Only time will tell if my approach will satisfactorily cool the mighty Triumph 2000 straight six lump... 
Last edited by Mister Towed; 9th March 2012 at 19:46..
|
9th March 2012, 20:57
|
|
Senior Member
|
|
Join Date: Jan 2012
Location: Poole, Dorset
Posts: 615
|
|
Thanks Mr Towed..... I can't wait to see if it cools it all down nicely.
Good job though, looks very good! Well done! Hope mine turns out as good.
|
10th March 2012, 05:40
|
|
Senior Member
|
|
Join Date: Jul 2011
Posts: 5,328
|
|
|
11th March 2012, 09:56
|
|
Junior Member
|
|
Join Date: Mar 2012
Posts: 5
|
|
Just an idea
Just an idea, but I've got hold of a VW cross-flow radiator (Golf - I think) and mounted it well forward, low down and sloping forwards at the top. It finishes close up to the oval air intake in the bonnet and therefore in the main airstream. I made up some simple mounting brackets off the original radiator bottom mounts and the top brackets screw onto the flat 3/8" UNF Herald bits already there on the 'bumper bar' at the front of the chassis. It's a cross-flow rad, and the connection off the water pump is quite easy, but I had to turn the thermostat housing through 180 deg to get it pointing the right way (gives added clearance too), and needed to fabricate a top pipe to incorporate the filler cap/system vent. (Beware of lowering the Herald rad too much if the filler cap finishes up below the thermostat housing) Don't know if it works yet, but modern rads seem to be a lot cheaper than poncing around with 40-year old stuff and anyway it looks more in keeping with the style of 1950's racing cars. If it strikes a chord I could try and send more details.

|
11th March 2012, 10:14
|
|
Senior Member
|
|
Join Date: Jan 2012
Location: Poole, Dorset
Posts: 615
|
|
Hammer head I would be really interested to see a picture of your set up. Sounds very smart
|
12th March 2012, 17:29
|
|
Junior Member
|
|
Join Date: Mar 2012
Posts: 5
|
|
VW Rad
The rad is supposed to be VW Caddy/Jetta/Scirocco/SEAT Toledo, bought new off e-bay for £24 (Hella). It's very light but the fins are especially vulnerable to damage. I had to turn the Herald thermostat housing through 180deg to get it pointing the right way (the Vitesse may be different) and also give extra clearance to the bonnet. I had the pulled bend kocked up to order in steel tube (can't weld ali) by pigginpipes (again, on e-bay). The filler cap has to be at the highest point, so I took it back towards the carburettor so that it goes up the bulge in the bonnet for proper clearance to finish up roughly in line with the top of the rocker box. The radiator vent at the top right needs a small-bore rubber pipe with some sort of bleed valve (á la caliper bleed?) to vent high spots in the rad. I still need to think about expansion vessels etc.
Brackets are made from 18swg sheet steel and bolted to existing Herald holes. The bottom brackets each have a hole in the tray part that register nicely with a couple of pegs in the rad . Rad bolts to the 4-brackets but I had to very gingerly tap 6mm holes in the VW (plastic) bosses (4). No drilling necessary, but take care not to drill right through to the water way. I might add a bungee cord later just to discourage the whole thing from jumping ship. Piping it up is fairly simple, but the water pump connection needs a bit of thought to keep it clear of the engine mounting.
That's about it really. You don't actually have to copy the rag in the carburettor hole, but it's always an option!
Hope this helps!
|
12th March 2012, 17:44
|
|
Senior Member
|
|
Join Date: Jan 2012
Location: Poole, Dorset
Posts: 615
|
|
Hammerhead, that looks a neat set up - I like the angle so it matches the scoop. Are you mounting a fan, couldn't see one in the pics.
I tried my bonnet on today, but without the engine, to see what it all looks like together, and started to clean the gearbox and engine so i can get them back in in the next week or so. I want to check the ride height as well as the clearance for various items.
I really want to use my original header tank as it is made of brass. It was painted when I got the Vitesse, but I have stripped the paint and polished it and it will make a nice feature if I can get it to fit!
|
12th March 2012, 19:09
|
|
Senior Member
|
|
Join Date: Jan 2012
Location: Warrington
Posts: 383
|
|
Im just getting to this stage of the build myself so Im glad to see this thread has appeared. The radiator from the donor car was in good condition so my plan is to lower this to fit under the bonnet but this would bring the filler too low. Im trying to keep things as simple as possible and wondered if anybody had tried fitting a header tank to the tubing for the old heater?
|
12th March 2012, 20:06
|
 |
Senior Member
|
|
Join Date: Jul 2011
Location: Marmande 47200
Posts: 501
|
|
Trevor did his that way and that's my intention,pick up the flow and return from the heater pipes to a header box. Sounds simple 
psycho |
13th March 2012, 09:00
|
|
Senior Member
|
|
Join Date: May 2011
Location: Somerset
Posts: 1,671
|
|
Quote:
Originally Posted by GazDavies

. Im trying to keep things as simple as possible and wondered if anybody had tried fitting a header tank to the tubing for the old heater?
|
Yup, i did it that way as well after i dropped my rad mounts 60mm.
I went to the scrappy and went through loads of header tanks and i ended up with one from a Renault Megane for a tenner, which turns out to be the same as Pat went for and fits on our bulkheads nicely 
The only pic i've got of it was during painting, but i can try and get some others and one of my modified rad tonight.
 |
13th March 2012, 14:08
|
|
Senior Member
|
|
Join Date: Jan 2012
Location: Warrington
Posts: 383
|
|
I have been to the scrap yard today and bought myself a header tank although it looks bigger and much more difficult to fit to the bulkhead than your does! Ive connected it up and it looks like it will do the job once I find a way of keeping it in place so Im now starting to look at my options for a fan. My preference would be to go for an electric fan (looks like the only option as the original is too high) however I have never fitted one before so I will be tawling through the internet tonight to try to figure out how im going to do this.
|
14th March 2012, 08:50
|
|
Senior Member
|
|
Join Date: Jul 2011
Posts: 5,328
|
|
A lot of after-market electric fans come with a 'fitting kit' which is half a dozen tie-wraps to attach the fan directly to the surface of the radiator by looping them through the structure.
This leaves the fan drawing air through about 70 to 80% of the radiator which is probably going to be okay for most installations. To maximise cooling it's a good idea to mount the fan in a shroud that encloses the whole cooling surface of the radiator. That way it draws air through the entire matrix.
I made mine out of 1.2mm sheet steel left over's and incorporated the mounting brackets into the shroud. This will simplify replacement if the radiator gets damaged as all I need to do is undo the four nuts that hold the rad into the shroud, pop out the broken radiator and slip a new one in. I also angled the brackets to tilt the radiator forwards and give the fan motor extra clearance from the pulleys. Although not perfect (I made my brackets by eye so they're not quite symmetrical) the result looks pretty much like a factory fitment.
You pays your money you takes your choice...
|
16th March 2012, 13:40
|
|
Senior Member
|
|
Join Date: May 2011
Location: Somerset
Posts: 1,671
|
|
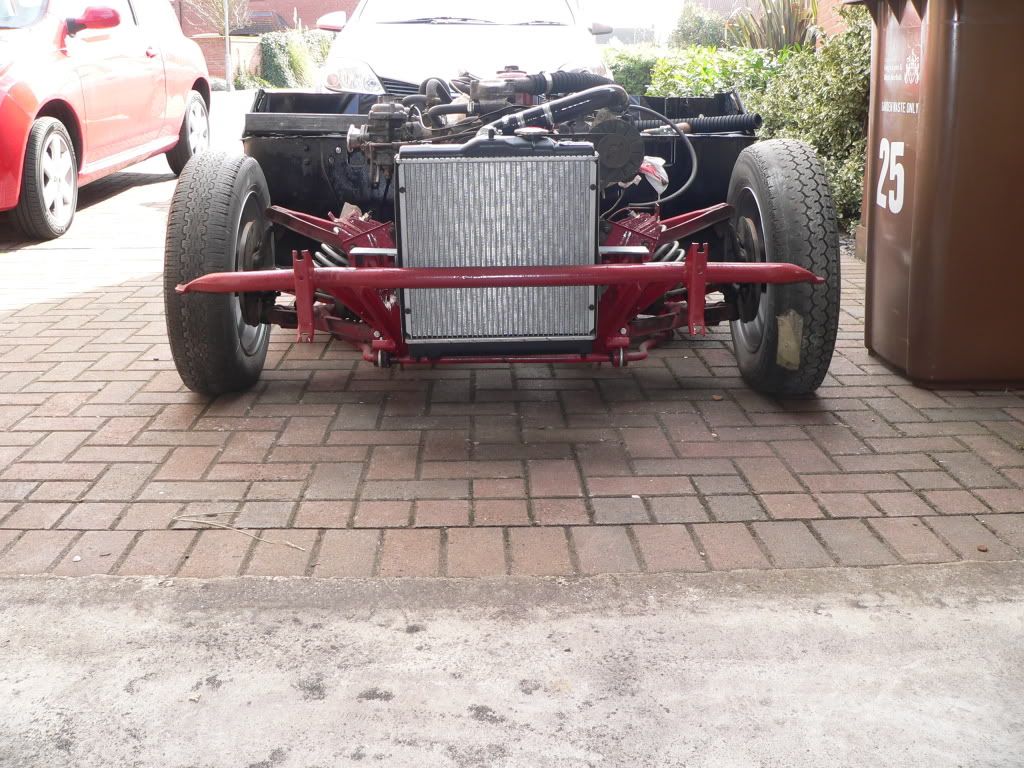
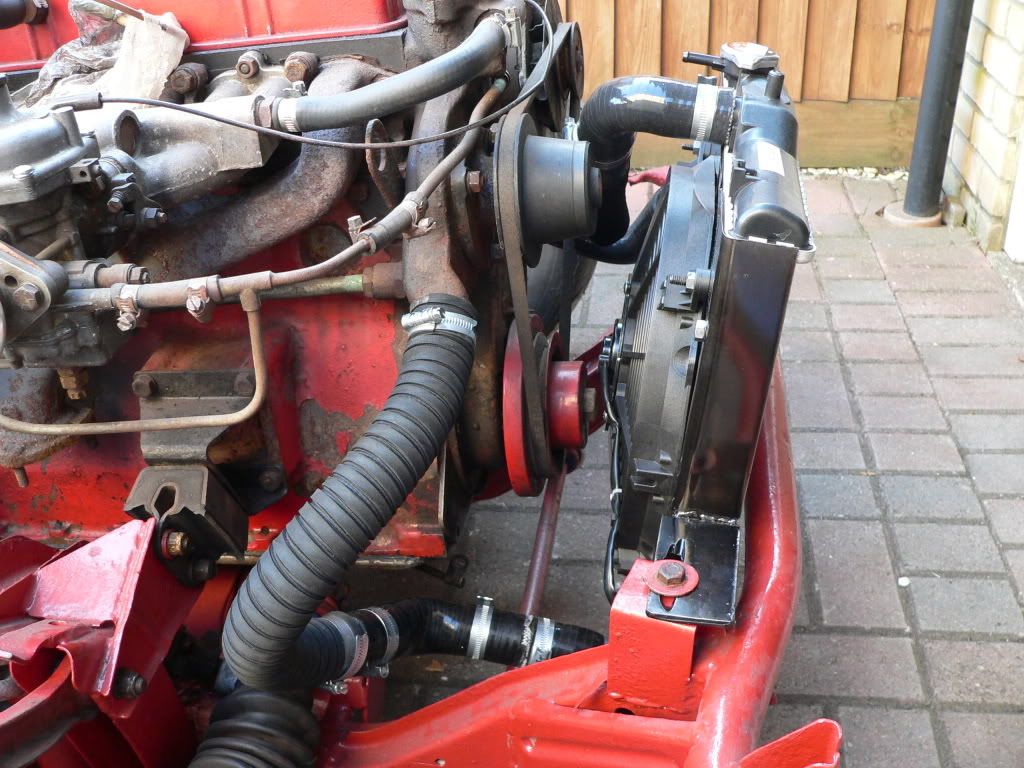
I've finally got some pics of my modified Vitesse rad for reference.
Please excuse the general untidiness of my under-bonnet (especially compared to some on here!) as tidying up the engine is next winters job!
But you should be able to see what a std rad looks like lowered and how little room there is with it all back together with the 2L 6.

 |
16th March 2012, 14:28
|
|
Senior Member
|
|
Join Date: Jan 2012
Location: Poole, Dorset
Posts: 615
|
|
Thanks Dave, that is brilliant info, and gives me something to go on now. I really want to use the original radiator so I can keep the period look, even under the bonnet.
I can see where you re-welded the mounting brackets on, so how much clearance does that give you to the bonnet now?
|
24th August 2012, 10:20
|
 |
Senior Member
|
|
Join Date: Jun 2012
Location: Luton
Posts: 133
|
|
I've been doing a bit of radiator research...
The Fisher Fury (or whatever it's called now) commonly uses a VW Polo radiator and the 1100cc version with a core size of 380mm wide, 322mm high and 34mm thick seems to cope for engines up to about 150+hp. Many people like to fit the larger 1.3 Polo rad with a 430mm wide core just to be on the safe side.
|
|
Currently Active Users Viewing This Thread: 1 (0 members and 1 guests)
|
|
|
 Posting Rules
|
You may not post new threads
You may not post replies
You may not post attachments
You may not edit your posts
HTML code is Off
|
|
|
All times are GMT +0. The time now is 05:12.
|


 Linear Mode

