|
|
| Old No.7 Builds 275 kits from Dan |

31st January 2019, 05:49
|
|
Senior Member
Enthusiast
|
|
Join Date: Mar 2008
Posts: 225
|
|
Looking great Mark, I hope your family's health issues are sorting themselves out.
Ross
|
1st February 2019, 01:53
|
|
Senior Member
|
|
Join Date: Aug 2017
Location: Auckland, New Zealand
Posts: 309
|
|
Quote:
Originally Posted by rossnzwpi

Looking great Mark, I hope your family's health issues are sorting themselves out.
Ross
|
Thanks Ross appreciate it fella. Been a bit of a perfect storm since the kit arrived really, I have had a long term knee issue that has only just been confirmed is a torn meniscus so need the surgery in the next few weeks. My boy has had three issues over the preceding months which has taken up a lot of visits etc with the last one a fractured toe. To cap it off daughter has just done the same this week! Always something going on.....
I have finished the steering wheel now, Farina horn button wired up just need the battery connected to test. The heat over here though is making even the simplest task taxing! (Apologies to the blighty brothers who are freezing their proverbials off!) Cheers Mark. |
7th February 2019, 05:31
|
|
Senior Member
|
|
Join Date: Aug 2017
Location: Auckland, New Zealand
Posts: 309
|
|

Managed a bit of work over the last few days, no photos though due not really visual progress.
Constructed all the looms for the front clam and first fit in conduit on brackets. Battery refitted and all tested out so no mixups or wiring fails yet. Can start terminating at the lights etc now. Horn checks out as well so all steering wheel now complete and tested.
Tried a trial fit of the sills, but with limited room in the garage unable to get the doors wide enough open so left that for another day when the car is pushed out. Got to keep pushing for progress as I don’t know when the surgeon is going to call waving his knife at me with a smile on his face!
Oh also had a great weekend at Hahei at the leadfoot festival. If I get a chance I’ll download the camera and see what I can post up, but look on google for leadfoot festival if interested. It is a yearly hillclimb event ona private estate driveway that has been designed by Rod Millen to represent his favourite parts of goodwood, pikes peak and forestry stages. Awesome event with awesome cars.
Last edited by Welshkiwi; 7th February 2019 at 06:14..
Reason: Leadfoot
|
12th February 2019, 06:46
|
|
Senior Member
|
|
Join Date: Aug 2017
Location: Auckland, New Zealand
Posts: 309
|
|
Be a few pictures soon, just been doing the hard graft under the bonnet with non visible stuff. Front indicators and side indicators in and working, R/h headlight in, pilot works and both beam circuits active, now need to fit 5 pin relay so that I can run the low beam and switch them off when high beam selected. Once I have that sorted will post a diagram for a record and others info. May have bought the wrong trims for the headlights as they seem not deep enough to cover the headlight assy. Need to work that out before I buy anymore! Might just be I need to adjust the light assy a bit. Once R/h side complete need to work on the bonnet safety catch mech extension. At present need to fit my hand in the l/h headlight bucket to open the front clam! That should fill my weekend upcoming........
|
13th February 2019, 05:33
|
 |
Senior Member
|
|
Join Date: Sep 2011
Posts: 1,446
|
|
Good to see you are moving forward with it
Pics as always help us dreamers visualise what’s going on
|
17th February 2019, 01:57
|
|
Senior Member
|
|
Join Date: Aug 2017
Location: Auckland, New Zealand
Posts: 309
|
|
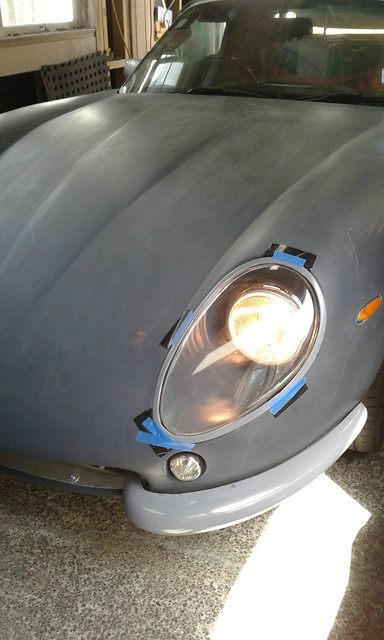
 More progress photos - front end
Hi guys, thanks for all the good views and enthusiasm so far!
Made progress as planned over the weekend, the heat though is making it pretty difficult to work in, NZ is cooking at the moment!
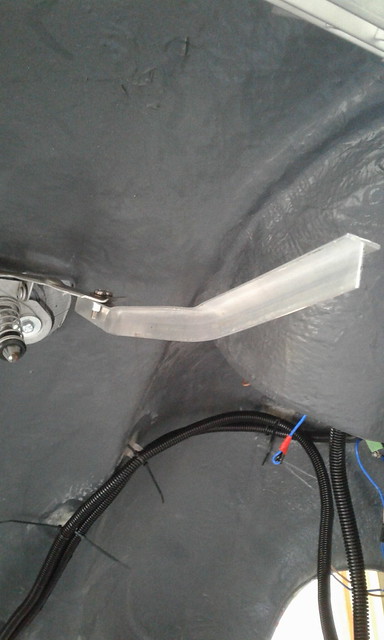
Wired in all the front lights - All working as planned and low/main beam working through the relay's that I have fitted both sides. (Mini auto relay/5 pin) 20amp Normally closed (NC) and 40 amp normally open (NO) side. Have rigged the low beam to use the NC side so that it operates normally. Once either high beam is "flashed" or put on with the stalk switch, then that powers the relay switch, uses it to feed the high beam and of course the NC side becomes open circuit and cuts the low beam. (This is using all the original wiring extended from the front of the car, so all bulb circuits had a +ve and -ve lead.) I have used the low beam ground wire for the H4 plug and the high beam ground lead for the relay switch ground, but it wouldn't really matter either way round. Works well.
Also extended the bonnet safety catch lever so that I can reach from the grille and pop the catch. Needs a bit of tidying and polishing a bit but works well.
Hoping to start looking at sills and front wheel arches/guards soon......
As you can see from the photos - gaffer tape if my friend at the moment to give me an idea of the look! Happy plodding!
 RH Light main RH Light main
 Pilots and indicators Pilots and indicators
 LH light main LH light main
 Front light relay setup Front light relay setup
 Safety catch extension Safety catch extension
 Safety catch rivnuts Safety catch rivnuts
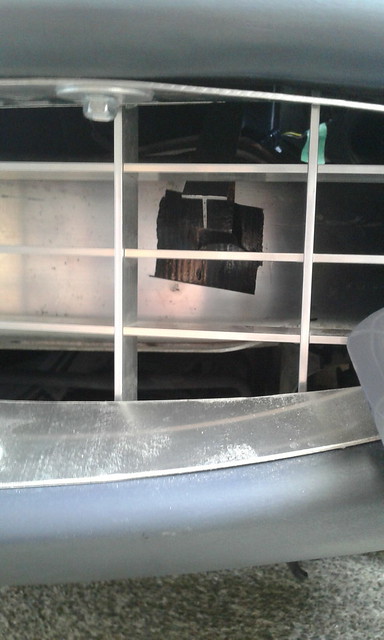 Safety catch end thru grille Safety catch end thru grille

|
17th February 2019, 08:20
|
 |
Senior Member
|
|
Join Date: Dec 2011
Location: Devon
Posts: 551
|
|
Dull and raining here so looking at your pictures is a ray of sunshine to me! The headlamps fitted with those covers and surrounds look great. Keep at it. Every little task completed moves you nearer your goal.
|
18th February 2019, 06:59
|
|
Senior Member
|
|
Join Date: Aug 2017
Location: Auckland, New Zealand
Posts: 309
|
|
Quote:
Originally Posted by froggyman
Dull and raining here so looking at your pictures is a ray of sunshine to me! The headlamps fitted with those covers and surrounds look great. Keep at it. Every little task completed moves you nearer your goal.
|
Thanks Froggyman, appreciate the motivation. I have the cert guy coming round tomorrow for a good chat on the rear body fixing amongst other things. There are a few areas I may have to do a few mods to for ensuring the certification side is happy. I’ll keep you all posted! Generally though I do feel heading in the right direction just! Cheers. |
18th February 2019, 07:16
|
 |
Senior Member
|
|
Join Date: Apr 2016
Location: Camberley
Posts: 972
|
|
It is great to see this coming together. Keep the momentum going.
|
19th February 2019, 02:24
|
|
Senior Member
|
|
Join Date: Aug 2017
Location: Auckland, New Zealand
Posts: 309
|
|
LVV Cert update
Quote:
Originally Posted by Barber
It is great to see this coming together. Keep the momentum going.
|
Cheers Barber will try my darndest!
Got together with the cert guy for LVV today, have agreed a few changes that need to be made.
Fuel filler needs to be moved from by the rear window and forward onto the rear arch. There is just not enough room to get the filler pipe through in between the roll cage bar and the rear tub construction without removing base metal. So we have agreed to move it onto the arch which solves that issue and the fact the filler was in the boot directly over the battery.
Rear body support needs to be modified/improved as the rear boot extension doesn’t give enough rigidity for cert. So I am working now changes that are likely to include glassed in brackets for the extension to rear bumper, the rear body onto the original rear guards location and some fixings between the sills/rear arch and in the parcel shelf area. Bit of work but needs must!
Have got a bit of work to redo on the front screen area as well as the r/h front screen edge does not fit tight enough because the infill trim I bonded in is slightly in the wrong position. So likely I will have to cut it and take out half, reclean/prep and re affix.
Lots to do as I will have to also come up with a plan/method to seal off the rear wheel arches from the cabin. Better get my fish oil stocked and brain food working! 
|
19th February 2019, 06:44
|
 |
Senior Member
|
|
Join Date: Jan 2014
Location: Egham, Surrey
Posts: 1,780
|
|
On my build, I turned the alloy bumper strengthener upside down. This gave me a flat boot floor that I was able to bolt the boot infill panel too (with a bit of modification). The boot infill panel was strengthened as well and made a great support for the rear body clam.
|
20th February 2019, 02:25
|
|
Senior Member
|
|
Join Date: Aug 2017
Location: Auckland, New Zealand
Posts: 309
|
|
Quote:
Originally Posted by Jaguartvr
On my build, I turned the alloy bumper strengthener upside down. This gave me a flat boot floor that I was able to bolt the boot infill panel too (with a bit of modification). The boot infill panel was strengthened as well and made a great support for the rear body clam.
|
Thanks for the info Jag, i’ll bear that in mind when trying to work it all out. I think I remember attempting to spin it round when I stripped the car and found an attachment bolt seize after half a thread turn. It torqued back up ok but I may be tempting fate if I attempt to get it back off. We’ll see......if I can work out the right heights and use wide enough/thick enough ally angle slotted and bolted I may be able to get the right support and leave it where it is. Thanks fella. |
24th February 2019, 06:55
|
|
Senior Member
|
|
Join Date: Aug 2017
Location: Auckland, New Zealand
Posts: 309
|
|
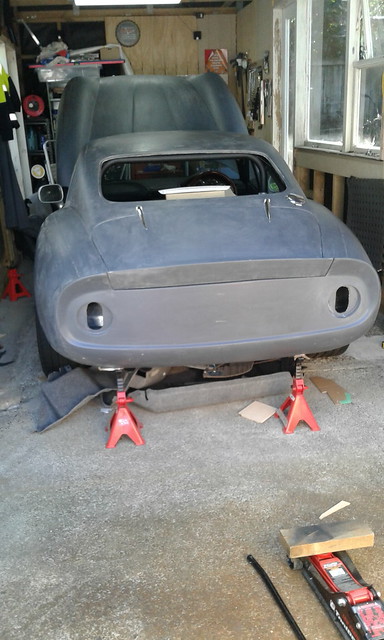
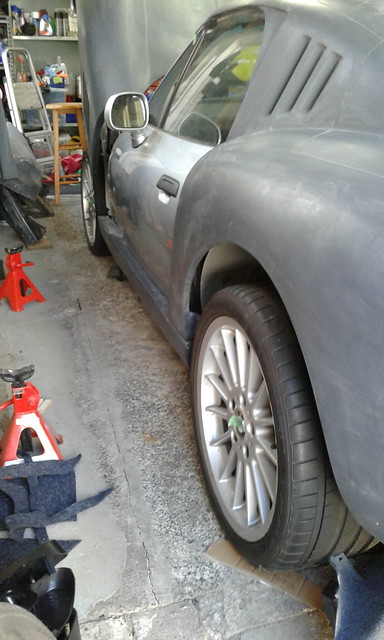
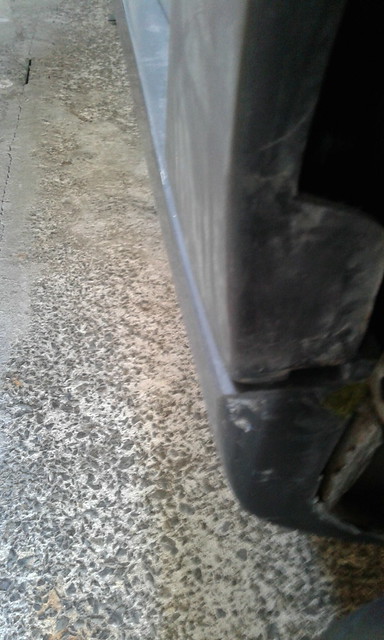
Bodyfit trial - initial gappin/fix
|
24th February 2019, 08:29
|
|
Senior Member
Enthusiast
|
|
Join Date: Jun 2015
Location: Reading, Berkshire
Posts: 688
|
|
Looking good so far.
I found doing a trial fit in the middle of the build help keep the motivation going. All the jobs are fiddly and take time and to get a glimpse of the end result does wonders.
Keep the pics coming 
Dave |
24th February 2019, 13:14
|
|
Senior Member
|
|
Join Date: Jun 2015
Posts: 1,401
|
|
My 250 SWB had the same slight offset to the rockers as your car. I Wedged those corners out to match, ran a single stainless sheet metal screw to hold them and 'glassed them to the rockers. Much cleaner looking IMO.
|
25th February 2019, 02:36
|
|
Senior Member
|
|
Join Date: Aug 2017
Location: Auckland, New Zealand
Posts: 309
|
|
Quote:
Originally Posted by DaveP
Looking good so far.
I found doing a trial fit in the middle of the build help keep the motivation going. All the jobs are fiddly and take time and to get a glimpse of the end result does wonders.
Keep the pics coming
Dave |
Will do Dave, only issue I need my mates to assist with the lift off/on so a bit of time needs to be spent lining up the kit and my lining up my ideas.....
Quote:
Originally Posted by molleur
My 250 SWB had the same slight offset to the rockers as your car. I Wedged those corners out to match, ran a single stainless sheet metal screw to hold them and 'glassed them to the rockers. Much cleaner looking IMO.
|
Thanks Molleur good stuff. Hoping to match the sills/rear drops inline and fix once more work done underneath. Does looks if it will push out and line up which is good. Good solution. Just so I am clear though, you are talking about the rear clam when you say “rockers”? Or do you mean the sills? Just never heard the term rockers other than in a valve sense! Cheers fella, M.
|
25th February 2019, 02:45
|
|
Senior Member
|
|
Join Date: Jun 2015
Posts: 1,401
|
|
Yes, in Americanese "rockers" are sills.
Also called rocker panels.
Yes, I 'glassed them in the aft end to the body. (rear clam)
|
25th February 2019, 04:33
|
|
Senior Member
|
|
Join Date: Aug 2017
Location: Auckland, New Zealand
Posts: 309
|
|
Quote:
Originally Posted by molleur
Yes, in Americanese "rockers" are sills.
Also called rocker panels.
Yes, I 'glassed them in the aft end to the body. (rear clam)
|
Awesome fella, you learn something everyday! Appreciate all the info..... |
26th February 2019, 06:48
|
|
Senior Member
Enthusiast
|
|
Join Date: Jun 2015
Location: Reading, Berkshire
Posts: 688
|
|
Two/ three nations divided by a common language.
Rockers = sills
Quarters = wings
Firewall = bulkhead
And don’t get me started on the trunk and hood weirdness...
My knowledge of the terms comes from spending much too long watching car shows from the UK, US and Aus.
Current faves are on UTube such as Project Binky, the Mongrel (Ford 100e grafting onto a MX5), MCM and Skid Factory.
Dave
|
26th February 2019, 10:19
|
|
Senior Member
|
|
Join Date: Aug 2012
Posts: 2,149
|
|
I was in the states once and over heard someone in a parking lot talking about a "deflationary situation" whilst pointing at his rear tyre !
|
|
Currently Active Users Viewing This Thread: 2441 (0 members and 2441 guests)
|
|
|
 Posting Rules
|
You may not post new threads
You may not post replies
You may not post attachments
You may not edit your posts
HTML code is Off
|
|
|
All times are GMT +0. The time now is 13:53.
|


 Linear Mode

