|
|
| Sammio Builds and discussions Sammio bodied car builds and specials |

17th December 2013, 15:52
|
|
Senior Member
|
|
Join Date: Mar 2012
Posts: 1,152
|
|
Thanks for sharing that, Mac. I'm planning to do the same so it is good to see it done. I'm toying with the idea of dropping it a little - similar to a TR2/3 profile but not quite as pronounced. I will probably chicken out and follow your lines.
|
17th December 2013, 16:16
|
 |
Senior Member
Enthusiast
|
|
Join Date: Dec 2006
Posts: 1,130
|
|
Here's my steering column.
Standard Triumph flexi joint at the bottom

If I remember correctlly that's a BMW u/j at the half-way point

Original Triumph steering column but with the sliding rod shortened

All looks simple now but it took a few days to work out  |
17th December 2013, 16:51
|
|
Senior Member
|
|
Join Date: Apr 2012
Posts: 1,163
|
|
I know what you mean, last time I did this sort of thing it took me longer to work out the optimum lengths and angles than it did to actually fabricate, lots of tacking trying then cutting tacks then tacking again.....
|
18th December 2013, 15:22
|
 |
Senior Member
|
|
Join Date: Feb 2012
Location: Wembley, London
Posts: 5,058
|
|
Mac - Can I just check that you and Micky are improving the standard Triumph set up?
I wanted to use the Spitfire bulkhead to keep the steering column in its factory position.
So am I missing something, or will the standard layout work well enough for me?
Cheers, Paul. 
|
18th December 2013, 15:36
|
 |
Senior Member
|
|
Join Date: Dec 2011
Posts: 656
|
|
Hi Paul,
What Mac and Mike are doing is to straighten the original layout of the steering column. As originally built, there is an angle between the steering rack and the steering wheel so the wheel does not lie parallel to the cockpit edge. They are fitting universal joints so that the final part of the steering column is at 90 degrees to the driving position. The standard layout will work perfectly well and their mods are out of choice rather than necessity.
I hope that helps.
|
18th December 2013, 18:12
|
|
Senior Member
Enthusiast
|
|
Join Date: Dec 2006
Posts: 1,130
|
|
Andy's not far wrong, but as you can see in the photos I had to get around the BMW exhaust manifold hence the bend and U/J. 
The original column is one straight shaft and does leave the steering wheel slightly off-set not noticeable until you strip down the car and try and line up the new body. |
18th December 2013, 19:24
|
 |
Senior Member
|
|
Join Date: Jul 2011
Posts: 5,328
|
|
No problem using the unmodified Triumph steering column on my car -
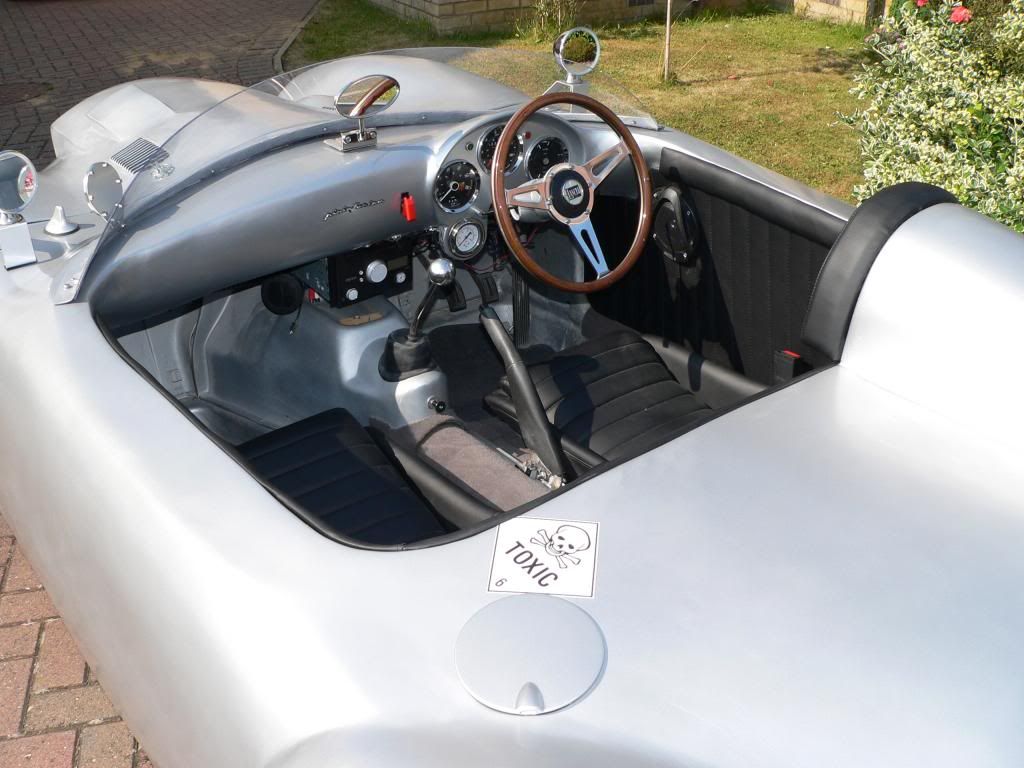
Yes, it's not quite straight, but neither is anything else on a Sammio and nobody ever notices. |
19th December 2013, 06:20
|
|
Senior Member
|
|
Join Date: Feb 2012
Location: Wembley, London
Posts: 5,058
|
|
Andy, Micky & Mr T - Thanks for the explanations chaps.  Mac
Mac - Sorry for the slight thread hijack. 
Cheers, Paul.
|
21st December 2013, 12:58
|
|
Senior Member
|
|
Join Date: Apr 2012
Posts: 1,163
|
|

Unfortunately my plan to get the whole week in the workshop went south Tuesday morning with a call out to a dead Server, 3 long days of work has it all back up and running but meant no time for the workshop. On top of that my good lady and our 15 month old granddaughter we nearly snatched away from us last night by an impatient driver overtaking a truck on a blind bend, SWMBO managed to veer half onto the verge and avoided a head on but it wiped the front offside corner off her car. Luckily both were checked out by the paramedics and given the all clear, the airbags hadn't deployed so didn't need to go to hospital. Driver of the other car had her airbags deployed and had a few bumps and scrapes but was not hospitalised. She has been "invited" to the local cop shop next week for interview....draw your own conclusion!
Anyway in between dealing with the claims management company and shuffling vehicles whilst we wait for the hire car to appear I have managed to grab a couple of hours of workshop therapy.
Shortening the steering column
First I set the column up sitting in the seat chocked to its finished position so I could see how much column I could lose.

Marked it up

removed the inner, clamped it up and cut the outer to the new length.

The new bushes have a dimple on either side for locating in the column outer.

Drilled a 9mm hole through the outer for the bush locating lugs to sit in.

Put the bush in the end after liberal application of grease.
[IMG] 
Drifted it home with a socket until the lugs popped into the locating holes, outer done!


Here you can see how much I have removed

Next I moved onto shortening the inner, cut it to length and drilled a 7mm hole straight through so I could puddle weld either side between the steering tube and the piece of solid splined bar I cut of the original spitfire lower column.

Below is a pic of the finished inner with the splined piece welded in, made sure I had good weld penetration as I knew I would have to be viscous with the grinder so it would slip through the bushes.
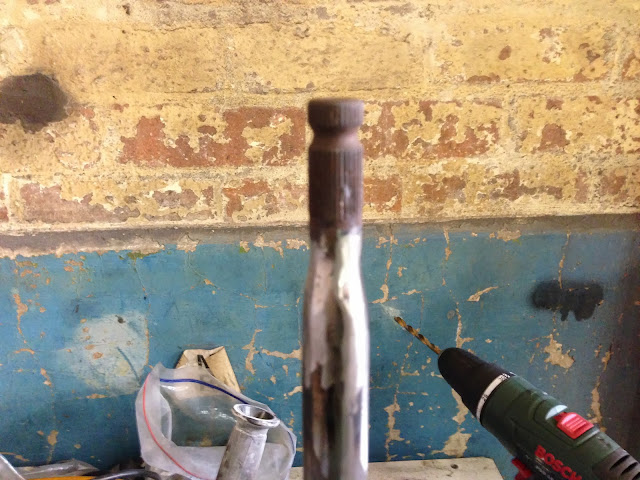
And a shot of the finished modified steering column, just going to give it another coat or 2 of paint then finish fitting the NOS headlamp switch I managed to find then I'm off home to pander to SWMBO!

Back in for a bit next week but progress will cease totally on the 31st as we are off on our annual pilgrimage to Sri Lanka for 5 weeks :-) Cant bloody wait!
Last edited by Viatron; 21st December 2013 at 13:39..
|
21st December 2013, 13:59
|
|
Senior Member
|
|
Join Date: Apr 2012
Posts: 1,163
|
|
Couldn't resist the shiny side :-)


TTFN and a Merry Christmas to all
Mac |
21st December 2013, 16:38
|
|
Senior Member
|
|
Join Date: Feb 2012
Location: Wembley, London
Posts: 5,058
|
|
Mac - Another nice job.
What are you using for the steering column switches?
I don't think it looks like my Spitfire one, but I can't really remember.
Good luck & Merry Christmas, Paul.
|
21st December 2013, 18:29
|
|
Senior Member
|
|
Join Date: Apr 2012
Posts: 1,163
|
|
Paul, indicators, dip / main beam / flash and the really long one on the left is for the overdrive but I may swivel the casing round to put that on the other side
Mac
|
22nd December 2013, 07:10
|
|
Senior Member
|
|
Join Date: Mar 2012
Posts: 159
|
|
Splendid Mac!
Michiel
|
22nd December 2013, 08:28
|
|
Senior Member
|
|
Join Date: Apr 2012
Posts: 1,163
|
|
Quote:
Originally Posted by Paul L

Mac - Another nice job.
What are you using for the steering column switches?
I don't think it looks like my Spitfire one, but I can't really remember.
Good luck & Merry Christmas, Paul.
|
Sorry Paul, on re reading i think i have misunderstood the question, all the switchgear is early spitfire, All new or NOS including the housings either side of the column. The look nice and period and are very simple switches.
Michiel, thanks. |
22nd December 2013, 12:42
|
|
Senior Member
|
|
Join Date: Feb 2012
Location: Wembley, London
Posts: 5,058
|
|
Mac - That makes sense, as I have a two piece plastic cover for my column switches.
|
22nd December 2013, 13:50
|
|
Senior Member
|
|
Join Date: Apr 2012
Posts: 1,163
|
|
I do have some spare switches if you need them as i replaced all mine to avoid electrical gremlins.
|
28th December 2013, 11:54
|
|
Senior Member
|
|
Join Date: Apr 2012
Posts: 1,163
|
|
Well got a few hours in the workshop today, not really time to do much but thought I would sort out remaking the return flange on the cockpit after my widening exercise.
First I cut some strips of Ali sheet long enough and wide enough to cover the area that needs remaking

Next I applied 4 coats of release wax, I use this stuff as its served me well over the years

That's it for now, going to fix them in place now, back in a bit with more pics hopefully
TTFN
Mac |
28th December 2013, 12:49
|
|
Senior Member
|
|
Join Date: Apr 2012
Posts: 1,163
|
|
Well got the strips riveted in and the body upside down on trestles so its all ready to go when Sean next door does some laminating and has some leftovers.
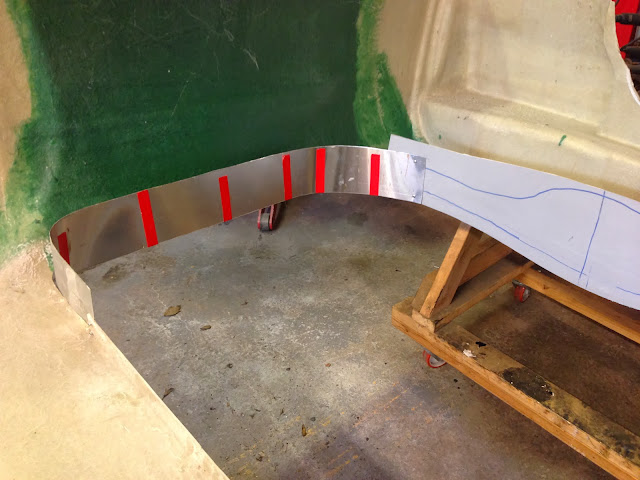


A small gap in a few places but im sure a few drops of gel will seal them up,

By adjusting the tension on the Ali I have managed to get a nice flowing curve in both the front and back so hopefully any reworking afterwards should be minimal.
Well folks im off home to pack as we fly out on Tuesday so unless I get very very lucky and get up again on Monday (Doubtful) this will be my last update until early February, although I may post a couple of holiday pics just to gloat a bit......
TTFN
Mac |
28th December 2013, 17:15
|
|
Senior Member
|
|
Join Date: Jun 2011
Location: birchington, kent
Posts: 1,769
|
|
Have lovely holiday. Happy new year.
|
30th December 2013, 16:03
|
|
Senior Member
|
|
Join Date: Feb 2012
Location: Wembley, London
Posts: 5,058
|
|
Mac - I'll add that release wax to my shopping list when I get to the fibre glassing stage.
Thanks also for showing how you repair the cut out section, as this is all new to me.
Enjoy your holiday, Paul.
|
|
Currently Active Users Viewing This Thread: 1 (0 members and 1 guests)
|
|
|
 Posting Rules
|
You may not post new threads
You may not post replies
You may not post attachments
You may not edit your posts
HTML code is Off
|
|
|
All times are GMT +0. The time now is 19:19.
|


 Linear Mode

