|
|
| Vintage and Classic Roadster Kit Car Builds For Vintage and Classic era kit cars. Post your build reports, problems and progress here |

1st April 2016, 21:06
|
|
Senior Member
|
|
Join Date: Apr 2014
Location: Birmingham, UK
Posts: 545
|
|
Cheers, I'll take a look when I get back home
|
1st April 2016, 21:45
|
|
Member
|
|
Join Date: Mar 2016
Posts: 98
|
|
Hi Roadster, I enjoyed the video too.  Thanks. |
2nd April 2016, 00:10
|
|
Senior Member
|
|
Join Date: Apr 2014
Location: Birmingham, UK
Posts: 545
|
|
Wow, that's cool - nice colour too!
|
2nd April 2016, 16:14
|
|
Senior Member
|
|
Join Date: Apr 2014
Location: Birmingham, UK
Posts: 545
|
|

I'm a happy bunny - Great bit of progress today - we finally sorted out the carburetor problems - it all stemmed from a split jet on one of the carbs - I tried to replace it with one that looked similar (had no way of knowing what ref or part number the other one was) and thought it was ok - then couldn't get the car running right at all.
It turns out that the jet was totally wrong and so the needle in it was stopping any fuel getting through on the left hand carb - making the car run very roughly. - so we changed both jets and needles and WOW - what a difference - I can't believe these tiny parts can make such a difference to the running of the car!!
So after that I actually had my first ever drive of the car today up and down the driveway (about 20ft) not much, but it felt pretty cool.
So now that's out of the way there's a few small bits to sort before it can go to be MOT'd and then it's just body prep and paint.
Also, I spoke to a guy this week who has a nearby body shop who reckons he can do the paint job pretty cheaply - so now I'm getting very excited indeed!!! 

|
2nd April 2016, 16:21
|
|
Senior Member
|
|
Join Date: Apr 2014
Location: Birmingham, UK
Posts: 545
|
|
[IMG]  DSC_0041 DSC_0041 by paul ward, on Flickr[/IMG] |
2nd April 2016, 16:28
|
|
Senior Member
|
|
Join Date: Apr 2014
Location: Birmingham, UK
Posts: 545
|
|
started fitting the boot and bonnet catches too - [IMG] 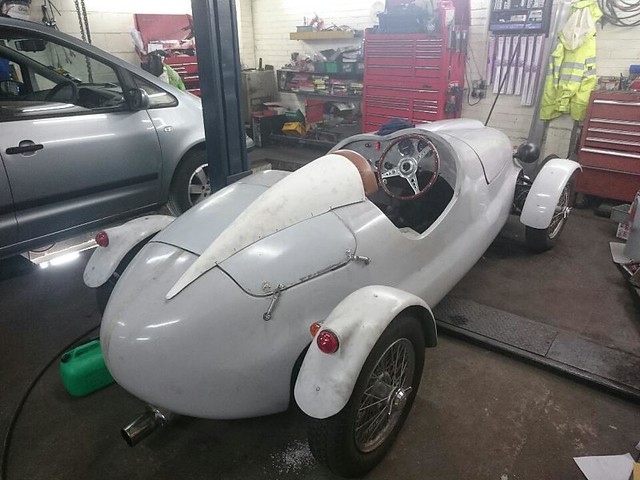 DSC_0036 DSC_0036 by paul ward, on Flickr[/IMG]
Last edited by Car photographer; 2nd April 2016 at 16:29..
Reason: spelling
|
2nd April 2016, 16:33
|
|
Member
|
|
Join Date: Mar 2016
Posts: 98
|
|
 Great news about the carburation problem being solved. Have you decided on the colour yet? Jaguar Regency Red from a 1968 Jaguar 420 is a darker colour which might suit the body shape. |
2nd April 2016, 16:38
|
|
Senior Member
|
|
Join Date: Apr 2014
Location: Birmingham, UK
Posts: 545
|
|
Quote:
Originally Posted by Old Jock

Great news about the carburation problem being solved. Have you decided on the colour yet? Jaguar Regency Red from a 1968 Jaguar 420 is a darker colour which might suit the body shape. |
I actually love the colour of the car on that video above - not sure what that would be called though.
I'll check out that Jag colour, thanks
any news on yours yet? |
2nd April 2016, 17:02
|
|
Member
|
|
Join Date: Mar 2016
Posts: 98
|
|
Still trying to get a decent quote for the shipping of the kit from Mick at Fiorano. Plus, of course, my garage is currently occupied by two motorbikes.  |
2nd April 2016, 17:26
|
|
Senior Member
|
|
Join Date: Apr 2014
Location: Birmingham, UK
Posts: 545
|
|
Quote:
Originally Posted by Old Jock
Still trying to get a decent quote for the shipping of the kit from Mick at Fiorano. Plus, of course, my garage is currently occupied by two motorbikes. |
Ahh, good luck |
2nd April 2016, 17:51
|
 |
Senior Member
|
|
Join Date: Jun 2011
Posts: 935
|
|
Quote:
Originally Posted by Car photographer
I actually love the colour of the car on that video above - not sure what that would be called though.
I'll check out that Jag colour, thanks
any news on yours yet?
|
This colour is close -Ral3004
A Sammio in the Netherlands was painted in it
http://www.madabout-kitcars.com/foru...?t=4479&page=3 |
2nd April 2016, 18:45
|
|
Senior Member
|
|
Join Date: Apr 2014
Location: Birmingham, UK
Posts: 545
|
|
Quote:
Originally Posted by Roadster
|
Cheers, yeah that looks pretty nice too |
9th April 2016, 13:09
|
|
Senior Member
|
|
Join Date: Apr 2014
Location: Birmingham, UK
Posts: 545
|
|
Found this Talbot Lago online yesterday - I think the front end is quite similar - back end is a bit different though -  |
9th April 2016, 17:31
|
|
Member
|
|
Join Date: Mar 2016
Posts: 98
|
|
I quite like that. The front end is more like the original Ferrari T166 as it is more upright. Not so sure about those mudguards though!! 
How are you getting on with your build? I collect the Spitfire donor on Wednesday next week, I have to clean off and degrease the chassis and remove the engine and gearbox and then it will be ready for the welding/chassis extending. Some progress at last.  |
9th April 2016, 20:35
|
|
Senior Member
|
|
Join Date: Apr 2014
Location: Birmingham, UK
Posts: 545
|
|
Cool glad to hear you're getting started - mines progressed a bit this week - we fixed and oil leak from the crank cover, and I've done a bit of filling and sanding,
I may be putting up my grille and aeroscreens for sale as I think I'm going to use different ones on the car, so if you wanted them I can let you have them at half the price they are from fiorano - just let me know if you're interested.
|
13th April 2016, 20:05
|
|
Member
|
|
Join Date: Mar 2016
Posts: 98
|
|
I picked up my donor car (less body) today. Yippee!!!! A good look at the chassis and it looks as if there is NO RUST on it other than a little surface rust at the front part which gets cut off - bonus.  Down side is that all of the body mounting bolts have disappeared and all of the brake pipes and handbrake cable have gone too but that's a small price to pay for the saving of labour involved in stripping the body off and then disposing of it. It would have been good to see how they were routed but hey ho. I'm sure that will be the least of my problems! The manifold is already tapped for a brake servo, the propshaft and steering shaft are off as is the radiator. I'm off on holiday next week but will be ordering the kit from Mick when I get back. This will put a bit of pressure on to get the chassis degreased in short order so I can take it and the chassis parts to the welder for him to work his magic. I'm not quite sure of the final look of the finished car, but I really do like the look of this: |
13th April 2016, 21:43
|
|
Senior Member
|
|
Join Date: Apr 2014
Location: Birmingham, UK
Posts: 545
|
|
Yeah that looks great, glad to hear you're off the starting block, the good thing is you can run all the pipes and wires exactly where you want.
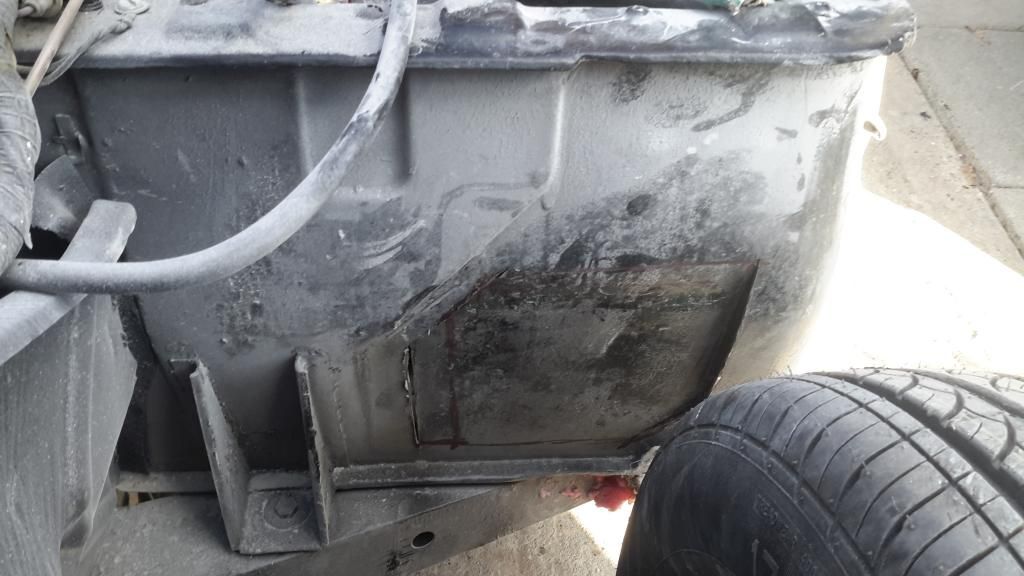
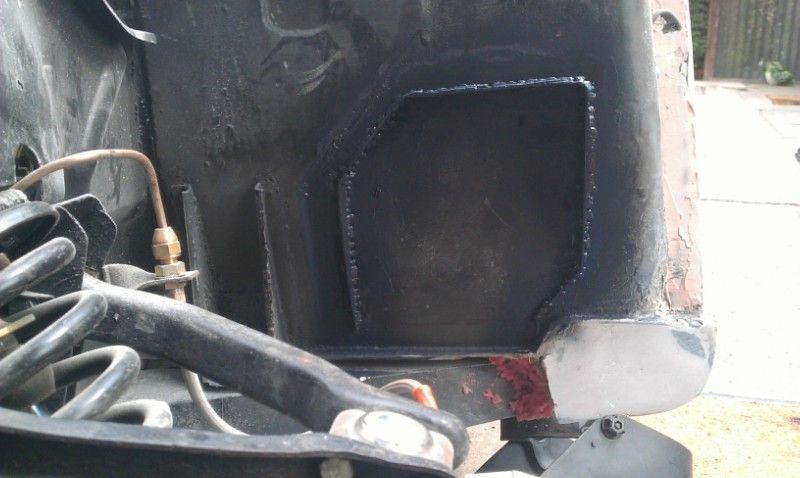
I've been having an issue with the body and the full lock of the front wheels hitting it, I've ended up cutting holes in the body behind the wheels to allow for turning but at the moment it looks a bit ugly - gotta think of some way of covering them up  |
14th April 2016, 06:52
|
|
Member
|
|
Join Date: Mar 2016
Posts: 98
|
|
You should have spoken to Mick at Fiorano. The "official " cure is to put spacers in the steering rack to limit the lock. It's the same as they do in the Lotus cars apparently and is supposed to be quite easy to do. Get the fibreglass bits back out of the bin!
|
14th April 2016, 07:15
|
 |
Senior Member
|
|
Join Date: Feb 2012
Location: Wembley, London
Posts: 5,058
|
|
Car Photographer - A few Sammios had a similar tyre rubbing the bulkhead problem.
A "simple" solution is to recess the panels you have cut out, something like this ( Car Noob's build).
Hope that helps, Paul.
PS
Old Jock - Congratulations on getting a donor car, sounds like a good excuse to start a build thread to me. 
|
14th April 2016, 13:53
|
|
Member
|
|
Join Date: Mar 2016
Posts: 98
|
|
Hi Paul L, Those photos are quite interesting but as a solution to the lock problem it seems a bit "agricultural". As I said in my reply to carphotographer, the Fiorano solution is to put a spacer in each end of the rack to limit the lock. The Spitfire seems to have quite a small turning circle so it seems like a better and neater solution to me. When it comes time for me to do it I will be contacting Mick at Fiorano again for more specific details about what is required.
As far as a build thread is concerned, maybe.  I will see how I get on although I haven't set a timescale to complete the build. However, I will be taking photos as work progresses so perhaps I could use that as a journal showing what I did etc. Has anyone done a build thread for a Fiorano before? My wife and I are off on holiday for a week and I have been warned against doing anything to the donor until after we come back.  Still, I could always clean up the dash instruments while she is watching the telly! She'd never notice 
|
|
Currently Active Users Viewing This Thread: 4 (0 members and 4 guests)
|
|
|
 Posting Rules
|
You may not post new threads
You may not post replies
You may not post attachments
You may not edit your posts
HTML code is Off
|
|
|
All times are GMT +0. The time now is 14:27.
|


 Linear Mode

