|
|
| Marlin Sportster, Cabrio, Berlinetta and Roadster builds Enthused or Confused about your vintage Marlin build? Ask away here or show off your build. |

29th September 2009, 11:25
|
 |
Senior Member
Enthusiast
|
|
Join Date: Sep 2005
Location: Northampton, UK
Posts: 1,891
|
|
I've got my closure panels for the boot and side wing areas done now (thank god - what a palaver that was :/)
I'll be cutting holes for a hatch and into the boot and for the harness webbing to come through next, but wanted some advice.
When it comes to the harness slots / holes, how have you trimmed them? I notice Peter has done some sort of chrome surround.
Also - my boot panel is one piece, and I need to cut the boot door from it with out too much material loss the piece that is removed, as that will be the door. whats the easiest way of getting a start into the material (3mm ali plate)? I was considering a chain of 2mm holes drilled and then plunging a jigsaw blade in.
Last question - what diameter trim ring did everyone use on the gearstick gator? I've seen some nice ones at Europa, but can't make my mind up on how big I want it.
|
29th September 2009, 12:26
|
 |
Senior Member
Enthusiast
|
|
Join Date: Sep 2004
Posts: 1,897
|
|

Quote:
Originally Posted by GreatOldOne

I'll be cutting holes for a hatch and into the boot and for the harness webbing to come through next, but wanted some advice.
|
Whatever you do you need to make sure that it runs freely with no edges that can cause the webbing to rub and fray. I think Peter obtained some chrome "rings" from a chandler. Before you do this you need to fit the bar that behaves as the top mount (turning point) for the belt. This has to be high enough above the seat base to meet the IVA criteria and probably means cutting something out of the rear tub edge to clear the belt after. As I haven't panelled in the boot area yet this was all I did.
Quote:
Originally Posted by GreatOldOne
Also - my boot panel is one piece, and I need to cut the boot door from it with out too much material loss the piece that is removed, as that will be the door. whats the easiest way of getting a start into the material (3mm ali plate)? I was considering a chain of 2mm holes drilled and then plunging a jigsaw blade in.
|
Good luck with that! I guess you must have a steadier hand than me as I have never managed a straight line with a jigsaw yet! I would have thought that chain driling some holes is the way to go although I am not sure that 2mm is enough. By the time you cover everything in leather cloth and fit a hinge (piano?) I would have though you could get away with slightly more than that.
I will be re-starting my trim again soon once the car is sorned for the winter. What are you planning for the transmission tunnel? I found this a real B*gger to do and will be having a second attempt....
Robin

|
29th September 2009, 12:52
|
|
Senior Member
Enthusiast
|
|
Join Date: Sep 2005
Location: Northampton, UK
Posts: 1,891
|
|
There are some seatbelt escutcheons on Europa which look nice...
I was going to fit some stainless hinges of some description, but not piano hinge - I've still got post traumatic stress syndrome from doing the bonnet hinge. 
I've got some Stainless 10mm roundbar for my turning hoop, which I've yet to bend into shape.
I think I'm going to do the same as patrick on the tunnel and carpet it and the other portions of the interior bar the seat pans in burgundy carpet. The pans will have rubber matting. |
29th September 2009, 20:55
|
 |
Senior Member
Enthusiast
|
|
Join Date: Mar 2005
Posts: 3,079
|
|
Quote:
Originally Posted by GreatOldOne
When it comes to the harness slots / holes, how have you trimmed them? I notice Peter has done some sort of chrome surround.
Also - my boot panel is one piece, and I need to cut the boot door from it with out too much material loss the piece that is removed, as that will be the door. whats the easiest way of getting a start into the material (3mm ali plate)? I was considering a chain of 2mm holes drilled and then plunging a jigsaw blade in.
Last question - what diameter trim ring did everyone use on the gearstick gator? I've seen some nice ones at Europa, but can't make my mind up on how big I want it.
|
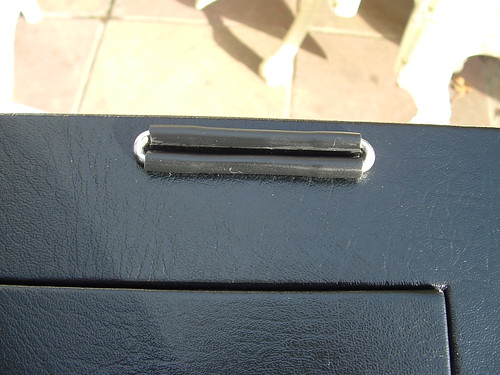
My seat belt slot trims are really simple, but from normal browsing distance look quite smart. I looked around for some suitable slots but ended up making some. It's two pieces of plastic wing piping (the hollow type) with two miniture stainless steel 'u' clamps. Robin is correct I bought them from a yacht chandler! The wing piping has the flappy bits inside and is just Evostuck to the panel.
2mm holes and a jigsaw sounds good to me, to cut the boot flap.
I used the Marlin supplied gearstick surround. I can measure it if you want some idea of its size?
IVA soon?
...peter
|
29th September 2009, 21:07
|
|
Senior Member
Enthusiast
|
|
Join Date: Mar 2005
Posts: 3,079
|
|
Quote:
Originally Posted by GreatOldOne
I've got some Stainless 10mm roundbar for my turning hoop, which I've yet to bend into shape.
|
I think the Marlin seat belt bar is a bit more than 10mm? The way they weld it to two bits of 'u' channel bolted to the chassis makes it surprisingly stiff and solid. I'd get Terry to supply you one if she will, to save messing about with something that might spoil your IVA day.
Or maybe get your local blacksmith to make something similar.
 |
29th September 2009, 21:30
|
|
Senior Member
Enthusiast
|
|
Join Date: Sep 2005
Location: Northampton, UK
Posts: 1,891
|
|
Thanks for the pic of the bar - I'll bend up the hoop and see how stiff it is.
With it being stainless, I'd assume that it'll be less susceptible to flexing than mild steel?
IVA soonish. Not booked, as I still don't have any bumpers.
|
29th September 2009, 23:37
|
|
Senior Member
Enthusiast
|
|
Join Date: Sep 2005
Posts: 354
|
|
seat belt plates
Just bought 2 chrome mgf seat belt escutcheon plates off ebay.They are perfect fit for top of scuttle.Others still for sale.
|
30th September 2009, 07:39
|
|
Senior Member
Enthusiast
|
|
Join Date: Sep 2004
Posts: 1,897
|
|
Quote:
Originally Posted by GreatOldOne
Thanks for the pic of the bar - I'll bend up the hoop and see how stiff it is.
With it being stainless, I'd assume that it'll be less susceptible to flexing than mild steel?
|
Personally I would think twice about making your own. If you ever need the seatbelts to work in anger the forces on them will be huge. Tons in fact. I was not even convinced that the Marlin one is up to the job so I bought a piece of seamless tube (40mm I recall) and, using some computer derived templates, cut it to fit between the uprights of the roll bar. I then just got a jobbing welder to come and weld it into position. It looks neat and should do the job if I ever need it to.
Robin |
4th October 2009, 16:43
|
|
Senior Member
Enthusiast
|
|
Join Date: Sep 2005
Location: Northampton, UK
Posts: 1,891
|
|
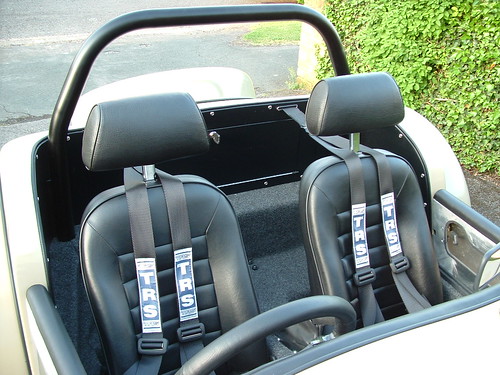
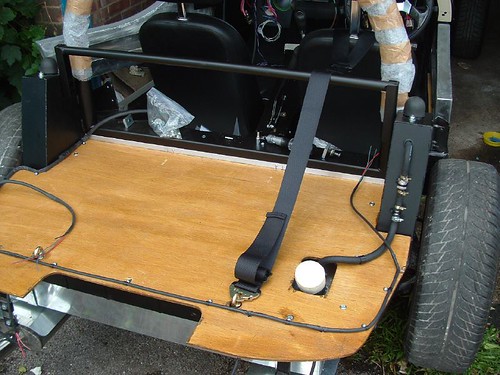
Well, here's what I've been labouring over for the past week or so:


The boot hatch and frame is made of 3mm Aluminium plate. The latch plate and door jambs are 6mm plate. The side panel is 1.5mm plate. It's all attached with stainless button heads. The hinges are stainless and attached with countersunk stainless screws. The seatbelt escutcheons (from Europa) are attached with M3 countersunk screws.
Also, my seats from Interior seating arrived. They're very nice! 


They're not bolted in yet, as they forgot to send my seat rails. |
4th October 2009, 19:20
|
 |
Senior Member
Enthusiast
|
|
Join Date: Feb 2005
Location: Hampshire
Posts: 2,497
|
|
That looks great |
4th October 2009, 21:15
|
|
Senior Member
Enthusiast
|
|
Join Date: Mar 2005
Posts: 3,079
|
|
You've been busy in the garage!
That will look very smart when covered and carpeted.
Are you pleased with the quality of those seat?
...peter
|
4th October 2009, 21:49
|
|
Senior Member
Enthusiast
|
|
Join Date: Sep 2005
Location: Northampton, UK
Posts: 1,891
|
|
Very. The craftsmanship is very good, and they are very sturdy without being heavy. Comfortable as well, and the side bolsters / bucket should stop too much lateral movement. That'll come in handy.  |
5th October 2009, 07:16
|
 |
Senior Member
|
|
Join Date: Apr 2009
Location: Somerset
Posts: 518
|
|
Very Nice. I like the wood floor in the boot. Is it genuine wood or laminate  ? |
5th October 2009, 07:28
|
|
Senior Member
Enthusiast
|
|
Join Date: Sep 2004
Posts: 1,897
|
|
Looking brill. Looking forward to some more pictures once you have trimmed everything. Did you manage to get some leathercloth that matches the seats?
Robin
|
5th October 2009, 07:48
|
|
Senior Member
Enthusiast
|
|
Join Date: Sep 2005
Location: Northampton, UK
Posts: 1,891
|
|
Yes - I got the seating manufacturer to send me oodles of the stuff.
Chris - technically it's both - it's real plywood! |
5th October 2009, 12:38
|
|
Senior Member
Enthusiast
|
|
Join Date: Sep 2004
Posts: 1,897
|
|
I just completed the last "mechanical" job (windscreen washers) so now I will (re) start the trim.
Now I have seen your panels using aly I think I may do the same.
Do you have any tips? I was wondering how you managed to get the bend correct for the rear quarters. I have Peter's mould which I could use but I wondered how you did it freehand.
Cheers
Robin
|
5th October 2009, 13:28
|
|
Senior Member
Enthusiast
|
|
Join Date: Sep 2005
Location: Northampton, UK
Posts: 1,891
|
|
Lots of swearing helps.
I tried to do it all in 3mm sheet, but it's just too thick to form the curves on the side panels, so the mostly flat hatch & frame are done in that. The side panels are thinner, so more easily formed.
The bottom of the frame has a 15ish degree bend in it - this was done over a section of box steel I had with a plastic mallet.
The top of frame has slight curls on the top to either side. I did these by tapping them over a round former (an off cut from the exhaust) until they looked about right when offered up. Then it was just wash, rinse and repeat until they fitted the curve. It was left to run above the tub.
The side panels where the same, but you can form that with your hands. I cut the bottom half to fit the shape of the chassis, and left the top over long. I then gave it a gentle bend in approx the right place with my knee, and then finessed it by hand until it almost fit. The final curve is held by the fixings. Again, these where left over long in height, and length around the curve where it met the boot panel. With the boot panel in place, I could then mark and trim to an exact length.
Once they where all fixed in place, I scribed around the back of them along the top of the tub, took them all off and trimmed it with a jigsaw. I then took a further 5 - 6mm off them all to drop them slightly below the top of the tub.
The hatch is cut directly from the boot panel. A couple of 2 /3mm holes where drilled on the line I wanted, and then it was jig-sawed out. Cutting fluid helps, as it does make the blade cut smoother. Just take your time.
I filed both the frame and the hatch to give a little more clearance.
The lock plate and side 'jambs' that stop the hatch from falling in are 6mm plate I had left over from the driving lamp brackets. These are held on with a couple of M4 counter sunk set screws held in place with nuts so they act as studs. The jambs and lock plate have 8mm holes cut in them to slip over the nuts, and then a washer and a further nut keeps it in place. I did think I was going to have to lock tight them (the screws) in place to stop them rotating once the panel is covered, but there's so much friction there's no need.
As you're only down Bedford way, I suggest you give ASC Metals a ring
A S C Metals Ltd
3 Jackdaw Close
Crow Lane Industrial Estate, Northampton
01604 415036
http://maps.google.co.uk/maps?li=d&h...LcrTjAfX8ISZAg
They have been absolutely brilliant - they have loads of offcuts, and they're dirt cheap compared to B&Q or the other DIY sheds. All the Ally I've had for the boot & the driving lamp brackets came to under £40 iirc.
Last edited by GreatOldOne; 5th October 2009 at 17:46..
Reason: I can schpell reel gud! :)
|
5th October 2009, 16:07
|
|
Senior Member
Enthusiast
|
|
Join Date: Sep 2004
Posts: 1,897
|
|
Thanks Jason
That's very helpful. I shall take your word for it about the Jigsaw. I have an expensive one that I bought years ago when building a boat. It was great for cutting the long curves for the boat's planks but I think it must remember that's what it was bought for 'cause I haven't managed a straight line with it since lol.
Robin
|
5th October 2009, 18:42
|
|
Senior Member
Enthusiast
|
|
Join Date: Feb 2008
Location: Bristol
Posts: 272
|
|
Hi, its looking very good!
With regards your seat belt bar, I didn't have one fitted for my IVA and it passed the seat belt anchorages with no prob. Maybe you need to book your IVA in Taunton
Tim |
6th October 2009, 09:45
|
|
Senior Member
Enthusiast
|
|
Join Date: Sep 2005
Location: Northampton, UK
Posts: 1,891
|
|
That'd be a long first run! 
My seat runners arrived this morning. Guess what I'll be doing when I get in from work. |
|
Currently Active Users Viewing This Thread: 2 (0 members and 2 guests)
|
|
|
 Posting Rules
|
You may not post new threads
You may not post replies
You may not post attachments
You may not edit your posts
HTML code is Off
|
|
|
All times are GMT +0. The time now is 04:57.
|


 Linear Mode

