|
|
| Tribute Automotive Builds Discuss your Tribute kit build |

4th January 2015, 22:30
|
|
Senior Member
|
|
Join Date: Dec 2013
Location: Sunny Cumbria
Posts: 470
|
|

Quote:
Originally Posted by adventuresoftimtim

Ed can I ask what reason did the DVLA give for insisting on an IVA? was it incorrectly registered? Anyway hope you get your new one built! The first sunny day drive you go on and it'll all seem worth it!
|
Mmmm, long story but the essence was that the original owner, my mate, had used a 1956 Austin A30 logbook to re-register the Marlin after the build. (The actual donor was a Morris Marina van.) Because he liked the number... The A30 had been his dads car for as long as he could remember.
My mate had lost the V5 and although it was on the computer system at DVLA, we didn't know what the VIN # was, we didn't even have any old MOT certs so had no way of knowing the VIN. We knew the kit # but it had been removed from the chassis. It was a very early issue of the Marina Roadster kits. I have copies of the original order and collection paperwork.
DVLA told me they would issue a new VIN, which they did, they even rang me at 8am the day after the inspection to say it wouldn't need an IVA, "Because it was too old." But when I submitter the paperwork including a brand new MOT, they insisted it needed an IVA.
That was a bridge too far, I know Roadsters could pass an IVA but it would have meant another complete rebuild and a lot of new (expensive) IVA compliant parts. Given I had already spent in excess of £2300 another probably ~ £2000 was not even an option. I could have bought a mint clean roadster for well under two grand. What I wanted was to put the one I had helped to build back on the road. The engine (1275 Marina) runs like a sewing machine.
Sorry Scottie, not intending to hijack your thread!

|
4th January 2015, 22:50
|
|
Senior Member
|
|
Join Date: Dec 2013
Location: Sunny Cumbria
Posts: 470
|
|
Quote:
Originally Posted by Scottie22
Wow! You've done me proud Ed, I admire your tenacity!
Scottie
|
You write a compelling and colourful story Scottie, in many ways we seem so similar in our build ethos.
I am retired and divorced, have a couple of lads aged 10 and 14, trying to create a dream on a shoestring. I don't have a garage, one of my neighbours took pity on me and offered me the use of his ageing shed for the build, but frankly there isn't that much difference between inside or outside when the rain and wind are on full song!
I love the dashboard you have created and your attention to detail, even including details like slanted switch knob legends! That's a real winner!
I do worry if your front lights may be too low? Not sure what the lower limit is for sidelights, I think it may be 16 inches, I do believe the headlamps should not be below 2 ft. nor above 3 ft 6 inches. Might be worth checking that if you haven't already, before you start painting... One option for the test might be to incorporate a side lamp in the headlamps?
Good luck and power to your elbow! 
|
4th January 2015, 23:29
|
|
Senior Member
|
|
Join Date: May 2013
Posts: 2,161
|
|
Don't worry about any hijack Ed!
I don't really care about the front lights, the car will not need an IVA, only an Mot, and I have an understanding Mot person, so things like that should not be an issue.
Regards the side lamps, my car has seperate side lamps at present, just like the Spitfire it is supposed to be, so I don't really see an issue there either, or have I missed a "nasty" that could trip me up?
|
5th January 2015, 07:18
|
 |
Senior Member
|
|
Join Date: Jul 2011
Posts: 5,328
|
|
Road Vehicle Lighting Regulations cover the headlight issue -
http://www.legislation.gov.uk/uksi/1...chedule/4/made
In a nutshell, headlights need to be minimum 500mm (about 20") maximum 1200mm (just over 47") from the ground, and under 400mm (15&3/4") from the side of the vehicle.
As for your Marlin Ed, it's such a shame you can't get it back on the road. Could you not find a scrap Morris Marina/Ital (with a V5) and 'rebuild' that as a Marlin using your existing chassis, body, engine etc to 'replace' the worn out originals? Just a thought... |
5th January 2015, 08:42
|
|
Senior Member
|
|
Join Date: Dec 2013
Location: Sunny Cumbria
Posts: 470
|
|
Quote:
Originally Posted by Scottie22
Don't worry about any hijack Ed!
I don't really care about the front lights, the car will not need an IVA, only an Mot, and I have an understanding Mot person, so things like that should not be an issue.
Regards the side lamps, my car has seperate side lamps at present, just like the Spitfire it is supposed to be, so I don't really see an issue there either, or have I missed a "nasty" that could trip me up?
|
Thanks Scottie, Mr T has cleared up the headlamps, but it was mainly the side lamps I was concerned about, you remarked yours are proportionally lower then the original XKSS car, and you have made your car even lower. I suspect Jaguars placement of the side lamps may be at, or near the lower limit, not wanting to make an issue of it but just something I noticed while reading your build and fairly easy to check/rectify before painting?
I realise you don't need an IVA but I don't think it's wise to step outside the regs on a silly thing like this which could attract unwanted attention at a roadside check.
Mr T seems to have a good grasp of the relevant dimensions. My newest copy of the regs was 1966 and they were lost several house moves ago!
Edit:
I have just read the link Mr T gave and it would appear there is no requirement for the height of side lamps, so I'm sorry if I raised blood pressure unnecessarily. I just thought it was worth checking at this stage, I would have hated it to be an issue later and not mentioned it.
Last edited by 8 Valve Ed; 5th January 2015 at 08:55..
|
5th January 2015, 09:32
|
|
Senior Member
|
|
Join Date: Dec 2013
Location: Sunny Cumbria
Posts: 470
|
|
Quote:
Originally Posted by Mister Towed
Road Vehicle Lighting Regulations cover the headlight issue -
http://www.legislation.gov.uk/uksi/1...chedule/4/made
In a nutshell, headlights need to be minimum 500mm (about 20") maximum 1200mm (just over 47") from the ground, and under 400mm (15&3/4") from the side of the vehicle.
As for your Marlin Ed, it's such a shame you can't get it back on the road. Could you not find a scrap Morris Marina/Ital (with a V5) and 'rebuild' that as a Marlin using your existing chassis, body, engine etc to 'replace' the worn out originals? Just a thought... |
Thanks for the link Mr. T, I have bookmarked it!
I haven't completely given up on the Roadster Mr. T. Nowadays it wouldn't be wise to follow the route you describe, DVLA are well aware of it and are actively on the lookout for such vehicles, revoking the V5's of any they find. Indeed I am told they send a team armed with video cameras to Kit Car shows looking for cars which are not correctly registered.
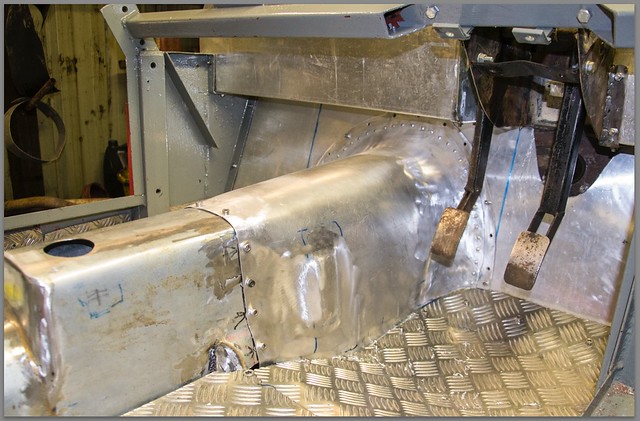
I am on the lookout for another old Marlin Roadster (with V5) which needs restoration... But not just yet!!! I have my hands full with the one I have right now. Yesterday I passed the 50% point when I completed the gearbox cover and connected it to the bulkhead.
This was formed with my English Wheel:
New Year resolution... I must start my own restoration thread!
|
5th January 2015, 10:26
|
|
Senior Member
|
|
Join Date: May 2013
Posts: 2,161
|
|
Monday
You have an English wheel Ed??? Wow!
I wish I could have and use one!
Your car is looking good so far, you must start a thread.
Reference the lights, I was kind of aware of the issues you raised, and like you said Mr Towed has sorted that area out. He can usually be relied on to come up with good solid stuff.
Well, to any DVLC personnel reading this, have no fear, I've just measured my lights, they conform to the regulations perfectly, and like Mr Towed's car,
although they look very low, its just an optical illusion!
when I painted my boot out with the "silver" paint, ( which turned out to be grey)
I wanted to refit the battery the next day, but could not do so as the paint was not dry. Nor was it dry the next day, nor the next.
This resulted in me hurling the tin of paint in the bin, with a few choice words.
However, it is now dry, and I re-fitted the battery in its posh new home,
complete with its posh new connections this morning.
I started to make the lid of what will be the passengers glove box.
some pics:
[IMG]  [/IMG]
[IMG]  [/IMG]
[IMG]  [/IMG]
|
5th January 2015, 18:01
|
|
Senior Member
|
|
Join Date: Jul 2011
Posts: 5,328
|
|
Did you put enough catalyst in that paint Scottie?
|
5th January 2015, 18:07
|
|
Senior Member
|
|
Join Date: May 2013
Posts: 2,161
|
|
I didn't put any in it Mr T, it came ready to use, and I still have'nt worked out why it is grey and not silver like it says on the tin!
Of course, I don't have the damned receipt, but after all its only a tin of paint, but annoying to say the least.
Today I bought a tried and tested litre of Hammerite silver, which I will do the passengers floor with.
|
5th January 2015, 18:23
|
|
Senior Member
|
|
Join Date: Apr 2014
Posts: 198
|
|
YAY ! Scotties back posting about the build.
Could you make some leather hinges out of belt thickness leather. With maybe a length of chain to stop the box open too far and magnet closure. All attached via the rivets which would of course be in the jag UAR position? I have some pictures somewhere of an turn of the century steam car with leather hinges on its bonnet, doors, tool box and glove box but I just spent an hour looking for them to no avail. What if one of the centre top rivets was modified to twist and lock the box. Ed.
|
5th January 2015, 22:17
|
|
Senior Member
|
|
Join Date: Dec 2013
Location: Sunny Cumbria
Posts: 470
|
|
Quote:
Originally Posted by Scottie22
You have an English wheel Ed??? Wow!
I wish I could have and use one!
Your car is looking good so far, you must start a thread.
Reference the lights, I was kind of aware of the issues you raised, and like you said Mr Towed has sorted that area out. He can usually be relied on to come up with good solid stuff.
Well, to any DVLC personnel reading this, have no fear, I've just measured my lights, they conform to the regulations perfectly, and like Mr Towed's car, although they look very low, its just an optical illusion!
|
Hi Scottie, that's great news, I was a just bit concerned about the lights. Sorry if I raised the blood pressure a bit!
The English wheel is something I made myself, although I have to admit I bought the wheel and anvils, at the price I paid I couldn't have started to make them, I don't have my own lathe any more.  I was a bit apprehensive whether I would be able to use the wheel but it seems easy enough so far. I make a trial shape first from offcuts, then having worked out the appropriate technique, I make the real thing.
To make the frame I used scrap box section/off-cuts from a fabricator I know. I think the box section cost me about £25 plus a bit of my time welding and painting. It's very heavy and it seems to work well. From what I have seen I would say it's well within your ability to make and use one. I took me about 3 hours to wheel that flare on the gearbox cover, good exercise for the upper body!
I will make my own build/restoration thread in the Marlin section shortly. I find it very stimulating knowing others with different experience from myself can keep an eye on me and offer guidance and encouragement at times of need. I have just started reading Paul L's 'Another Cordite is Born' thread, fascinating! We all have different approaches to these projects.

|
6th January 2015, 12:16
|
|
Senior Member
|
|
Join Date: May 2013
Posts: 2,161
|
|
Tuesday
This morning I carried on with the build, derusted the minor surface rust on the passengers floor and got a good coat of silver hammerite onto it.
Upon checking the boot paint, (which was bone dry where the battery went back in) I found that on the parts of the paint that are in contact with the Sikaflex sealer/bonder stuff, the paint is STILL very wet after 6 days!
It has to dry eventually, does'nt it? (Should be dry by the time I get to, or if I ever get to Stoneleigh)
On my stereo unit (which is now fitted hidden under the dash), there are 4 or 5 coloured lights that when the unit is in use, flash all different colours, a bit like a mini-disco. This has always annoyed me, and is not in keeping with a 50's style car, so I have stuck some aluminium tape over them, which has done an excellent job. So now they are none functional from a visual point of view.
In my spare time, I work on the glove box lid hinge problem, a fiddly, frustrating awkward job, a bit like most of my build I suppose!
Pics:
[IMG]  [/IMG]
[IMG]  [/IMG]
[IMG]  [/IMG]
|
6th January 2015, 21:29
|
 |
Senior Member
|
|
Join Date: Jan 2014
Location: Egham, Surrey
Posts: 1,780
|
|
How about using the hinges from the MK2 glove box? You could use a welding joggler to make and indent and glue them on with epoxy. Small glued on magnet would work as a catch.
|
7th January 2015, 12:13
|
|
Senior Member
|
|
Join Date: Nov 2011
Posts: 3,563
|
|
Small glued on magnet would work as a catch.
Reply With Quote
or velcro...
|
7th January 2015, 12:29
|
|
Senior Member
|
|
Join Date: Jan 2014
Location: Egham, Surrey
Posts: 1,780
|
|
Or as with my TVR, a B&Q loft hatch catch!
|
7th January 2015, 14:47
|
|
Senior Member
|
|
Join Date: May 2013
Posts: 2,161
|
|
Wednesday
Thanks for the advice Jagtvr and WCA!
I am already thinking along the magnetic catch route.
I have fannied around with this job for so bloody long now, I have grown tired of it.
At the end of the day, the hinges are not important, to me at least, what is important is to stick to the principle of my idea,which is to have access to the space behind the lid.
So, sick of wasting so much time on such a mundane (un-important) job,
I have fallen back on plan B, and my compromise is as follows:
I have glued the rivets into the lid, drilled holes in the dash, so the rivets will fit into, and locate the lid onto the dash, and when the magnets arrive through the post, the lid will stay in place magnetically.
So, I have not wasted any more time, and will still get access to the glove box behind the dash, which I can fabricate at any later stage.
At least now I can move on with the more important stuff of the build.
Pics:
[IMG]  [/IMG]
[IMG]  [/IMG] |
11th January 2015, 22:19
|
 |
Senior Member
|
|
Join Date: Mar 2013
Location: Gloucester
Posts: 247
|
|
I saw a very simple glove box hinge on another site the other day - an alloy tube bonded to the lower edge of the door and a plain P-clip either end behind the dash for the tube to rotate in.
|
12th January 2015, 13:14
|
|
Senior Member
|
|
Join Date: May 2013
Posts: 2,161
|
|
Monday
Hi Scimjim, thanks for the tip, but I read it too late!
Well the magnetic strip finally arrived, so I got stuck in and finished the job, then read the bit you posted about the tube hinge!
Sounds like a really good idea, which I most likely would have done if I'd read your comments first.
having spent what seems like an incredible amount of time pissing about with glue, magnets and bits of alloy, I eventually got to where I wanted to be.
At least it works, and perhaps a hinge may come later, but I doubt it!!!!
I seem to moan a lot about fiddly-arsed jobs, but I have to be truthful, and this was another one!
Also, I have decided to fit a main battery lead cut-off switch somewhere under the dash.
To those not in the know, unbelievably, the Spitfire donar I have used for my build, only has three fuses, yes three, not 8,567 like most modern cars.
(I think all Spitfires are similar)
By the time I have done all the connections to my new Jag-type dashboard, I would imagine the chances of a fire due to a short, and only three fuses would be a bit higher than I would like.
Apparently cut-off switches come in two main catagories, one with a removable switch, and the type with a fixed switch.
I decided to go for the latter, as the removable type switch would be just gagging to get lost, and then I would be stuck.
Well, stuck under the dash with a pair of wire cutters at least, not what I had in mind.
The switch has not arrived yet, but I will need an extension piece of cable to re-route the wiring under the dash, so I made one.
When the cut-off switch is fitted, I will have peace of mind, fire-wise, and a car that is bit more secure from theft possibly, so it won't be a bad thing to do.
[IMG]  [/IMG]
[IMG]  [/IMG]
[IMG]  [/IMG]
[IMG]  [/IMG]
[IMG]  [/IMG]
[IMG]  [/IMG]
[IMG]  [/IMG]
|
12th January 2015, 15:07
|
|
Senior Member
|
|
Join Date: Jul 2011
Posts: 5,328
|
|
Three fuses you say? Luxury. T't Vitesse only 'as two.
|
12th January 2015, 16:51
|
|
Senior Member
|
|
Join Date: May 2013
Posts: 2,161
|
|
Seriously??? Wow!!
|
|
Currently Active Users Viewing This Thread: 3 (0 members and 3 guests)
|
|
|
 Posting Rules
|
You may not post new threads
You may not post replies
You may not post attachments
You may not edit your posts
HTML code is Off
|
|
|
All times are GMT +0. The time now is 20:10.
|


 Linear Mode

