|
|
| Marlin Sportster, Cabrio, Berlinetta and Roadster builds Enthused or Confused about your vintage Marlin build? Ask away here or show off your build. |

10th February 2015, 07:55
|
|
Senior Member
|
|
Join Date: Dec 2013
Location: Sunny Cumbria
Posts: 470
|
|

Thank you Paul, I think sharing links is one of the key aspects of a good forum, it helps everybody, and sometimes opens up new, unexpected avenues.
Michael and his younger brother Christopher spend every weekend and all their school holidays with me. They love taking stuff apart and building their own 'creations' I have made Christopher his own little bench complete with a vice where he can play to his hearts content (Provided he doesn't do too much hammering!).  
On a different tack, I took a look on eBay last evening, just out of curiosity rather than looking for anything specific. I lost access to my account last year due the the security breach. All attempts to reset my password failed, I never got my reset eMail so couldn't reset my password. I don't do much on eBay now but I may want to in the future so I was a bit concerned at the loss of my account.
I didn't want to create a new account because although my feedback is pretty low in numbers I joined eBay in 2001, so it goes back a long way. Also I have a rather amusing username - irealyhatepcsalot - which often raises amusement from other eBay users I deal with.
Anyway, last evening just for fun, I tried the "reset password" button AGAIN and low and behold, it worked, they have revised the mechanism to reset passwords. So if anybody reading this has a similar problem, just try again, it worked for me this time. So I am able to buy and sell again!!!  
Better get out there and DO something... LOL

|
10th February 2015, 22:39
|
|
Senior Member
|
|
Join Date: Dec 2013
Location: Sunny Cumbria
Posts: 470
|
|
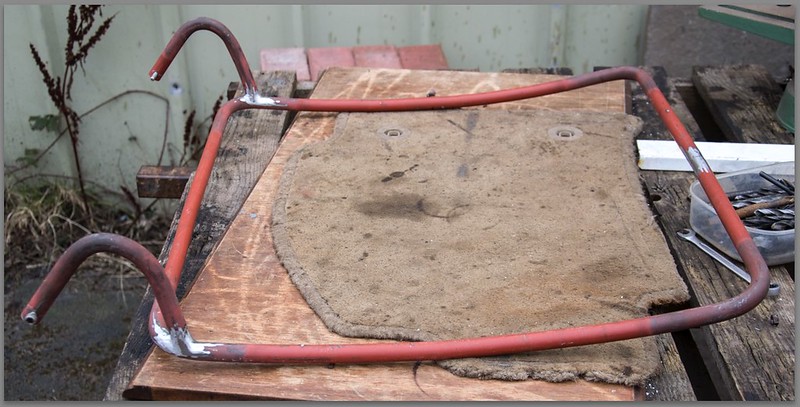
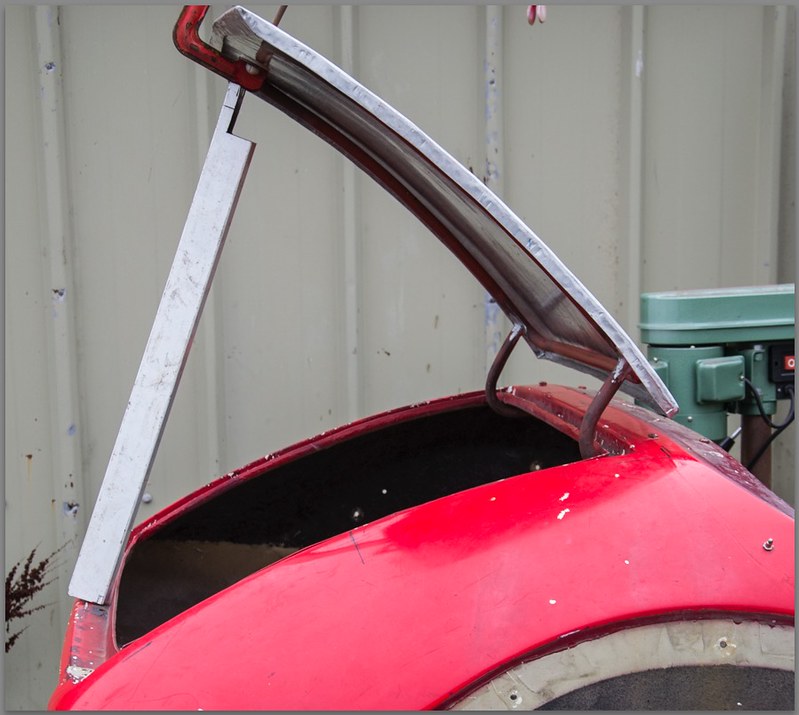
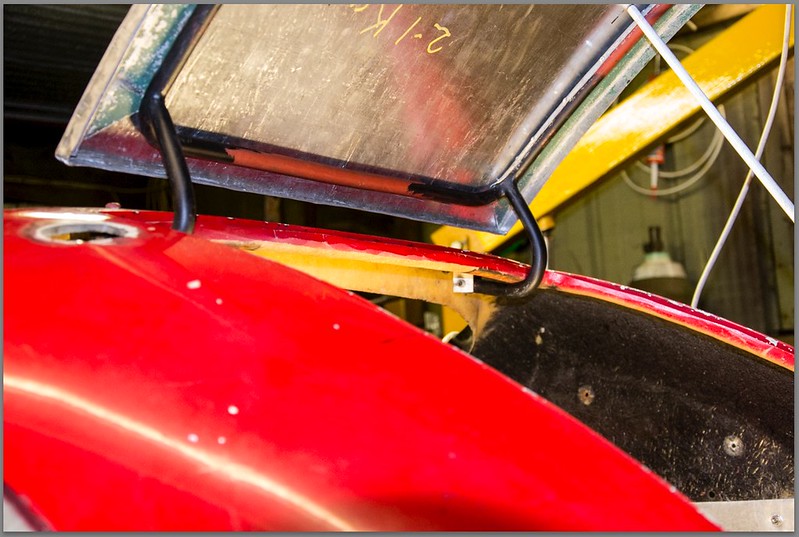
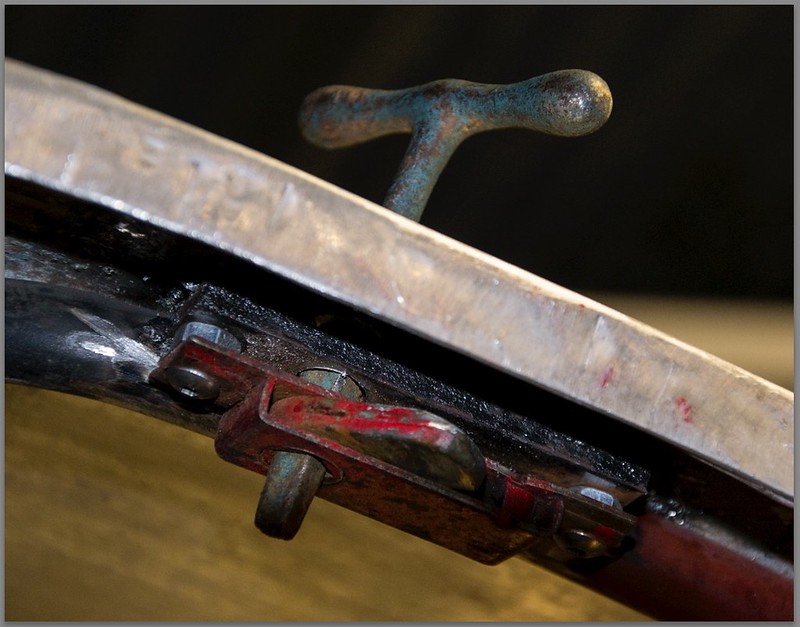
Well I had a good day! I eventually tore myself away at half past nine, having almost finished mounting the boot lid.
I am so pleased with the results of this. Some of it has been very tricky but I have got there in the end. Bending the hinges was a challenge to get them both the same.
When I checked the post after lunch I discovered a little package from Rimmers, 6 Flywheel bolts! The exact right ones, almost exactly 24 Hrs after ordering them on-line.
Two of the old bolts are on the left, The new bolt is the third from the left, the right hand bolt is from the Auto Gearbox drive plate.

Am pretty tired now, I think the pix speak for themselves. Tomorrow I hope to finish the boot lid and maybe start preparing the cylinder heads.

Zzzzzzzzz... |
12th February 2015, 08:19
|
|
Senior Member
|
|
Join Date: Dec 2013
Location: Sunny Cumbria
Posts: 470
|
|
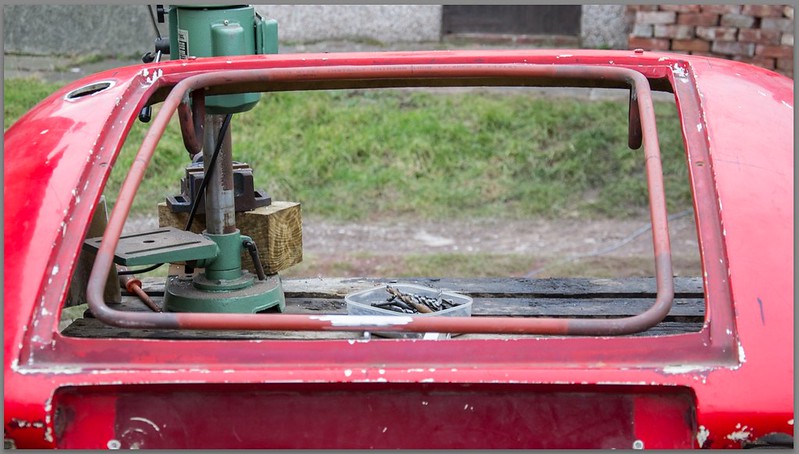
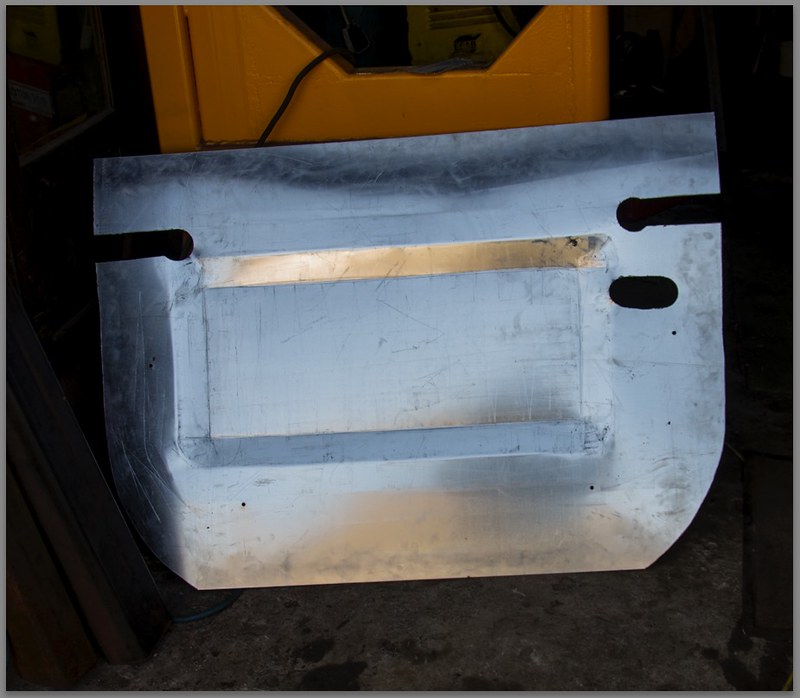
I finished fabricating the boot lid yesterday, I added the final support flanges and two old fashioned 'square key' locks. The lid is effectively done now but I still have to clean and paint the support frame before bonding it to the lid.
I tried to find an old fashioned escutcheon to cover the two keyholes either side of the lid. I came upon this site which supplies commercial vehicle body parts. They seem to have an very good range of fittings, well worth browsing the sections particularly the locks and handles, I think their prices seem to be very competitive compared with the usual kit car parts suppliers.
This is the type of escutcheon I need.
http://stedall.co.uk/product/escutcheon-cp-3-hole/
I started stripping the cylinder heads last night so I now have 16 valves ready to grind in... Will clean up the heads today, although the dry weather seems to have finished, we have very fine drizzle this morning. :-(
Last evening I had an eMail from Michael my son, it seems he has made the lights work on his Land Rover... He borrowed? the battery off of his mothers car and wired the lights up himself!

She was so impressed I don't think he is in trouble for 'borrowing' the battery.
Must make a start.
|
12th February 2015, 22:36
|
|
Senior Member
|
|
Join Date: Dec 2013
Location: Sunny Cumbria
Posts: 470
|
|
A Question...
Constructing my tubular boot lid frame, I needed to rivet aluminium flanges to the steel tube frame.
I found the rivets set (the stem broke) far too easily. As a result the aluminium flange was not clamped as tightly to the tube as I would have liked. It's years since I used 1/8" pop rivets but I remember them capable of squashing two panels together very firmly. These rivets are Screw-Fix specials, are there 'better' rivets out there, which are capable of pulling components together?
Can anybody make a suggestion where I can get something more powerful please.
Ooooh! I'm a Senior Member!!!  
Last edited by 8 Valve Ed; 12th February 2015 at 22:39..
|
14th February 2015, 21:24
|
|
Senior Member
|
|
Join Date: Dec 2013
Location: Sunny Cumbria
Posts: 470
|
|
Friday 13th...
My bad luck was a stripped spark plug hole. It was extremely tight to remove as you can see from the slippage marks on the flats.

I have 4 SD1 heads, one now has a stripped spark plug hole on cyl #4. I have run a tap through it but really it needs a helicoil. I would say about 1/3 of the threads are OK, 2/3 are not. Trouble is that on close examination neither of my 'spare' heads are much better, both have sustained damage while they have been stored and in frequent moves from one location to another.
At the moment I am staying with the first head with the stripped plug hole. I have tried a plug and it seemed to take a reasonably tightness without seeming to yield.
On a more positive note I finishes assembling and fitting the distributor, which meant I could assemble the oil pump. The Rover V8 has one particular characteristic, the oil pump is set high and dry, not submerged in the sump like many engines, therefore it needs priming before it will pump oil. The standard method is to pack the oil pump with Vaseline which then causes the gears to suck up the oil from the sump on first starting. The Vaseline then dissolves in the oil once the engine is running and up to temp.

Once the engine is fitted things can leap ahead with the build. I hadn't realised what a logjam it had created.
Last edited by 8 Valve Ed; 14th February 2015 at 21:26..
Reason: Typo
|
15th February 2015, 20:19
|
|
Senior Member
|
|
Join Date: Dec 2013
Location: Sunny Cumbria
Posts: 470
|
|
The Boot Floor
Today I set myself the target of making and installing the Boot Floor.
I had 'found' a nice piece of 2mm sheet aluminium to make the floor with. The original floor had been a piece of 12mm Far Eastern plywood which had seen better days.
Despite me lowering it by 6mm the fuel tank still seemed to stick up about 12mm too high. I was reluctant to lower it any more. My answer was to put a 'power bulge' into the panel, that served two purposes, firstly to accommodate the fuel tank and secondly to strengthen the boot floor.
I used the English Wheel to raise a rim around the affected area, by 'tipping' the sheet while pushing the metal through the rollers with little or no pressure on the metal. I had never done this before so I was pleased when it seemed to achieve what I wanted. After I had raised the area, I stretched the area above the fuel tank by rolling it to a slight crown to help it relieve any stresses in the panel and to help push the power bulge up a little.


This seemed to work well enough with a little adjustment and fine tuning. So I went on to bolt the panel onto the chassis and cut an access hole for the fuel pipe connections and sender unit.
The peculiar colour is from the protective plastic film combined with the fluorescent lamps in the garage.
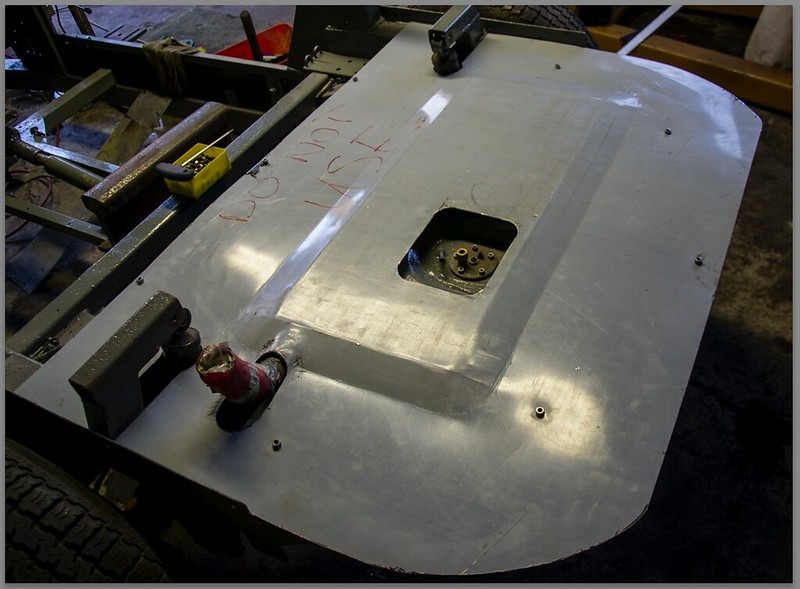
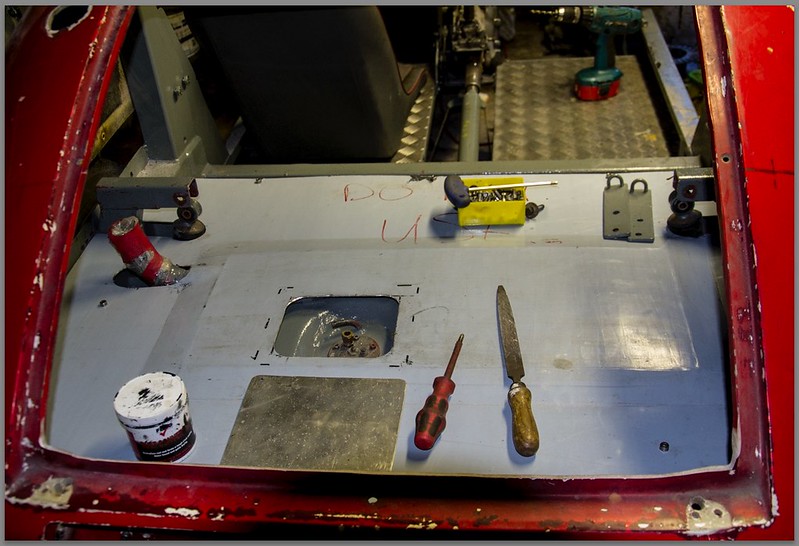
Made a small cover for the access hole. Will probably fix it with stainless self tappers.
Tomorrow I plan to assemble and fit one of the cylinder heads.
|
16th February 2015, 18:39
|
 |
Senior Member
Enthusiast
|
|
Join Date: Sep 2004
Posts: 1,895
|
|
Quote:
Originally Posted by 8 Valve Ed

Constructing my tubular boot lid frame, I needed to rivet aluminium flanges to the steel tube frame.
I found the rivets set (the stem broke) far too easily. As a result the aluminium flange was not clamped as tightly to the tube as I would have liked. It's years since I used 1/8" pop rivets but I remember them capable of squashing two panels together very firmly. These rivets are Screw-Fix specials, are there 'better' rivets out there, which are capable of pulling components together?
Can anybody make a suggestion where I can get something more powerful please.
Ooooh! I'm a Senior Member!!! |
Try Rivetwise. I have used several hundred on the Pembleton. They do closed end rivets which are much better if riveting into a box section. They also do rivets with a stainless mandrel but they are a bugger to set with a hand rivet tool.
Cheers, Robin |
16th February 2015, 20:21
|
|
Senior Member
|
|
Join Date: Dec 2013
Location: Sunny Cumbria
Posts: 470
|
|
Thanks Robin, seems a very comprehensive site, Having now seen the prices of the air riveters, I now know why I use a hand riveter!!! They seem to start at about £350... Way outside my budget.
|
19th February 2015, 21:04
|
|
Senior Member
|
|
Join Date: Dec 2013
Location: Sunny Cumbria
Posts: 470
|
|
I am still here!
I have been beavering away while I have the boys with me (half term), we are working from 9am till 9:30pm, I have little energy left for posting progress having scrubbed up after a hard days fun.
Progress: The engine is finished and fitted, the boot floor is finished, Michael is currently cleaning the carbs, I am installing the fuel pumps and catching all those little tasks which can get missed.
We are planning to install the main services from front to back, like the fuel pipes, Battery leads and main wiring cable in the next day or two. Michael wants to see the engine running before they go back to school but I think that's pushing it.
I will post some pix when I have the energy.
The car is about 73% complete as of now.
|
|
Currently Active Users Viewing This Thread: 1 (0 members and 1 guests)
|
|
|
 Posting Rules
|
You may not post new threads
You may not post replies
You may not post attachments
You may not edit your posts
HTML code is Off
|
|
|
All times are GMT +0. The time now is 11:49.
|


 Hybrid Mode
