|
|
| Sammio Builds and discussions Sammio bodied car builds and specials |

13th August 2016, 17:03
|
 |
Senior Member
|
|
Join Date: Jun 2011
Posts: 935
|
|
Well done Paul
Its no longer a project - its officially a car.
Im sure the starter issue is something simple.
|
13th August 2016, 21:22
|
 |
Senior Member
|
|
Join Date: Jul 2011
Posts: 5,328
|
|
Lucas starter solenoids are hopeless. Mine kept stranding me at petrol stations with the same symptoms you describe - nothing on turning the key even though everything's new and connected properly. Only reliable solution is to fit mechanically actuated solenoid, I used Series 1 Landy item, but this should do the job - http://www.ebay.co.uk/itm/MANUAL-PUS...IAAOSwX~dWlTM6 |
14th August 2016, 06:10
|
 |
Senior Member
|
|
Join Date: Feb 2012
Location: Wembley, London
Posts: 5,056
|
|
Roadster - Cheers, I really like the way the car is finally coming together. 
I just need to keep ticking off the last few jobs before it will be ready for an MOT.
- - - - - - - - - - - - - - - - - - - - - - - - - - - -
Mr T - Thanks for the link.
( I do remember you fitting this in your car, as I hadn't seen one before. )
Unfortunately, my ignition problem starts before I get to the solenoid stage, i.e. the first turn of the key.
The battery is fully charged, but the ignition light doesn't come on. 
Later today I will try to by-pass the battery cut off switch, in case there is a problem with that.
- - - - - - - - - - - - - - - - - - - - - - - - - - - -
Cheers, Paul. 
|
14th August 2016, 08:39
|
|
Senior Member
Enthusiast
|
|
Join Date: Jun 2015
Location: Reading, Berkshire
Posts: 688
|
|
Looks great Paul. Love the black interior against the grey body. And the aero screens with the rear view mirror having its own screen look brilliant.
You're getting there !
Dave
|
14th August 2016, 09:19
|
|
Junior Member
|
|
Join Date: Mar 2016
Posts: 10
|
|
Still great work going on here I see
The cockpit looks like it's been lines in a purpose built rubber lining which looks great but hides all the work and hours that have gone into it 
Keep up the great work and you'll be rolling soon enough |
14th August 2016, 14:28
|
|
Senior Member
|
|
Join Date: Feb 2012
Location: Wembley, London
Posts: 5,056
|
|

DaveP - Thanks.
The matching aero screen for the rear view mirror was one of those ideas that started out as a dodgy sketch...

But it has turned out a lot better in reality.
- - - - - - - - - - - - - - - - - - - - - - - - - - - - - - -
WelshOne - Cheers.
Don't forget I am actively trying to hide all the hours had have gone into this build.
It is supposed to look like a 50 years old race car under going a rolling restoration after I found it languishing in a barn. 
- - - - - - - - - - - - - - - - - - - - - - - - - - - - - - -
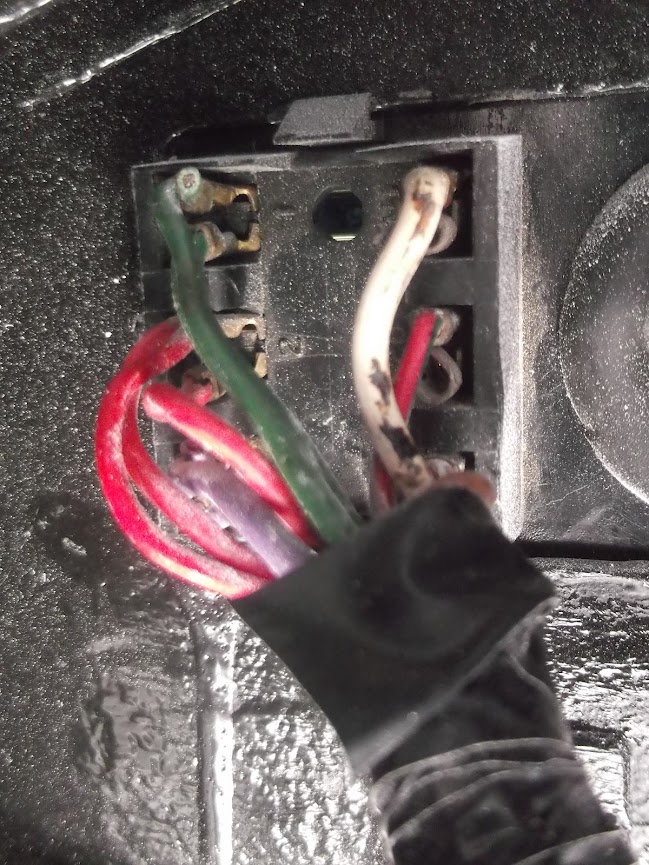
The Weakest Link:
After quite a frustration session of trial and error, I think I have found my problem…
I started by by-passing the cut off switch and as if by magic the ignition light came on & the engine started.
Unfortunately, it then promptly died again leaving me once again with no power.
Lots more fiddling around with wires later and for no apparent reason, the ignition light came on when the cut off switch was in use normally & not by-passed.
Again the engine fired up straight away and this time it ran for a little while before dying.
I pulled out all the fuses, cleaned the terminals and re-fitted them.

This seemed to do the trick as everything was now working, including the front side lights.

Whilst I was happy to see these come on, I was frustrated at the way I've butchered the front loom looking for the fault.
The other thing that I have discovered recently is that the I don't have the right sensor fitted for the oil pressure gauge. 
So I simply reconnected the oil warning light wire to the oil warning light sensor.

Which means I now have both lights coming on with the ignition key.

Feeling very happy with myself, I wheeled the car out for some celebratory photos…


Then with the car safely back on the drive and the engine running, I just wiggled the loom behind the fuse box…
At which point the engine instantly died.
BINGO!
Now I have had a modern blade type fuse box on my Ebay watch list for years as I didn't think the glass fuses were a good idea.
So I've now ordered the fuse box, some fuses and some new "piggyback" terminals to rewire everything.
Thankfully, I can fit the new box inside the passenger footwell somewhere within the current lengths of the wiring.
Now a good rule of thumb for car building is…
"Quit while you're ahead!" 
Actually, the truth is the next job is cleaning up the underside of the passenger cockpit panels and I couldn't face it.
( I am still feeling a little run down. )
But I still feel very happy that if I fix the fuses I will be good to go. 
Until next time, take care, Paul.
Last edited by Paul L; 14th August 2016 at 18:53..
Reason: Typo
|
14th August 2016, 16:13
|
 |
Senior Member
|
|
Join Date: Dec 2011
Location: Devon
Posts: 550
|
|
Well done Paul, intermittent faults on anything are a pain in the *ss to find so a good job done. Hopefully the new fusebox will be easy for you to fit and will sort it for good. Car is looking great now and really coming together as you add more finishing touches.
|
14th August 2016, 17:52
|
|
Junior Member
|
|
Join Date: Jan 2014
Posts: 17
|
|
Hi paul ,the car looks truly great a credit to you for all the hours you have put in ,Pete.
|
15th August 2016, 13:19
|
|
Junior Member
|
|
Join Date: Apr 2016
Posts: 3
|
|
Paul, you are getting really close!!! Here is a page of some speculative fonts and graphics for your Triumph Swordfish. I tried to pick fonts that would be 60s sports car-ish... ;-) Easy enough to vinyl cut or even 3D print raised/beveled letters (at least the 3D modeling part from the font).  This is my small thanks for capturing my imagination with your build. ... link is not showing...right click and following the link does.
Last edited by fwingo; 15th August 2016 at 13:25..
Reason: imgur.com link not working correctly?
|
15th August 2016, 18:15
|
|
Senior Member
|
|
Join Date: Feb 2012
Location: Wembley, London
Posts: 5,056
|
|
Froggyman - Cheers, I am very relieved to have traced the problem to the original fuse box.
As, after all the time I spent testing the loom in my bedroom, I would have been gutted if that was the problem.

So even though it is a bit of extra work, it will give me a lot more confidence when driving the car.
( As I was beginning to fear that I wouldn't be able to make it to the MOT station, let alone Norfolk. )
- - - - - - - - - - - - - - - - - - - - - - - - - - - - - - -
Slickshod - Thanks.
I know this build had taken a LONG time to reach this stage, but the MOT is definitely in sight.
I just need to stay focussed on ticking off the last few jobs and doing them properly.
- - - - - - - - - - - - - - - - - - - - - - - - - - - - - - -
Fwingo - Hopefully, I've managed to get the link to work…

Thanks for putting the time and effort into do that for me, I really appreciate it.
I have wondered about putting the Swordfish name on the car, or just keep people guessing.
Using a Triumph motorcycle logo has always been on the cards.
At one point I was thinking about using this font, to match the 1500 badge I have on my dash.

Thankfully, there will be plenty of time to make these decisions after the MOT.
- - - - - - - - - - - - - - - - - - - - - - - - - - - - - - -
Monday - Part 1:
Spent the morning on domestic chores & the early afternoon on some real work & dropping my youngest daughter around to her friend's.
So it was mid afternoon before I could get outside to the car and the driveway was a hot place to work.
The engine fires up first time today.
Although when I reversed it back across my driveway, the oil leaking from the gearbox is plain to see.

So before I fix the gearbox cover back into position, I will need to tighten all the bolts in here and hope for the best.
( As it is the fact the oil is dripping on the exhaust pipe that is the real problem. )

Note: Just like Oxford's build, mine could do with a wash too.
Then it was time to jack the car up to tackle the underside.
As soon as I started on the rear end, the car started to slide down the driveway a bit.

Eventually, I had 3 wheels supported.


And the front passenger side was supported under the chassis.

As the front wheel just wants to hang down when the rest of the car is lifted up.

Note: This arrangement is much stronger & stable than it looks.
End of Part 1…

|
15th August 2016, 18:16
|
|
Senior Member
|
|
Join Date: Feb 2012
Location: Wembley, London
Posts: 5,056
|
|
Monday - Part 2:
There now follows a series of rubbish photos trying to show the areas I needed to work on.
Behind the body shell side extension.

The panels joining the body shell to the internal framework.


And the join between the lowered floor pans and the front footwells.
( This needs to be done on both sides. )

Before I started I removed the bottom bonnet strap bracket.

And masked off the holes.

Then I removed the bonnet locating pin as well.

Finally a load of dust sheets were put in place.

I used a combination of my belt sander, dremmel look-a-like and sand paper to tidy everything up.
Which was very hot and dirty work.
Eventually I could mask a few bits off and get some etch primer on.
Again, the photos are not great.


I just needed to keep reminding myself this is the underside of the car.
So it doesn't need to be smooth, just tidy enough for the MOT tester to see it is complete.
With a bit of luck, I will be able to get the first coat of Tetroseal on this tomorrow.
End of Part 2…
|
15th August 2016, 18:17
|
|
Senior Member
|
|
Join Date: Feb 2012
Location: Wembley, London
Posts: 5,056
|
|
Monday - Part 3:
One last job for the day was to wrap up my temporary wiring blocks.

Now I know the side light problem stems from the fuse box, I don't need to touch these again.
At some point I will come back and wire in some proper connections, but this will do for the MOT.


Did I mention the car could do with a wash?
Until next time, take care, Paul.
|
16th August 2016, 16:33
|
|
Senior Member
|
|
Join Date: Feb 2012
Location: Wembley, London
Posts: 5,056
|
|
Limited Tuesday - Part 1:
One of those days with great weather outside, but too many other things competing for car time...
Masked off the bottom edge of the driver's side.

This only covers a small area, as it is only the join between the two floors that needs painting on this side.
Whereas, the passenger side needs painting from that join, all the way along to the body shell extension on the front.

Slapping on the Tetroseal was the usual messy job, although for the first time I did manage to get some in my (limited) hair.
Not sure why I keep trying to take photos under the car as they are never great, but here goes…
The join on the driver's side.

The plywood panels.

The body shell extension (you can just see the masking tape above the locating pin hole).

These were taken after the first coat went on and I did apply a second coat later on.
Even though it is hard to get a decent photo, the underside of the car is now fully sealed.

I really hope this will give a good first impression to the MOT tester.
I did some more tidying up work along the front loom.
I wrapped the indicator connectors on both sides.

And replaced the temporary ties with proper zip ties.

Leaving the passenger side looking like this.

And the driver's side, looking like this.

This still leaves enough slack for the wires when the bonnet is closed.

End of Part 1…
|
16th August 2016, 16:33
|
|
Senior Member
|
|
Join Date: Feb 2012
Location: Wembley, London
Posts: 5,056
|
|
Limited Tuesday - Part 2:
I also found the length of hose I had put to one side for the battery box drain.
( Excuse the dust everywhere. )


But I can't trim it to the right length and zip tie it out of the way just yet...
As I need to double check the front tyre clearance and I can't turn the wheel with the car jacked up.
Before JY Classic fixed my clutch master cylinder, a small amount of hydraulic fuel had leaked onto the front footwell.
So I sanded that all down, although this was quite tricky to reach.

And got a coat of etch primer on it.

I must confess the heat is still taking too much out of me, so that was it for today.
The good news is that I managed to tick off some more jobs from the MOT "To Do" list.
Until next time, take care, Paul.
|
17th August 2016, 21:41
|
|
Senior Member
|
|
Join Date: Feb 2012
Location: Wembley, London
Posts: 5,056
|
|
Hectic Wednesday – Part 1:
I only had the start of the day to play with, but still squeezed quite a bit in.
The fuse box I’ve ordered has 4 blade fuses compared to the original 3 glass fuses.
So I have a cunning plan, but this is a long story.
You may remember that my first fan speed switch kept blowing fuses before finally melting.
( The switch was meant to convert a single speed fan into a multiple speed one. )
In addition, my original ignition switch wiring broke just after I fixed the steering bush problems.
Unfortunately, the new ignition wiring connection plug didn’t match the plug on the loom.
So I ended up fitting 2 x 2 pin connectors instead (as I had ordered them in error for the lighting).
The only good thing that came out of all this extra work is that I now had the radio feed wire from the ignition.
( I had cut out all the wiring associated with the radio when thinning out the loom. )
So my plan is to use the radio feed as the power source for the fan speed switch via the fuse box.
I added the pin connector to a spare piece of wire.

Now, once again, I must apologise for the run of rubbish photos that follows, taken while working upside down in a dark space.
I then connect the pin to the connecting block that joins to the ignition wiring.

As before, now I know the fuse box is the problems, I can wrap up all the connectors in this area.

The used of silver electrical tape over the black wrap makes this look a bit of a mess in a bad photo.

Fitting the new fan switch turned out to be a bit long winded…
I figured the old outer switch would be fine where it was, as new switch looked the same.

This is the new switch.

But when I fitted the new lever, it didn’t line up with the markings. 

So I removed everything and fitted both parts of the new switch.

Note:
Despite the 3 speed settings, the fan will work on a simple on/off basis on the first setting.
End of Part 1…
|
17th August 2016, 21:41
|
|
Senior Member
|
|
Join Date: Feb 2012
Location: Wembley, London
Posts: 5,056
|
|
Hectic Wednesday – Part 2:
The next job was to take care of the original fan switch wiring.
( This had been taped to cardboard so it wouldn’t short out. )

Of these three wires, I just need one as the line out to the fan.
So the other two wires (earth & the original power) were sealed off.


Before being tucked away with the rest of the loom behind the dash.
This meant that, until the fuse box arrived, I was finished with wiring for a while.
So I gave the front foot wells a coat of Tetroseal.


I decided to cover the bulkhead fixing bolts while I was at it.

I then went around the body shell to touch up the etch primer for the last time before the MOT.
This included the boot lid.

The area around the boot opening.

The outer headlight rims.

Note:
These can’t be fitted until after the MOT guy has adjusted the headlight beams.
But I thought I’d bring them along to the MOT, so I should show me I was going to fit them.
I also cleaned up the Tetroseal smudge from the cockpit side.

As well as preparing the car for its first MOT, today was also about tidying up too.
Because my uncle is coming over from America and will be here on Saturday.
Whilst it would be good if my uncle could see the car looking its best.
I am also under strict instructions to remove all tools and parts from the porch & dining room.
Recently, I’ve also been storing parts in the passenger side of the cockpit and the boot too.
So today was a chance to combine tidying up with dressing up.
With everything removed from the boot, I could fit the lid & lock it ready for the MOT.

End of Part 2…
|
17th August 2016, 21:42
|
|
Senior Member
|
|
Join Date: Feb 2012
Location: Wembley, London
Posts: 5,056
|
|
Hectic Wednesday – Part 3:
I cut some cardboard to protect the seat bases.

And just rested both seats in place.

I refitted the bonnet strap and locating pin on the passenger side.

I peeled off the protective cover from the front number plate.
( Although it took a lot of cleaning to remove the sticky mess before it looked like this.)

At which point I could finally move the car out of the way…


So I could wash down the driveway for the umpteenth time.

After I had finished washing the drive I looked up the road to where the car was parked.

It really is very small / low compared to everything else in my street.
I then put it back on the driveway facing forwards.

Before hanging out of a bedroom window for my “drone” shot.
( Which would work better if the sun wasn’t shining. )

In a great bit of timing, no sooner had I put the covers on when the postman arrived bearing gifts…

All the connectors have also turned up too, but I was in full tidy up mode by now.
( But fitting this will be at the top of my “To Do” list. )
There then followed a LOT of journeys to the back of the garden carrying stuff.
( With everything being shoved into the Summer House & Shed for now. )
I have a big work meeting tomorrow, but not sure if I’m needed on Friday as well.
So I may not be able to work on the car for a few days now.
Unfortunately, the MOT “To Do” list does seem to be growing every time I tick one job off.
However, every time I see what this car has finally turned into is a great boost to morale.
So until next time, take care, Paul.
Last edited by Paul L; 19th August 2016 at 04:56..
Reason: Typo
|
17th August 2016, 22:28
|
|
Senior Member
|
|
Join Date: Jun 2015
Posts: 1,401
|
|
Your time and great effort is now paying off. Looks fantastic!
|
18th August 2016, 05:43
|
|
Senior Member
|
|
Join Date: Jun 2011
Posts: 935
|
|
Looks good Paul
Only you (and us following on here) know the work that have brought you to this point.
MOT and then paint.
You can start thinking of a trip to Norfolk in 2017.
|
18th August 2016, 11:50
|
 |
Senior Member
|
|
Join Date: Oct 2011
Location: Surrey
Posts: 363
|
|
Built on the Drive! god knows the frustration over the years with ice, show, wind and rain. Not only is it complete but looks bloody brilliant well done!
|
|
Currently Active Users Viewing This Thread: 4 (0 members and 4 guests)
|
|
|
 Posting Rules
|
You may not post new threads
You may not post replies
You may not post attachments
You may not edit your posts
HTML code is Off
|
|
|
All times are GMT +0. The time now is 14:08.
|


 Linear Mode

