|
|
| Marlin Sportster, Cabrio, Berlinetta and Roadster builds Enthused or Confused about your vintage Marlin build? Ask away here or show off your build. |

4th September 2009, 07:55
|
 |
Senior Member
Enthusiast
|
|
Join Date: Sep 2004
Posts: 1,893
|
|
What did you guys mount your motor on. I can see it is on a plate but what is the plate bolted to? Is it the 25mm box section tube that is set at 45Deg and runs the width of the car behind the dash?
Robin
Ordered my last wheel box so now I have three. It's amazing how prices vary. On Ebay the cheapest I could find (including the rubber spacers) was over £18. I then found a mini specialist selling the same thing for only £12. He also stocked the little chrome plinths so I ordered 4 of those as well (can only get them in 2's) They were also much cheaper as £5 a pair.
|
4th September 2009, 08:00
|
 |
Senior Member
Enthusiast
|
|
Join Date: Feb 2005
Location: Hampshire
Posts: 2,497
|
|
Quote:
Originally Posted by MartinClan

What did you guys mount your motor on. I can see it is on a plate but what is the plate bolted to? Is it the 25mm box section tube that is set at 45Deg and runs the width of the car behind the dash?
Robin
Ordered my last wheel box so now I have three. It's amazing how prices vary. On Ebay the cheapest I could find (including the rubber spacers) was over £18. I then found a mini specialist selling the same thing for only £12. He also stocked the little chrome plinths so I ordered 4 of those as well (can only get them in 2's) They were also much cheaper as £5 a pair.
|
Yup its on the box section in our car:
 |
4th September 2009, 21:39
|
 |
Senior Member
Enthusiast
|
|
Join Date: Mar 2005
Posts: 3,079
|
|
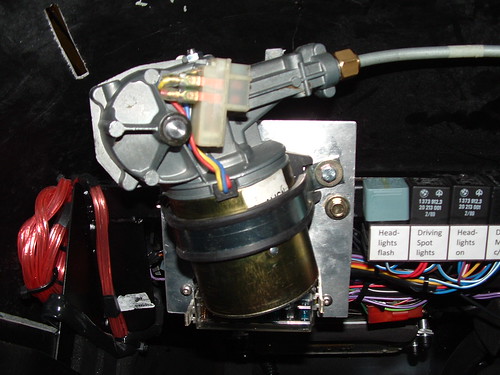
I fixed a thick aluminium plate to the chassis(box section). I had to move my fuse box down as I previously mounted it here. There is a special rubber mount that sits under the motor. I fixed the wheel boxes first with the drive shaft and then drilled the holes to mount the motor. |
6th September 2009, 19:58
|
|
Senior Member
Enthusiast
|
|
Join Date: Sep 2004
Posts: 1,893
|
|
Quote:
Originally Posted by MartinClan
Still on the camera!
Robin
|
Off topic I know, but here is the car in question. Apparently it was built specifically for the Mille Miglia. Features a conventional chassis but a body built from small gauge steel tube skinned with ally.

 |
6th September 2009, 21:15
|
|
Senior Member
Enthusiast
|
|
Join Date: Mar 2005
Posts: 3,079
|
|
Very nice, especially the 'go faster' rear wheel covers!
Is it registered for use on the UK roads? Or are those funny number plates just for the show?
...peter
|
7th September 2009, 07:38
|
|
Senior Member
Enthusiast
|
|
Join Date: Sep 2004
Posts: 1,893
|
|
The story was that it had been given to him by an Italian friend. Strange though because as you can see from the picture it is right hand drive.
|
14th September 2009, 07:43
|
|
Senior Member
Enthusiast
|
|
Join Date: Sep 2004
Posts: 1,893
|
|
Well the windscreen wipers are fitted and seem to work well. All I need now is some rain lol.
When testing I found that the natural course for any cleared rain is down the windscreen support and into the cockpit! The gasket I made seemed to do little to prevent this. What hace you guys done? Is it a question of gumming up the hole with silicon sealant?
Also where is a good place for the windscreen washer bottle? I have a space on the offside engine bay but I don't fancy dangling the bottle (which could be quite heavy when full) off the fragile alluminium sides.
Robin
|
14th September 2009, 10:49
|
|
Senior Member
Enthusiast
|
|
Join Date: Feb 2005
Location: Hampshire
Posts: 2,497
|
|
Quote:
Originally Posted by MartinClan
Well the windscreen wipers are fitted and seem to work well. All I need now is some rain lol.
When testing I found that the natural course for any cleared rain is down the windscreen support and into the cockpit! The gasket I made seemed to do little to prevent this. What hace you guys done? Is it a question of gumming up the hole with silicon sealant?
Also where is a good place for the windscreen washer bottle? I have a space on the offside engine bay but I don't fancy dangling the bottle (which could be quite heavy when full) off the fragile alluminium sides.
Robin
|
Won't have long to wait for some rain 
I mounted the bottle on the firewall under the header tank. Bit of a pain to get to but it's not like I'm planning on need to fill it very often. |
14th September 2009, 20:28
|
|
Senior Member
Enthusiast
|
|
Join Date: Mar 2005
Posts: 3,079
|
|

Quote:
Originally Posted by MartinClan
When testing I found that the natural course for any cleared rain is down the windscreen support and into the cockpit! The gasket I made seemed to do little to prevent this. What hace you guys done? Is it a question of gumming up the hole with silicon sealant?
Robin
|
When its lashing down with rain that's the least of your worries - ask Patrick and Rich
Quote:
Originally Posted by MartinClan
Also where is a good place for the windscreen washer bottle? I have a space on the offside engine bay but I don't fancy dangling the bottle (which could be quite heavy when full) off the fragile alluminium sides.
Robin
|
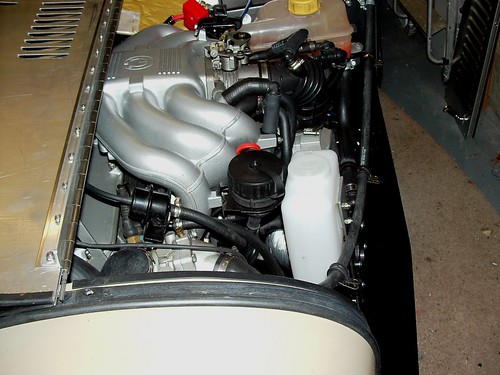
Mine is on the nearside mounted on a vertical piece of ali fixed to the chassis and supported horizontally to the side bonnet to stop it vibrating. (Easier to make than describe). The picture is before the side bonnet and horizontal bracket was fitted.
Rain is forecast so you'll be able to try out the wipers soon. Don't forget to put drain holes in your doors unless your into fish keeping 

|
3rd May 2010, 17:28
|
 |
Senior Member
Enthusiast
|
|
Join Date: Sep 2005
Location: Northampton, UK
Posts: 1,891
|
|
Hi all - fresh back from Stoneliegh, with lots of wiper bits! 
I got a lucas wiper kit + extra wheel box, but no bundy tube was supplied with it. Does anyone know where I can get some? Also, can someone also post up what size wiper arms and blades are required? |
3rd May 2010, 20:05
|
|
Senior Member
Enthusiast
|
|
Join Date: Sep 2004
Posts: 1,893
|
|
SVC have all the bits including the bundy tube and gear wheel for the wiper motor which you may have to change to get the correct sweep. I used B05109 wiper blades and U71300 wiper arms from TEX. Had to bend and shorten the arms to fit.
Robin
PS - Did you get the hail?
|
3rd May 2010, 20:20
|
|
Senior Member
Enthusiast
|
|
Join Date: Mar 2005
Posts: 3,079
|
|
Quote:
Originally Posted by GreatOldOne
Hi all - fresh back from Stoneliegh, with lots of wiper bits!
I got a lucas wiper kit + extra wheel box, but no bundy tube was supplied with it. Does anyone know where I can get some? Also, can someone also post up what size wiper arms and blades are required? |
Hi Jason,
yes we're back safely as well.
I got my wiper bundy tube from SVC. The guy there was very helful getting the right drive wheel plus supplied, cut and flarred the bundy tube to order.
The wiper arms and blades I used are TEX and I got mine from Europaspares.
ITEM : 5.2mm RHP - U71300 X 3
You have to put a bit more crank angle on the arms to make them come to rest horizontal. (see further back up this post for details and a picture)
My order says 10 inch blades but I think I had to change them as the ones on the car are 9 inch. The 9 inch ones are the correct size.(9inch - B05109)
Have you been told to order the hood yet? (  )
...peter
Last edited by peterux; 3rd May 2010 at 20:34..
Reason: additional info
|
3rd May 2010, 20:44
|
|
Senior Member
Enthusiast
|
|
Join Date: Sep 2005
Location: Northampton, UK
Posts: 1,891
|
|
Quote:
Originally Posted by MartinClan
PS - Did you get the hail?
|
Oh Yes.
Thanks for the part numbers. |
6th May 2010, 13:44
|
|
Senior Member
Enthusiast
|
|
Join Date: Sep 2005
Location: Northampton, UK
Posts: 1,891
|
|
Have put in an order with Europa for the arms and wipers. One final question - how do I go about locating the wheel boxes on the scuttle?
I'm assuming that I need to shorten the arms, fit the blades and then work out the right hand most box's position (as looking from the front of the car)by placing it on the windscreen and noting where the arm sits on the scuttle, and then work across the screen with the other arms ensuring they don't interfere with one another.
Or is that all ass backwards? |
6th May 2010, 14:34
|
|
Senior Member
Enthusiast
|
|
Join Date: Sep 2004
Posts: 1,893
|
|
Your procedure is pretty much what I did but it would have been considerably easier if I could have seen what someone else did first.
But - you could be in luck.... I haven't put the scuttle top back on yet. I can send you a birds eye picture of the ww instalation complete with rule if that would be useful.
Robin
|
6th May 2010, 14:52
|
|
Senior Member
Enthusiast
|
|
Join Date: Sep 2005
Location: Northampton, UK
Posts: 1,891
|
|
That'd be great - thanks Robin! |
6th May 2010, 20:05
|
|
Senior Member
Enthusiast
|
|
Join Date: Mar 2005
Posts: 3,079
|
|
Quote:
Originally Posted by GreatOldOne
I'm assuming that I need to shorten the arms, fit the blades and then work out the right hand most box's position (as looking from the front of the car)by placing it on the windscreen and noting where the arm sits on the scuttle, and then work across the screen with the other arms ensuring they don't interfere with one another.
Or is that all ass backwards? |
I think I started from the drivers side. I first found the position that gives the full sweep from vertical to horizontal. Then with that blade in place you can find the position of the other two arms and blades. I found taking the spring off one of the arms helps. But i'm sure you can go the other way and end up in the same place.
The usual rule of 'measure twice, cut once' becomes 'measure 6 times and cut once'!! |
8th May 2010, 10:36
|
|
Senior Member
Enthusiast
|
|
Join Date: Sep 2004
Posts: 1,893
|
|
Sorry marks on ruler aren't very visible...
 |
8th May 2010, 11:44
|
|
Senior Member
Enthusiast
|
|
Join Date: Sep 2005
Location: Northampton, UK
Posts: 1,891
|
|
Thanks Robin - gives me an idea of the rough locations.
That carpet looks a bit posh!
BTW - what's that black box sticking up from the passenger side bulkhead, in front of the expansion tank? Alarm? |
8th May 2010, 17:56
|
|
Senior Member
Enthusiast
|
|
Join Date: Sep 2004
Posts: 1,893
|
|
Its the business end of a Toad alarm/imobiliser. Carpet is same as the stuff used in classic Jags - but is a real pain to use. Wouldn't use it again...
Robin
|
|
Currently Active Users Viewing This Thread: 3 (0 members and 3 guests)
|
|
|
 Posting Rules
|
You may not post new threads
You may not post replies
You may not post attachments
You may not edit your posts
HTML code is Off
|
|
|
All times are GMT +0. The time now is 22:43.
|


 Linear Mode

