|
|
| Marlin 5exi builds Calling all you sexi builders....sorry 5exi builders, show us your progress. |

4th August 2008, 18:04
|
 |
Senior Member
Enthusiast
|
|
Join Date: Nov 2005
Location: Cheshire
Posts: 404
|
|
 Suspension Set Up
Hi All....
Decided that whether I keep the car (or not) the suspension set up needs to be improved. I'm not going for the full cut up...or the Marlin mod, but reckon a few subtle tweaks will help massively.
So plan of attack as below:-
2 x New front springs ordered (10" 225lb) £58 delivered from demon tweeks - current 170lbs dive too much and drop over an inch when I get in!!
Will remove old front springs and while off; will set bumpsteer on the front up to minimise deflection (seeing as I never did this at all!)
This should do for the front.
Rear:-
Springs OK. So they stay.
Manufacture stiffener for across rear chassis tubes to minimise flex...not sure of best design or how to mount this yet? (suggestions welcome)
Replace upper track control adjuster arm with a ball joint the same size as the other (minimise bumpsteer at rear) and improve adjustability of this (LH/RH turnbuckle) - anyone know what the ball joints are off?
...then get the whole thing 4 wheel aligned.....I reckon 3mm overall toe in at back & 1mm overall toe out at front.
P.S> Not changing my camber settings as they are around 1 deg neg on back and 1/2 deg neg on front.
Any thoughts anyone?
Rich

|
4th August 2008, 20:41
|
 |
Senior Member
Enthusiast
|
|
Join Date: Nov 2005
Location: Tyne and wear
Posts: 784
|
|
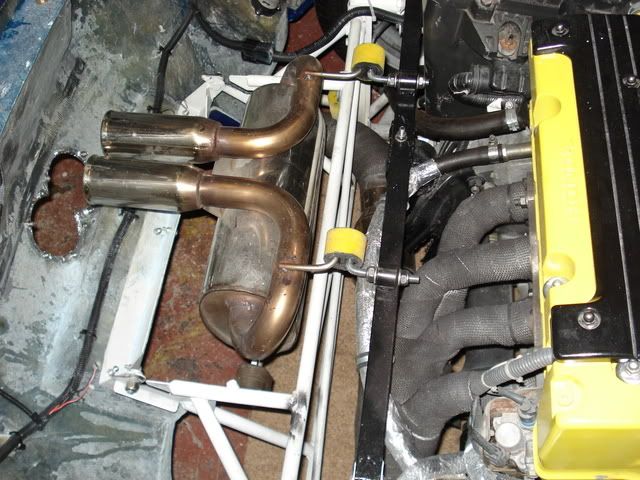
Rich,
This is my rear stiffener and John did one aswell but lower down! mine had to be quite high for exhaust mounting though!
I also have a rear undertray which will help with flex aswell
 |
4th August 2008, 22:32
|
 |
Senior Member
Enthusiast
|
|
Join Date: Jul 2005
Location: Dorset
Posts: 1,180
|
|

Weld in the rear frame - easiest way to stiffen up the rear without any fabrication.
You might want something a bit beefier than 225 on the front. 300lb wasn't too bad on mine - it's what I believe Marlin are running on their blue car, and also what Ken Robson is running on his car (which kit build). Mine has slightly different movement ratios, so I've been told I should fit 250lb at the front (this is in combination with an ARB though). I'm sticking with my 300lb springs for the moment, as I can't bring myself to buy yet more springs, just yet!
As Craig mentioned I had a cross car beam I bolted in, to support the rear engine mount of the type-r. I'm junking my old one, as the mounts no longer exist, but will be replacing it with a length of 1 3/4" CDS, again to support the engine, and stiffen the rear.
As for the price of springs, I'm pretty sure mine were cheaper than Demon Tweaks. They were from the same company that supplies the Gaz shocks to the kit-car market. I'll try and remember the company name, and post a link.........
This is the company:
Dampertech
+44 (0)1709 703 992
Brampton-En-Le-Morthen, Rotherham, UK
www.dampertech.co.uk
sales@dampertech.co.uk
The base settings I've had recommended to me are:
Front
Toe in of 0.25 deg
Camber -0.25 deg
Rear
Toe - 0 deg to 0.25 deg toe in
Camber -0.25deg
Do you have any idea how much caster the Marlin runs as standard, with approx -0.25deg camber? My new arms are set at 4.5 deg.
|
5th August 2008, 17:35
|
|
Senior Member
Enthusiast
|
|
Join Date: Nov 2005
Location: Cheshire
Posts: 404
|
|
Neg toe in on the front?...shouldn't this be toe out?
...as for the castor...the 4 wheel alignment report I had done said mine was running at 4 deg 40' left and 4 deg 46' right....so pretty cloes to yours.
Rich
|
6th August 2008, 16:59
|
 |
Senior Member
Enthusiast
|
|
Join Date: Nov 2007
Location: Somerset
Posts: 232
|
|
When it all shakes down it all depends what you want to do with the car.
I want a reliable road car that gives me a thrill on the track occasionally.
I would like to let loose TD on my car and it may be worth the added % for the work that John has had done to get a car that handles properly and operated consistently in all weathers.
Just messing with the springs and the tracking is just that messing, if you need to toe in the rear to make it work the car is wrong, believe it, its just beyond messing.
Think of a number you are prepared to spend and talk to TD and ask what they can do for that budget, you may be surprised what you can do for 10% of the original spend. If you can weld really well there is the option for the design and components to be supplied and final set up for instance.
Is 10% too much? Does not sound too much to me to have a better track day car, road use should not matter if you adhere to the limits. Okay I withdraw that bit perhaps.
Option-in a front ARB and leave the springs soft because you then can, it will be better on the bumpy British roads, and make the rear work better with the budget you have, making the track day better.
Anything else is guess work and may not actually improve the handling that you need for the track and the fun days.
Your choice in the end.
JohnC
|
6th August 2008, 18:38
|
|
Senior Member
Enthusiast
|
|
Join Date: Nov 2005
Location: Cheshire
Posts: 404
|
|

Hi John,
Kind of agree and not....
Yes...if the cars geometry and dimensions were right in the first place then the springs and toe settings would not make much difference as the overall quality of geometry / chassis would compensate for the minor errors on track, toe, etc...
...but, as the car is too wide for its length (or too short for its width!) ....and the chassis is too flexy at the back....and the bumpsteer is wrong at the back....and the geometry of the susp pick ups etc is not the best.......then some of these issues need to be put right to help the handling.
John Dry's option is probably the best as it solves all of the issues...but a bit too drastic and dear for me (I aint spending more than £150!)
...so I reckoned by improving sme of the issues...i.e. the rear stiffness, rear and front bumpsteer and firming up the front (so that ride height isn't too low when me and passenger are in the car) will help.
Couple this with better alignment of the wheels and it's gotv to be better.
..as for the toe settings....following the Lotus Elise settings basically...if it's good enough for Lotus...it'll do for me.
I'll let you know the verdict!
ATB
Rich
|
6th August 2008, 18:52
|
|
Senior Member
Enthusiast
|
|
Join Date: Jul 2005
Location: Dorset
Posts: 1,180
|
|
"John Dry's option is probably the best as it solves all of the issues..."
To be confirmed!  |
13th August 2008, 16:32
|
|
Senior Member
Enthusiast
|
|
Join Date: Nov 2005
Location: Cheshire
Posts: 404
|
|
Update on suspension set up...
Fitted the new springs to the front and these seem much stiffer than the old ones...also set the bumpsteer to 'minimum'...couldn't believe how much bumpsteer I was getting before adjusting.
Then turned the car around and have started on the rear. Manufacturing a box section brace bar to brace between the rear lower suspension pivot points (will post pics when done)...
As for the rear bumpsteer.....chronic amounts!! Decided best way forward without buying new suspension is to replace the marlin rear track control rod with a left/right thread machined adjuster with rod ends on each end....I can then set the pivot height at the hub to be exactly the same as the top susp joint. Again, I'll post some pics when done and let you know the verdict.
Total est cost (inc springs) - £200
Rich
|
17th August 2008, 17:49
|
|
Senior Member
Enthusiast
|
|
Join Date: Nov 2005
Location: Cheshire
Posts: 404
|
|

Ok....so I've finished stage one of the mods:-
1) New front springs, minimise bumpsteer by resetting arms.
2) Brace rear chassis across lower suspension points, remove track control arms and replace with rose jointed adjustables.
Photos coming shortly.
Then, had the tracking adjusted.....that was interesting......my car has 3mm of setback on the front wheels and 9mm on the rear (basically this means that the wheels aren't in line across the car and I hyave a wheel base difference of 6mm across the sides. General sources reckon 6mm of setback is OK...but when you've got a car as twitchy as an Exi every little bit of error matters....and when the tracking is set to zero...it isn't actually because of the setback.....
Anyway, lots of tweaks and resetting and I'm now running:-
150mm ride height front and rear.
Damping - 8 clicks from soft on front, 7 on back.
Front camber - 0.25 deg neg
Rear camber - 0.5 deg neg
Rear toe in - 3mm
Front toe out - 1mm
Total cost:- £165 ~(including tracking adjust)
VERDICT:- loads better than before. The new rose jointed arms have eliminated the bumpsteer at the back and this helps a lot on the bumpy roads. The stiffer front springs have helped the turn in and reducing the front bumpsteer has helped also. Rear brace seems to have helped as well....the 'whooooh' moment that I used to get when throttling back at 70 and braking has just about gone....possibly might brace the top suspension pivots from the bottom brace. Don't get me wrong....it still aint a Lotus...but I feel a lot safer!
Rich
|
17th August 2008, 18:32
|
|
Senior Member
Enthusiast
|
|
Join Date: Nov 2005
Location: Tyne and wear
Posts: 784
|
|
Quote:
Originally Posted by bigrich

Rear brace seems to have helped as well....the 'whooooh' moment that I used to get when throttling back at 70 and braking has just about gone....
Rich
|
Interesting comments Rich! I have only done about 120 miles in mine and it's not setup but backing of the throttle at anything over 65 ish is a complete no no for me as very very nearly crashed the first time I did it!! rear end felt like it was on ice. I certainly at the moment could not drive the car over 70 ish safely!
So going to have to do something quick as hopefully it will be on the road in the next 6 weeks! Can anyone comfirm that the marlin phase 2 rear suspension COMPLETELY eliminates this as it's a lot to fork out otherwise?? |
17th August 2008, 19:16
|
|
Senior Member
Enthusiast
|
|
Join Date: Jul 2005
Location: Dorset
Posts: 1,180
|
|
Rich, did you try flexing the chassis 'rails' by hand, before and after the brace was installed? It's quite alarming how easily they can be displaced by hand!
It's good to see you're taking on the task of resolving some of the fundemental issues with the car. Are you going to put up a shopping list of parts, so others car sort the rear bump steer?
Theoretically, as the Marlin new rear upright uses identical ball joints, connected to a common top arm, the bump steer should be sorted.
|
17th August 2008, 19:16
|
|
Senior Member
Enthusiast
|
|
Join Date: Nov 2005
Location: Cheshire
Posts: 404
|
|
Pictures
1st picture shows CDS box section brace - drilled 11mm holes and used longer susp pivot bolts. Rock Solid.
2nd and 3rd pictures show the new rose jointed track control arm - again used longer pivot bolts for suspension.
|
18th August 2008, 20:26
|
|
Senior Member
Enthusiast
|
|
Join Date: Jul 2005
Location: Dorset
Posts: 1,180
|
|
Rich, I can't see the pictures, but is the rear box section going between the suspension clevaces? Is the box effetively pin jointed at each end?
|
19th August 2008, 18:02
|
|
Senior Member
Enthusiast
|
|
Join Date: Nov 2005
Location: Cheshire
Posts: 404
|
|
Yes...basically used the pivot pins for the lower susp arm to bolt on the bracket. I was concerned that the brace may allow for pivot about these pins but it's rock solid...although will probably brace (triangulate) from this bottom bar to the top pivot points as well.
I have a theory on the 'throttle lift off rear snaking'.....I think that the kick back from the engine is transferring inertia to the chassis lower rail. As only one of the lower rails is connected to the engine stabiliser arm then this turns into a sideways thrust effectively.
If I did away with this mount and put a mount centrally on the lower brace to evenly distribute the engine kick back would this help?
Comments..
Rich
|
19th August 2008, 18:34
|
|
Senior Member
Enthusiast
|
|
Join Date: Jul 2005
Location: Dorset
Posts: 1,180
|
|
My engine was mounted (and is still similarly mounted), with a mount on the front just to the engine side of the bellhousing, again on the back on the engine side of the bellhousing, and then at either end of the engine/gearbox roughly along the crank-line of the engine (but higher up). Pretty symetrical, and the engine tended to rotate about the lateral mounts, with negligible rotation about the vertical axis.
My car with this mount arrangement, caused serious heart in mouth moments when backing off suddenly.
My theory is the jacking, bumpsteer, and toe-stiffness are intrinisically linked, and thus if you induce one phenomenom you can't help but induce another, and they work in a sort of harmonic fashion.
I would guess your remedial work has almost nailed the bumpsteer (it's going to hard to get it perfect?), the toe stiffness is better (rear brace), but not totally removed due to the pin-jointing and the camber / toe pick ups on the hub still being pretty close. The jacking is still there as that's impossible to correct without changing inboard pickups.
|
25th August 2008, 18:56
|
|
Senior Member
Enthusiast
|
|
Join Date: Nov 2005
Location: Tyne and wear
Posts: 784
|
|
Rich, very interested in this if it works! any updates?
Also any chance of hosting the pics? if you mail me them I will put them up?
Craig
|
29th August 2008, 18:20
|
|
Senior Member
Enthusiast
|
|
Join Date: Nov 2005
Location: Cheshire
Posts: 404
|
|
Oh Bo***x,
Back end sway is back (but lot less than before)...just jacked up the back and there is very slight play in my rose joints.....But given the short distance between them and the top ball joint this is giving rise to slight wheel movement...bit like 4 wheel steering, but not!
....so, back to the drawing board...I like the design, just need some zero play joints.
Any ideas?
...Just found 'rodobal rod ends'...zero play for motorsport applications...anyone know a stockist??
Rich
|
29th August 2008, 18:58
|
|
Senior Member
Enthusiast
|
|
Join Date: Jul 2005
Location: Dorset
Posts: 1,180
|
|
try merlin motorsport
|
3rd October 2008, 21:33
|
|
Senior Member
Enthusiast
|
|
Join Date: Nov 2005
Location: Cheshire
Posts: 404
|
|
 Improved rear end set up
OK....got some new rod ends for the rear suspension. Aurora ptfe lined 3 piece rod ends. No play and look like good quality stuff £140 for 4.
Fitted them and redone the tracking ......awesome!!
All the way to 70+mph and no adverse sway or directon change when backing off the throttle. Goes in a straight line and is predictable on the bends. Nice throttle off oversteer on roundabouts that can be balanced easily with the gas pedal.
Have set front track to parallel and rear 3mm toe in overall.....could probably live with less rear toe in to reduce the lift off oversteer...but not really an issue.
Did the 4 wheel tracking myself using the method below. Well worth doing and in my opinion is the only way that has worked for this car...as it gives true toe in / out for each wheel against a good datum. Trouble I've found with autocentre gauges is that they assume there is no setback on the wheels...and as these cars are handbuilt this isn't the case...therefore giving you false readings on the gauges....
http://elantragtclub.tripod.com/elantra/id554.html
Smiling again.
Rich
|
4th October 2008, 21:30
|
|
Senior Member
Enthusiast
|
|
Join Date: Jul 2005
Location: Dorset
Posts: 1,180
|
|
Rich,
Good to hear you've made some progress.
I don't know if it is of any use to you, but my technique for aligning the wheels is to set my toe (with a dunlop gauge). I then place a laser level against the outside of a wheel on the axle I'm aligning, and aim it at a set square mounted against the front/rear wheel on the side I'm currently working on. I measure the distance the laser spot hits hits the set square at from the tyre edge, and then move to the other side of the car and repeat. Once I have measured both distances, I take the combined distance, divide it by two, and set the toe equal across the axle. It's worked for me, and my steering wheel is always level.
The other benefit is it's a pretty quick process.
John.
|
|
Currently Active Users Viewing This Thread: 1 (0 members and 1 guests)
|
|
|
 Posting Rules
|
You may not post new threads
You may not post replies
You may not post attachments
You may not edit your posts
HTML code is Off
|
|
|
All times are GMT +0. The time now is 10:17.
|


 Linear Mode

