|
|
| Vintage and Classic Roadster Kit Car Builds For Vintage and Classic era kit cars. Post your build reports, problems and progress here |

12th April 2020, 07:39
|
|
Senior Member
|
|
Join Date: Nov 2012
Posts: 845
|
|
 Cracking On
The last few days I've been addressing the 1001 small five minute (Ha Ha) jobs that are outstanding. Clutch and brake bleeding help has been unavailable as the lure of Overwatch et al seems irresistible during quarantining. I fitted the brake light switch to its bracket on the pedal box, having had to order the retaining nut. It operated correctly with no adjustment needed first time. Miracle!
I then had a play with the upright section of the seat. It was a massive fiddle to manoeuvre into position, negating my wanting to use the space behind as a handy luggage/shopping etc. area. After the usual head scratching, I decided to remake it in halves. Off with the vinyl (so many staples!) and out with the saw, job done. I then decided that the driver's side should be fixed in position and the other, access side, just sitting. I then offered up the vinyl but it's not big enough to cover the new reveals down the join. Scanning what's available on Ebay, I bought more, this time heavy duty in dark brown which I thought would complement the look better than black.
I then turned my attention to the rear view mirror mounting problem. The rear deck is much higher than the scuttle so, without a windscreen on which to mount it, some sort of pedestal would be required. After gauging the height needed using a long batten and spirit level I decided on a 3mm thick ally bracket braced with the remains of the stainless rod I'd used for mounting the one on the A352. Lots of back and forth, bending; drilling; thread cutting; trial fitting and, finally, polishing and the job was done. Having a sit in to view the back wall of the cave in my handiwork I decided to fit the 'wing' mirror. Locating it as near as possible to maximise the field of view, and fine tuning the angle with it held on by the front stud only, the job was soon done. Both these mirrors are Beaulieu Autojumble purchases, the second still marked in black felt tip with the original and knocked down prices. Also visible below are the Mille Miglia and Quadrifoglio stickers that have been patiently waiting their day in my Monaco folder.

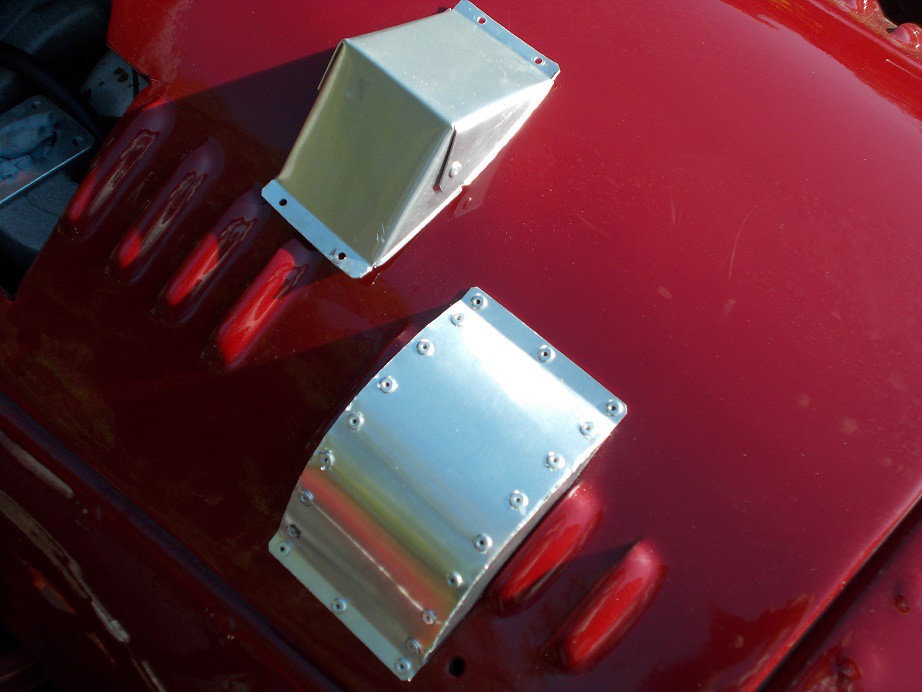
Yesterday's final effort was to remake the ally bulge over the radiator cap, which protrudes through the bonnet. I decided against the angular folded style of my first effort - the result to be revealed  . .
This picture appeared this morning on my Moss Owners' FB feed. It's Fiat Twin Cam powered on '66 MkII Spitfire underpinnings. Nice!

Off to do battle down the sunny cave now .
Regards, Mick

|
12th April 2020, 09:28
|
 |
Senior Member
Enthusiast
|
|
Join Date: Mar 2005
Posts: 3,079
|
|
Quote:
Originally Posted by Mick O'Malley

The last few days I've been addressing the 1001 small five minute (Ha Ha) jobs that are outstanding.
|
That made me laugh this morning, but you are so right. Nice work on that central mirror plinth, looks just right for the car.  |
13th April 2020, 07:32
|
|
Senior Member
|
|
Join Date: Nov 2012
Posts: 845
|
|
 Yesterday's Efforts
First job in the cave yesterday was to rivet on the MkII radiator filler cap bulge. I'd passed on doing it the previous afternoon as I know how good I am at cocking things up when I'm tired. I'm reasonably satisfied by the result, especially when comparing it to its predecessor.
I then decided to fill and bleed the clutch hydraulics as my live-in son was available. With the off side jacked up and an axle stand in place, I could just about worm my way underneath. I softened the end of the bleeding tube  in very hot water and worked it over the nipple, which I'd fitted in the upper of the two tappings on the cylinder so that gravity would assist in purging air. Not that easy with the copper pipe in the way. I'd given both end nuts a final tighten as I'd not made up hydraulic pipe before, and was unsure if my flares would be OK. Five minutes with my son sat in the car and we had a pedal, and no leaks . The down side? After three years the driven plate isn't releasing, but, if experience is anything to go by, it'll free itself after the engine heat's done its bit a few times. in very hot water and worked it over the nipple, which I'd fitted in the upper of the two tappings on the cylinder so that gravity would assist in purging air. Not that easy with the copper pipe in the way. I'd given both end nuts a final tighten as I'd not made up hydraulic pipe before, and was unsure if my flares would be OK. Five minutes with my son sat in the car and we had a pedal, and no leaks . The down side? After three years the driven plate isn't releasing, but, if experience is anything to go by, it'll free itself after the engine heat's done its bit a few times.
I then dug out the last of the 1"x1"x1/8" aluminium angle I'd scavenged when the pet supplies shop around the corner closed - it was the surround of its sign. I cut and cleaned two suitable lengths and Sikaflexed them to the floor to prevent the seat squabs from moving forwards. I'd done this on my Marlin to good effect. The heat in the cave was now tropical so I called it a day.
I'm a member of the 'Homebuilt Cars From Scratch Or Kits' group on FB and my hero, one Howard Baker, yesterday posted his latest sublime efforts towards his scratch built Auto Union C Type evocation. Another of his followers posted this video which had me itching to get down the cave and crack on. Skip to 1.56 to get to the highly inspirational meat - max volume and cans required .
Regards, Mick
Last edited by Mick O'Malley; 15th April 2020 at 07:54..
Reason: Typo.
|
|
Currently Active Users Viewing This Thread: 349 (0 members and 349 guests)
|
|
|
 Posting Rules
|
You may not post new threads
You may not post replies
You may not post attachments
You may not edit your posts
HTML code is Off
|
|
|
All times are GMT +0. The time now is 05:03.
|


 Hybrid Mode
