|
|
| Sammio Builds and discussions Sammio bodied car builds and specials |

10th December 2018, 21:55
|
|
Member
|
|
Join Date: Nov 2017
Location: Pudsey Leeds West Yorkshire
Posts: 86
|
|
For me it’s the gapping of the panels and there shape that I am concentrating on. As you can’t see both sides of the car at the same time. I was also pointed out by some body shop guys that many 1950s and some 1960s cars weren’t the same size panels on both sides including a Italian prancing horse.
|

12th December 2018, 18:53
|
 |
Senior Member
|
|
Join Date: Feb 2012
Location: Wembley, London
Posts: 5,069
|
|
Chris - This is quite a tricky one to answer.
On the one hand, most people will not notice the imperfections in the first place.
(Especially when all the body work is one colour.)
On the other hand, if it really bothers you now, it is likely to still bother you going forward.
In the end, I made my peace with the fact that I just couldn't achieve a profession standard of bodywork on my build. 
That is not to say I didn't spend a LOT of time trying to get everything as good as I possibly could.
But in the end, it came down to me wanting to get the car on the road more than spending even longer trying to achieve perfection.
Whilst I can still point out every fault that I didn't fix, there is no need to as no one else cares. 
As always, your car, your choice.
Good luck, Paul. 
|

16th December 2018, 11:20
|
 |
Senior Member
|
|
Join Date: May 2011
Location: Somerset
Posts: 1,671
|
|
Straigt lines.... Sammio.... 
Sorry, no offence meant, but given that i built one and i've been in the same position as you, i know what you're going through and all the best of luck with whatever you do!
Straight lines... classic! |

16th December 2018, 17:51
|
|
Senior Member
|
|
Join Date: Jul 2011
Location: Hampshire
Posts: 146
|
|
None taken davecymru.
I guess my question was really about whether my bonnet is 'good enough'. I am very happy to follow the sammio collective on this.
Thanks again all.
|

21st December 2018, 06:36
|
 |
Senior Member
|
|
Join Date: Feb 2012
Location: Wembley, London
Posts: 5,069
|
|
Quote:
Originally Posted by cbjroms

… I guess my question was really about whether my bonnet is 'good enough'…
|
In that case, I’d suggest a quick coat of etch primer to cover all the body work you have done so far.
Then, when the whole front end is a single colour, your eyes will be drawn to any areas that look ‘wrong’.
I know my own patchwork quilt of original car, new fibreglass and body filler looked worst than it was before paint.
Good luck, Paul.  |

14th February 2019, 14:30
|
|
Senior Member
|
|
Join Date: Jul 2011
Location: Hampshire
Posts: 146
|
|
Another question on bodywork. What is the quickest, easiest and cheapest way to build-up the glass fibe bodywork? I have areas that I want to build-up by 20mm and given they are quite large this will require alot of body filler. Not sure how strong a thick layer of filler will be. So wondering about using some bits of the Sammio that I have cut-off (oops - hope none of them were important!!) cutting them into rectangles, sticking them to the panel and putting filler around. Any thoughts?
|

14th February 2019, 19:33
|
|
Senior Member
|
|
Join Date: Jun 2015
Posts: 1,401
|
|
Quote:
Originally Posted by cbjroms

Another question on bodywork. What is the quickest, easiest and cheapest way to build-up the glass fibe bodywork? I have areas that I want to build-up by 20mm and given they are quite large this will require alot of body filler. Not sure how strong a thick layer of filler will be. So wondering about using some bits of the Sammio that I have cut-off (oops - hope none of them were important!!) cutting them into rectangles, sticking them to the panel and putting filler around. Any thoughts?
|
I'm afraid that will not be structural. Some 'glass matting (three layers), a bit of glass fiber reinforced filler, and at least two more layers of 'glass matting to hold it all together may just do it. |

15th February 2019, 05:35
|
 |
Senior Member
|
|
Join Date: Feb 2012
Location: Wembley, London
Posts: 5,069
|
|
CJ – I’d also suggest following Molleur’s advice about building up the thickness with fibreglass matting.
- - - - - - - - - - - - - - - - - - - - - - - - - - - - - - -
Given how rough my car is in places, feel free to ignore what I did when building my scuttle. 
As I made some ‘Home Brew’ filler, that started with some scraps of fibreglass matting.

Then resin and catalyst are added as normal.

This created a rough sea of fibreglass.
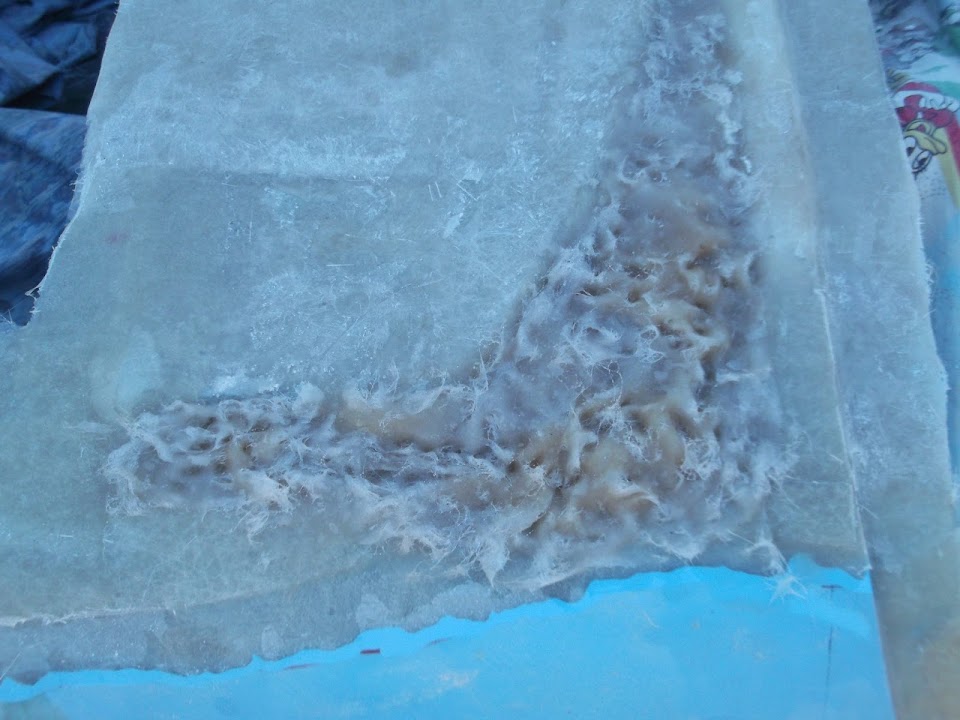
Before an angle grinder removed the peaks and left a series of voids.
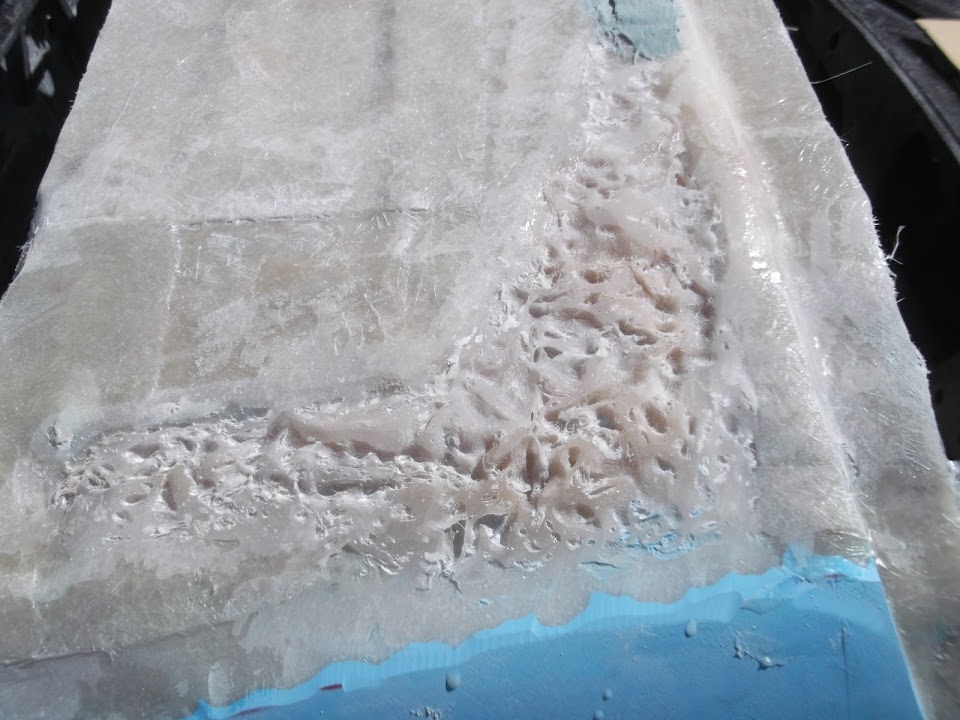
Which acted as a good key for the ‘normal’ fibreglass filler.

- - - - - - - - - - - - - - - - - - - - - - - - - - - - - - -
Good luck, Paul. 
|

16th February 2019, 06:44
|
 |
Senior Member
|
|
Join Date: Feb 2012
Location: Wembley, London
Posts: 5,069
|
|
CJ – I had some more thoughts on your options…
Quote:
Originally Posted by cbjroms

… cutting them into rectangles, sticking them to the panel and putting filler around…
|
If you stick/bond them to the panel you could then add layers of fibreglass matting over them instead.
I did this on several occasions using rope to cross brace my bonnet and boot lid.


In fact, for my new scuttle, I even used plastic trunking and plasticine to give me a shape to work with.


Before adding layers of matting over the top.

Note: This created the void where I stuffed my home brew fibreglass filler in (see previous post).
Good luck, Paul. 
|

16th February 2019, 11:57
|
|
Senior Member
|
|
Join Date: Jul 2011
Location: Hampshire
Posts: 146
|
|
Thanks guys for the advice.
Paul, as always, you are so generous with your helpful ideas.
|

16th February 2019, 16:25
|
|
Senior Member
|
|
Join Date: Jul 2011
Location: Hampshire
Posts: 146
|
|
Just had another thought.
On the scuttle I have an area where I have put a a couple of layers of matt covered by 10mm skin of filler.
Given the advice above, do I need to sand off that 10mm layer or can I get away with putting more matt on top?
|

17th February 2019, 06:55
|
 |
Senior Member
|
|
Join Date: Feb 2012
Location: Wembley, London
Posts: 5,069
|
|
As always, take my advice with a pinch of salt...
But I'd say it depends...
If the filler area was small and the matting was going to cover the filler area completely and 'stick' to fibreglass beyond the outside edges of the filler, it might be OK.
But if the filler area was large and the matting small, so it was solely on the filler, then maybe not so much.
|

18th February 2019, 19:19
|
|
Senior Member
|
|
Join Date: Jul 2011
Location: Hampshire
Posts: 146
|
|
Paul
Just noticed that CFS sell bags of schopped strands. £24.14 for 5kg bag.
Looks like another of your techniques that I will be copying. Just got to cut away the filler that I have wasted first.
|

19th February 2019, 18:12
|
|
Senior Member
|
|
Join Date: Jul 2011
Location: Hampshire
Posts: 146
|
|
Thought about the 5kg bags of chopped strands overnight and realised that 5kg of chopped strand mat costs less than £5!
Anyway, out with the angle grinder this afternoon and removed the 5kg of body filler that I had used to try and build out the off-side/front of the main tub. Then I ran some strings along the side of the tub at various heights and confirmed that the lines of the near-side of the tub are pretty straight - lets say 'Sammio' straight. Whereas there is a definite gap to be filled-in (as shown below) on the offside.
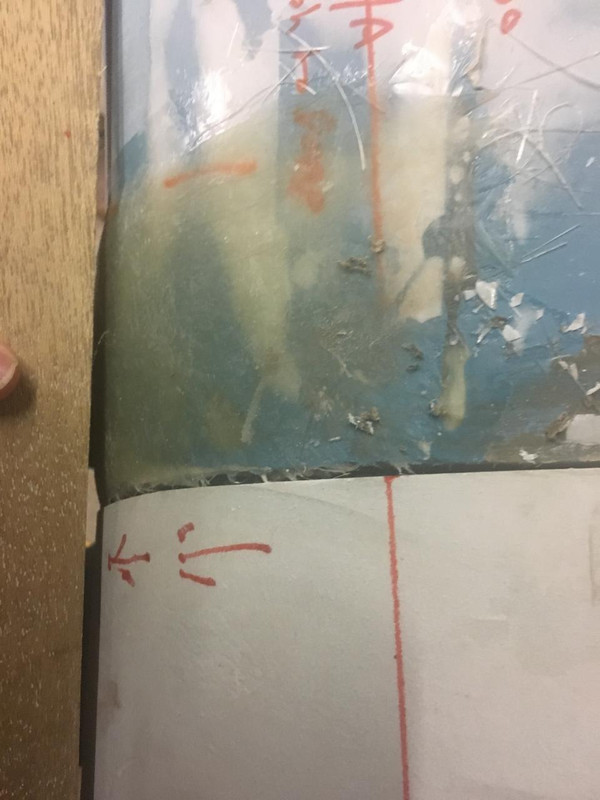 .
In fact this photo under-eggs the gap because the piece of wood is only about 18" long. Running the string along the side of the cockpit shows the gap to be more like 10mm + as per below.
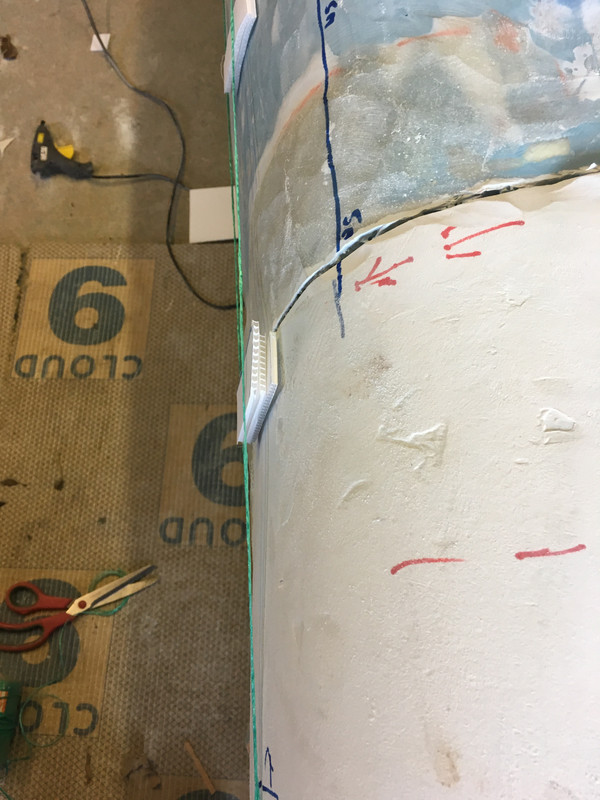
So having ground-off the filler I spent the rest of the afternoon put a number of layers of mat to build-up the area between my 2 x correx spacers. |

20th February 2019, 17:00
|
 |
Senior Member
|
|
Join Date: Feb 2012
Location: Wembley, London
Posts: 5,069
|
|
As long as you are happy with the final shape that is all that matters.
Good luck, Paul.  |

17th March 2019, 13:16
|
|
Senior Member
|
|
Join Date: Jul 2011
Location: Hampshire
Posts: 146
|
|
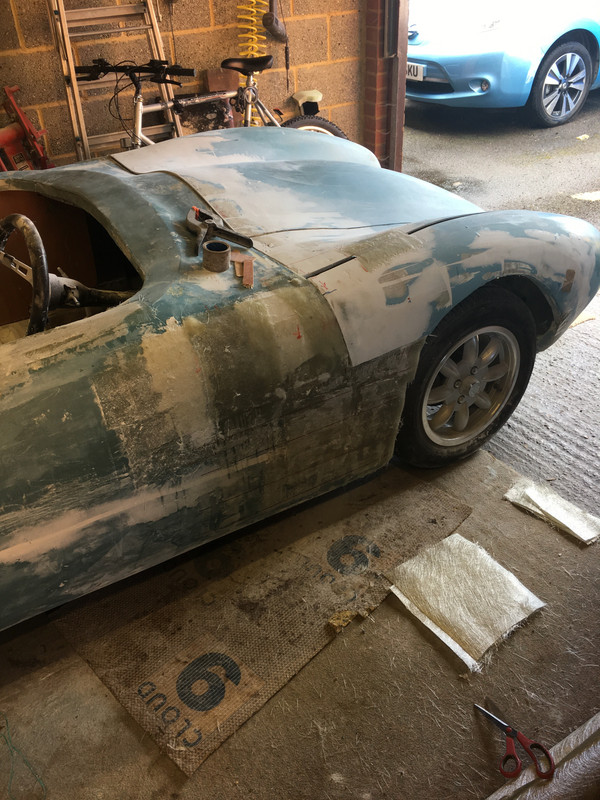
So, at last I am getting a shape that I am happy with.
 |

17th March 2019, 16:35
|
|
Member
|
|
Join Date: Nov 2017
Location: Pudsey Leeds West Yorkshire
Posts: 86
|
|
I like your approach to bodywork detail I also have had fiberglass work on the arches I am also on my second attempt but the time spent now will pay off in the end result or so I am told. Yours is look well Dave
|

26th March 2019, 15:32
|
 |
Senior Member
|
|
Join Date: Feb 2012
Location: Wembley, London
Posts: 5,069
|
|
Quote:
Originally Posted by cbjroms

... I am getting a shape that I am happy with...
|
Which is the main thing.  |

8th May 2019, 19:51
|
|
Senior Member
|
|
Join Date: Jul 2011
Location: Hampshire
Posts: 146
|
|
Still pressing-on.
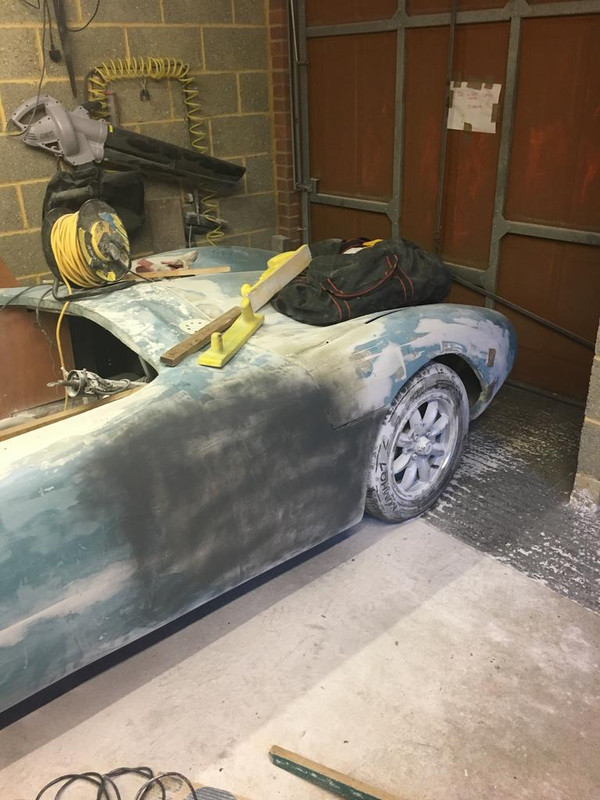

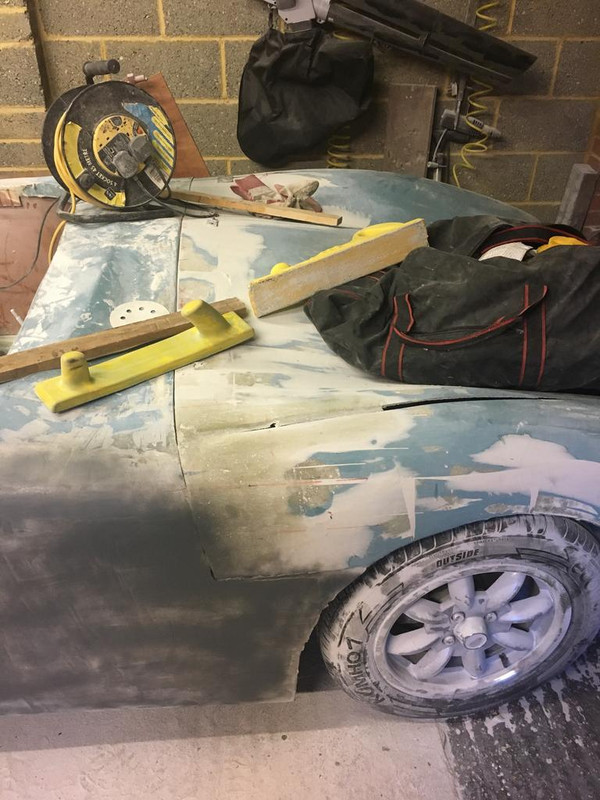
The shape is there but still working at getting it flat and smooth.
At what stage should I move from using bonding paste to fill holes to using bidy filler? Bonding paste is hard work to rub down and I feel that the cycle seems to be add paste, remove paste then add more paste and repeat!! Anybody got any tips? |

9th May 2019, 06:29
|
 |
Senior Member
|
|
Join Date: Jul 2011
Posts: 5,328
|
|
Try fibreglass reinforced filler for larger gaps/holes with standard filler over the top once it's set and been roughly sanded.
It's not as easy to use as ordinary filler as the fibre strands mean it clings to itself and doesn't spread out very easily, but it'll fill voids without cracking later on.
Nice to see it's still being built, keep up the good work!
|
|
Currently Active Users Viewing This Thread: 3 (0 members and 3 guests)
|
|
|
 Posting Rules
|
You may not post new threads
You may not post replies
You may not post attachments
You may not edit your posts
HTML code is Off
|
|
|
All times are GMT +0. The time now is 23:33.
|