|
|
| Vintage and Classic Roadster Kit Car Builds For Vintage and Classic era kit cars. Post your build reports, problems and progress here |

18th January 2013, 12:58
|
 |
Senior Member
Enthusiast
|
|
Join Date: Mar 2005
Posts: 3,079
|
|
Quote:
Originally Posted by garyh

So, will it be one of these above? Or have you come up with a different combination?
|
It'll be on steel wheels or or maybe wires, but the colour options are still wide open.
I hope to see some finished cars at shows this year before making up my mind. |
23rd January 2013, 15:56
|
|
Senior Member
Enthusiast
|
|
Join Date: Mar 2005
Posts: 3,079
|
|

Week 21 update......
After finishing the painting last week meant that I could get back to spannering and start bolting bits back together. 
First up was refitting the rear beam followed by the two trailing arms and (temporarily) the shock absorbers.
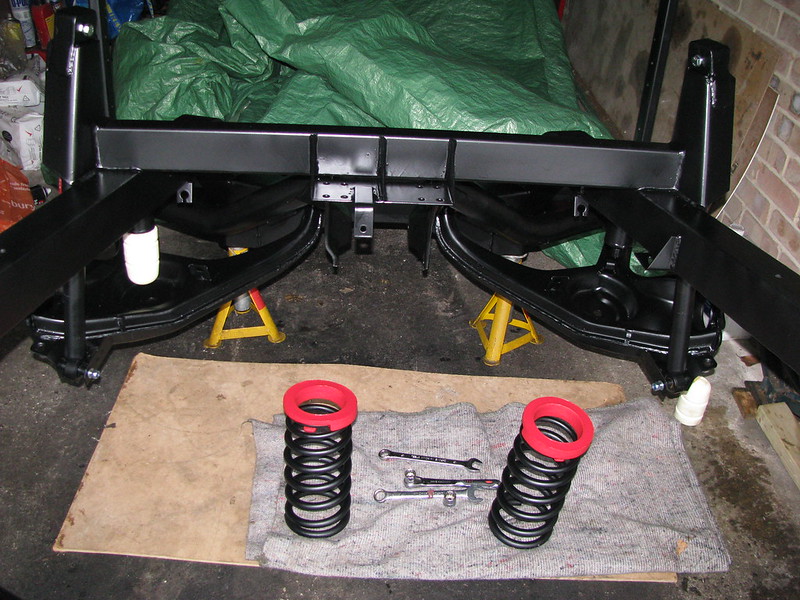 Rear beam and trailing arms
 by marlinpeter, on Flickr
The rear bump stops are as rare as 'hens teeth'.
Unfortunately, the shocks that came with the kit were for a Granada and the wrong length for the Sabre, so I decided to try these Japanese KYB shock absorbers.
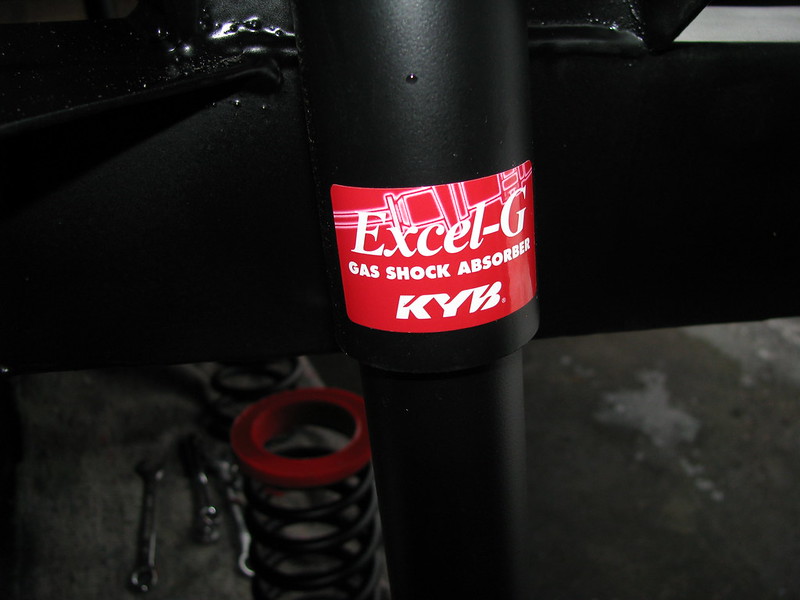 Shock absorbers
 by marlinpeter, on Flickr
After a trial fit of the rear beam, it became clear that I needed the top part of the bush.
 Rear beam poly bush
 by marlinpeter, on Flickr
 Rear beam poly bush
 by marlinpeter, on Flickr
View from below. The smaller bolts are 7/16 inch UNF but I have no idea why.
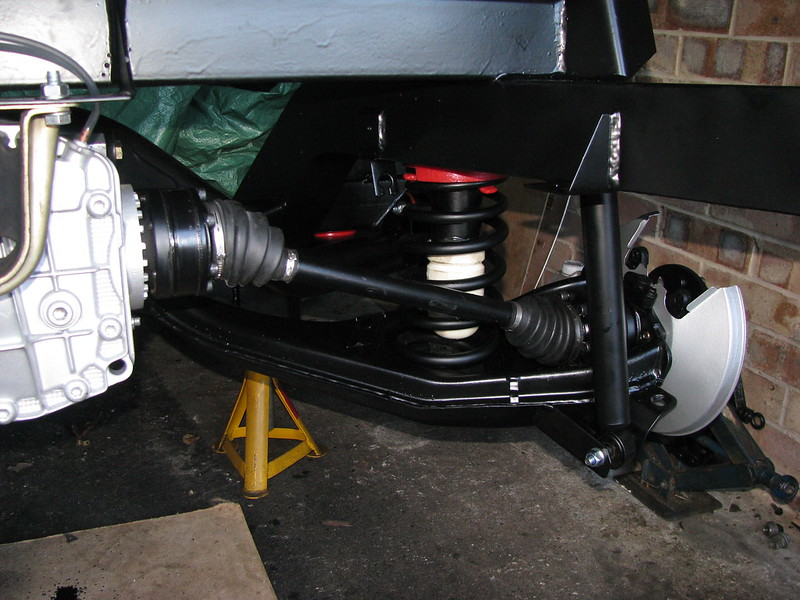
Rear hubs have been refurbished with new bearings and grease seals.
 Rear hubs fitted
 by marlinpeter, on Flickr
I've fitted the differential/final drive but the bad news was that the Floflex mount didn't fit so I've put the Ford part back.
 Final Drive fitted
 by marlinpeter, on Flickr
Next up will be the rear springs, half shafts and then a quick go round with the torque wrench before putting the rear wheels back on.
........peter

|
17th January 2013, 15:46
|
|
Senior Member
|
|
Join Date: Jun 2011
Location: birchington, kent
Posts: 1,769
|
|
I agree, the alloys don't do anything for it.
|
23rd January 2013, 16:21
|
 |
Senior Member
|
|
Join Date: Mar 2012
Posts: 294
|
|
Peter,
What a great re-build you are doing.
Well done
Can't wait to see this one on the road, I forget, has it been registered yet or needs IVA?
I have that joy this year 
Keep up the good work
Cheers
Steve |
23rd January 2013, 20:22
|
|
Senior Member
Enthusiast
|
|
Join Date: Mar 2005
Posts: 3,079
|
|
Quote:
Originally Posted by AcC8braman
Peter,
What a great re-build you are doing.
Well done
Can't wait to see this one on the road, I forget, has it been registered yet or needs IVA?
I have that joy this year
Keep up the good work
Cheers
Steve |
Thanks for the feedback.
A quick summary for you and anyone else joining the story late.....
The Royale Sabre Chassis was made in 1994 and the build presumably started shortly after. The car was upholstered in 1997 but the car was never finished or registered. The story I was told was that the guy building it didn't put any antifreeze in the cooling water which froze and split the engine block. After that he lost heart and never finished it. It then languished in garages or under tarpaulins until I bought it last August (2012).
So yes, it will now need IVA testing before I can register it.
Enjoy your IVA 
...peter |
24th January 2013, 19:55
|
 |
Senior Member
Enthusiast
|
|
Join Date: Feb 2005
Location: Hampshire
Posts: 2,497
|
|
Good stuff, it's looking great  |
24th January 2013, 21:18
|
|
Senior Member
Enthusiast
|
|
Join Date: Mar 2005
Posts: 3,079
|
|
Quote:
Originally Posted by Patrick
Good stuff, it's looking great |
Thanks, Patrick.It's certainly coming along nicely now but I can't wait to start playing with engines again |
30th January 2013, 16:17
|
|
Senior Member
Enthusiast
|
|
Join Date: Mar 2005
Posts: 3,079
|
|
Week 22 update.
This week I've refitted the rear springs and drive shafts.
 Rear springs and drive shafts
 by marlinpeter, on Flickr
Which means that I now have a rolling chassis again!
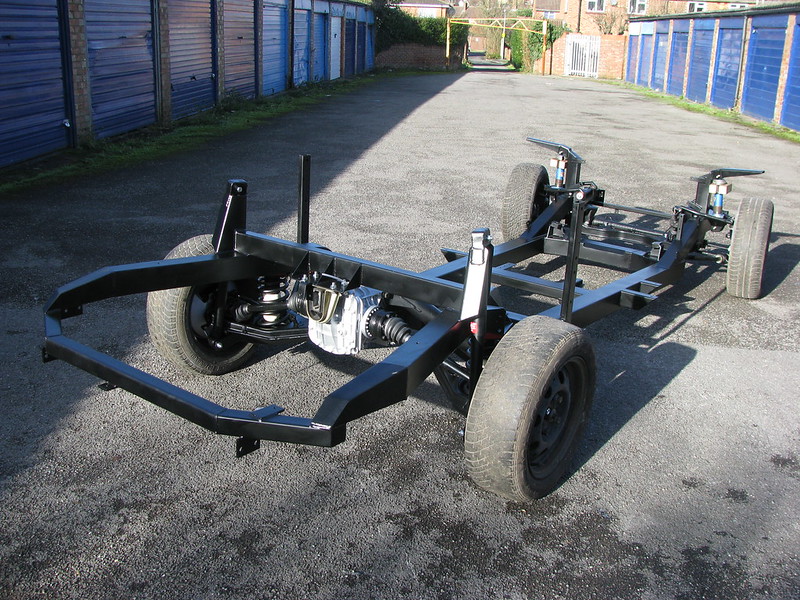 Rolling Chassis complete
 by marlinpeter, on Flickr
Now I can get back to engine fitting trials
........peter |
30th January 2013, 20:31
|
 |
Senior Member
|
|
Join Date: Nov 2011
Location: Emsworth
Posts: 810
|
|
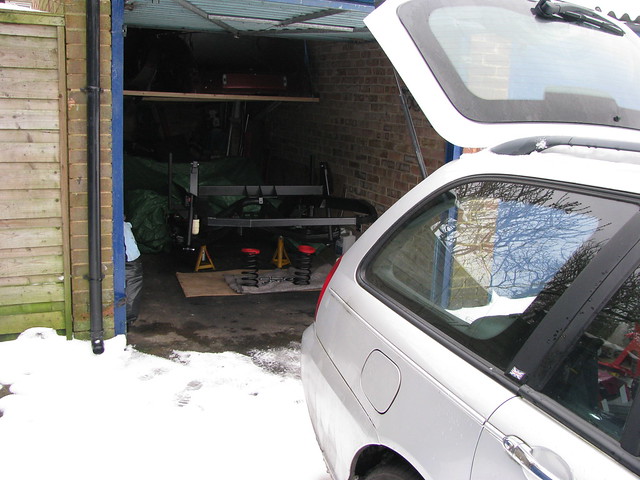
You are doing a blooming lovely job Peter. But I do have a major criticism. There was no evidence of any handbrake turns in the snow by your garage. Tut tut! Now you will have to wait until next year!!
|
31st January 2013, 08:20
|
|
Senior Member
Enthusiast
|
|
Join Date: Mar 2005
Posts: 3,079
|
|
Quote:
Originally Posted by seanick
There was no evidence of any handbrake turns in the snow by your garage. Tut tut! Now you will have to wait until next year!!
|
 |
31st January 2013, 19:02
|
|
Senior Member
Enthusiast
|
|
Join Date: Feb 2005
Location: Hampshire
Posts: 2,497
|
|
/\ he he (there is in my work car park   ) |
8th February 2013, 09:37
|
|
Senior Member
Enthusiast
|
|
Join Date: Mar 2005
Posts: 3,079
|
|
Week 23.
Sorry no pictures this week. I've been working on an issue with my front hub bearings but nothing new to see at the moment. 
....peter |
14th February 2013, 08:36
|
|
Senior Member
Enthusiast
|
|
Join Date: Mar 2005
Posts: 3,079
|
|
Week 24 update.....
And so on to the engine trial fitting....
The Royal Sabre chassis that I have, was designed to take the Ford 'Cologne' V6 engines. These engines are very heavy and relatively low power for their CC. They are also hard to come by in good condition and second hand ones on ebay can be a bit of a gamble. Other Sabre builders have used the Rover V8 engines but my preferred choice at present is the BMW M52 in the 2.8 variety. These make 190BHP in stock form and there are plenty of cars about to choose an engine from. If I can get an early 1995 model I might escape having to fit cats. The Sabre gearbox tunnel will likely need some modification but as this is made of fibreglass and not structural it should be relatively easy to modify.
The big question still to be answered is whether the M52B28 will fit and still have room for the brake servo due to its 30 degree slant mounting angle. I have a 'gash' M52 engine from a previous abandoned project that I'm going to use to see if it all fits before committing to the final engine.
So I first bolted together the gash engines sump, block and gearbox. I then rested this combo on a 10mm thick offcuts of MDF on the chassis crossmember. I need to get the engine as low as possible but still need some clearance for the engine to 'rock' under acceleration. I'm using very stiff Land Rover engine mounts so there shouldn't be much vertical deflection.
I then cobbled together a gearbox mount from a Marlin part and some old Ford parts to bring the engine block level.
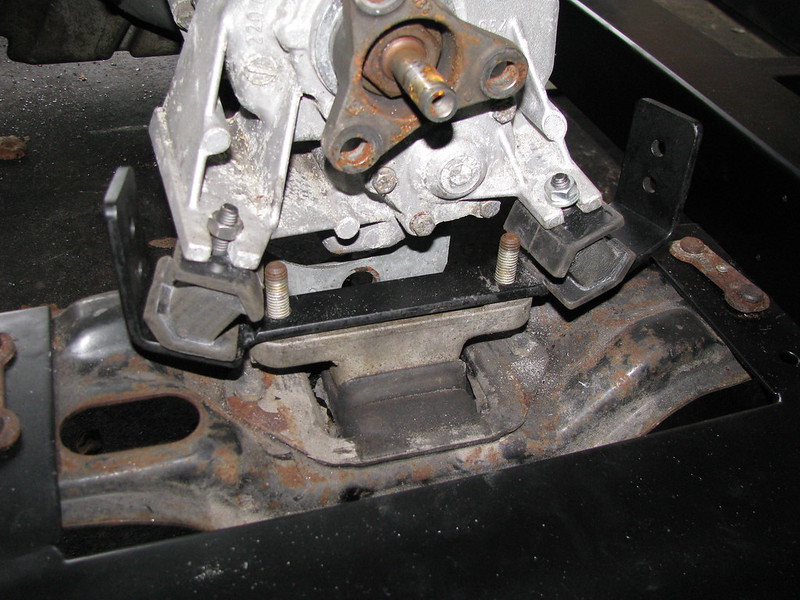 Engine fitting trials
 by marlinpeter, on Flickr
This combination created just the right height to get the engine block level. A more elegant mount will be made if this works.
(Since posting this picture on my Flickr site, Ian (Morris) has pointed ot that the BMW engines are mounted in their cars with the back of the engine sloppy down by about an inch, so I will experiment with dropping the back of the gearbox down further but I'm concerned about the propshaft working angle deltas.)
I then made up some 'stays' to hold the engine in the right position and at the right cant angle. Even without the cylinder head it tends to roll over if not supported.
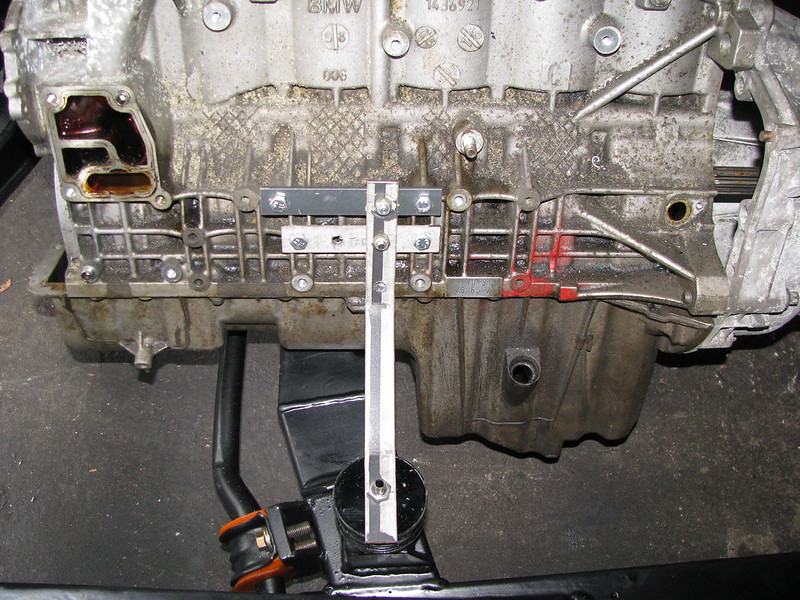 Engine fitting trials
 by marlinpeter, on Flickr
 Engine fitting trials
 by marlinpeter, on Flickr
The disposable stays are able to be adjusted fore and aft and sideways. Since taking this shot I've slotted the holes on the stay to the rubber mount so I can adjust the engine side to side.
 Engine fitting trials
 by marlinpeter, on Flickr
 Engine fitting trials
 by marlinpeter, on Flickr
Now I've got the engine in position, the next job will be to refit the body tub and see where I need clearance. That's a job for the weekend when my sons are around as it's a three man job!
I've also now swapped my Granada power steering rack track rods for the ones from the Sierra manual rack. This has given me the correct track width to adjust the front wheel toe-in correctly. The track rods have the same screw fitting inside the rack so it was an easy swap.
....peter
Last edited by peterux; 14th February 2013 at 08:41..
Reason: extra picture
|
14th February 2013, 12:30
|
 |
Senior Member
Enthusiast
|
|
Join Date: Sep 2004
Posts: 1,895
|
|
That's an interesting approach to sizing it all up. An "empty" block is going to be much easier to move about than a "full" one!
I was going to say that you have plenty of room in there - but then I remembered what the Sportster engine bay looked like at first before all the bits and bobs were bolted to the engine.
It will be interesting to see how it all fits one you have the body panels on, but I am guessing if they manage to squeeze a V8 in there you should be fine.
Must pop down and take a gander soon....
Cheers, Robin
|
14th February 2013, 15:47
|
|
Junior Member
|
|
Join Date: Feb 2013
Posts: 2
|
|
 Newbie
Hi Peter,
First off, it looks like you are doing an amazing job on this lovely motor.
Now to business. I have recently inherited an unfinished Sabre kit from my Dad. It has been sat as a rolling chassis for a few years now. I've yet to do a complete survey as to how it has held up, but at first glance it doesn't seem too bad.
I'm just wondering if you would mind answering my questions in the future as this will be my first build. I'm aiming to pick the car up in a little over a month and will be stripping it right back as you have done.
Any help from yourself and any others here would be greatly appreciated.
Cheers
Mark
|
14th February 2013, 15:54
|
|
Senior Member
Enthusiast
|
|
Join Date: Mar 2005
Posts: 3,079
|
|
Quote:
Originally Posted by MartinClan
That's an interesting approach to sizing it all up. An "empty" block is going to be much easier to move about than a "full" one!
I was going to say that you have plenty of room in there - but then I remembered what the Sportster engine bay looked like at first before all the bits and bobs were bolted to the engine.
It will be interesting to see how it all fits one you have the body panels on, but I am guessing if they manage to squeeze a V8 in there you should be fine.
Must pop down and take a gander soon....
Cheers, Robin
|
Hi Robin,
yes, assembling the engine bits 'in situ' is much easier as I can lift the alloy block without a crane but probably not advised for an engine you plan to use as you can see rust forming on the parts.
Your welcome to come have a look whenever you like....
...peter |
19th February 2013, 21:26
|
|
Senior Member
Enthusiast
|
|
Join Date: Feb 2005
Location: Hampshire
Posts: 2,497
|
|
awesome stuff I like that diff bush / mount system. |
19th February 2013, 21:50
|
|
Senior Member
Enthusiast
|
|
Join Date: Mar 2005
Posts: 3,079
|
|
Quote:
Originally Posted by Patrick
awesome stuff |
Yeah, but I've spent far too much time on the car this week. Pauline says that I've got OCD but I don't know what she is talking about |
19th February 2013, 22:17
|
|
Senior Member
Enthusiast
|
|
Join Date: Feb 2005
Location: Hampshire
Posts: 2,497
|
|
obsessive car disorder, I think that one goes around quite a bit  |
|
Currently Active Users Viewing This Thread: 2471 (0 members and 2471 guests)
|
|
|
 Posting Rules
|
You may not post new threads
You may not post replies
You may not post attachments
You may not edit your posts
HTML code is Off
|
|
|
All times are GMT +0. The time now is 12:24.
|


 Hybrid Mode
