|
|
| Vintage and Classic Roadster Kit Car Builds For Vintage and Classic era kit cars. Post your build reports, problems and progress here |

20th October 2014, 15:57
|
 |
Senior Member
Enthusiast
|
|
Join Date: Mar 2005
Posts: 3,079
|
|
Hi Amir,
that is an ingenious idea. I had not considered using the spaces under the front wings!
Do you have a particular servo in mind?
...peter
|
20th October 2014, 16:37
|
|
Member
|
|
Join Date: Jul 2014
Location: Ealing London
Posts: 54
|
|
Hi Peter,
The two Remote Servos were purchased from Powertrack Limited, Lockheed Servo Installation kit, I believe Part No: PT726798, at least this is what we have been invoiced. and the picture of one positioned under the wing is attached. IMG_3403.jpg
|
20th October 2014, 16:56
|
|
Member
|
|
Join Date: Jul 2014
Location: Ealing London
Posts: 54
|
|
Sorry, the picture was wrong one, I attach the right one, I hope. IMG_3404.jpg
|
23rd January 2015, 19:30
|
|
Senior Member
Enthusiast
|
|
Join Date: Mar 2005
Posts: 3,079
|
|
 The beginning of the end....
...or is it the end of the beginning?
Whatever, it's time to finish stripping down my donor car for the engine and ancillaries for my Royale Sabre build.
I thought it best to start underneath the car so raised it on axle stands and ran the engine for the last time to warm it up before draining the oil. I also disconnected and removed the battery for safety.
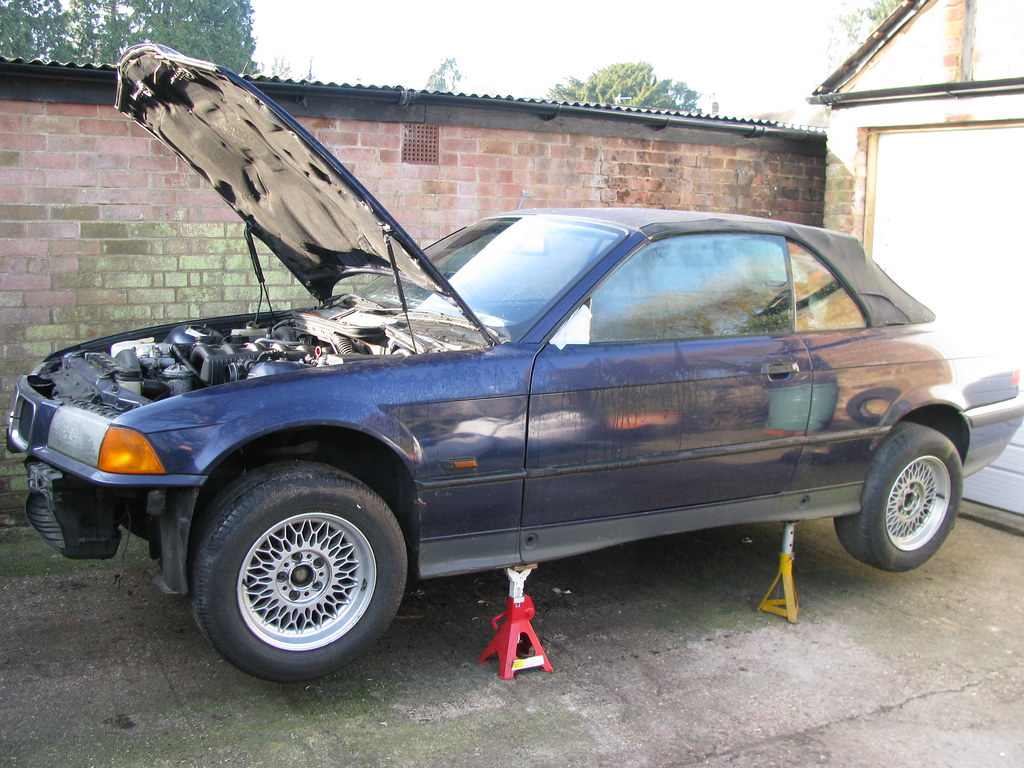 e36 Donor Strip down e36 Donor Strip down by marlinpeter, on Flickr
After dosing all the exhaust mounting nuts with penetrating oil spray I stopped for lunch while the oil did its stuff. Upon return I moved underneath the car and removed the entire exhaust system in one piece. The usual arguments with a load of rusty nuts but no major dramas.
I'm not yet sure if I will use this exhaust system (suitably shortened) on the Sabre but it is in good condition and has some interesting features.
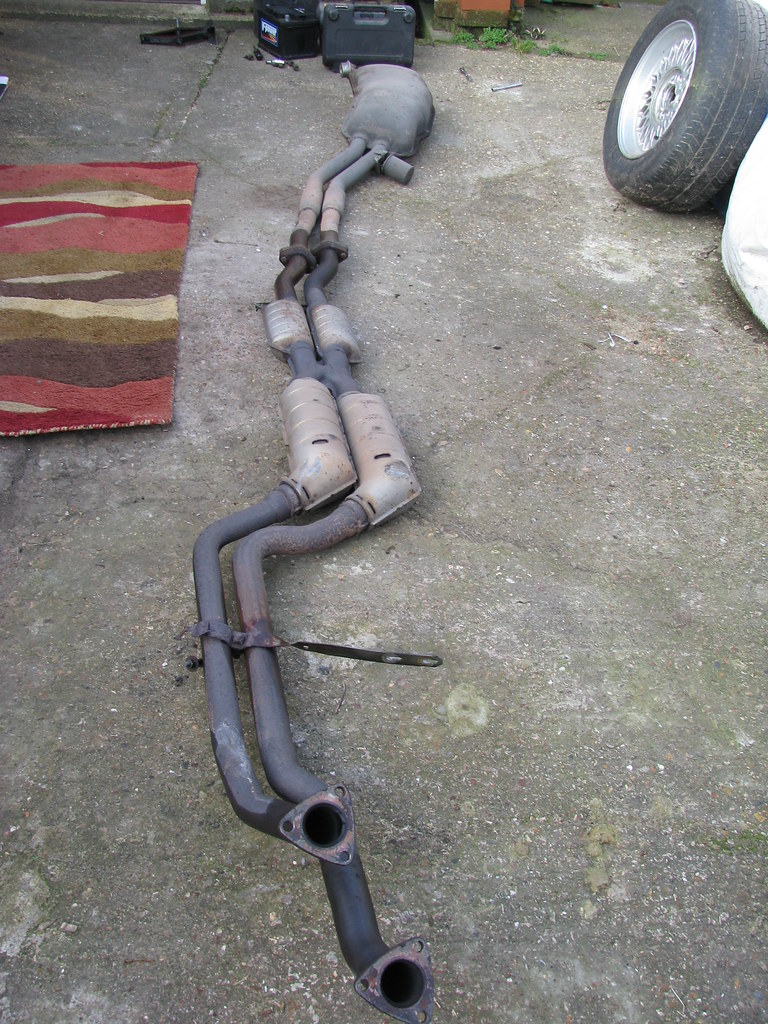 e36 Donor Exhaust system e36 Donor Exhaust system by marlinpeter, on Flickr
Cat heat shields in good nick but a bit loose so will need to be re-fixed if this system is used.
 e36 Donor Exhaust system e36 Donor Exhaust system by marlinpeter, on Flickr
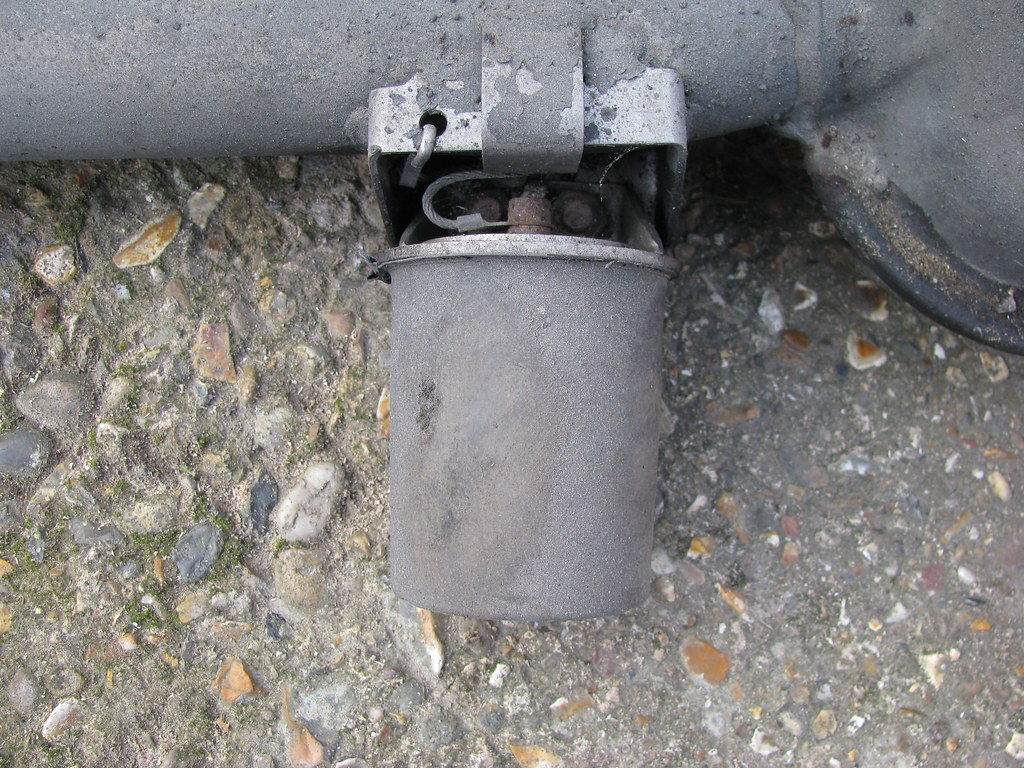
Strange device at the back which is a Vibration Absorber according to realoem
 e36 Donor Exhaust system e36 Donor Exhaust system by marlinpeter, on Flickr
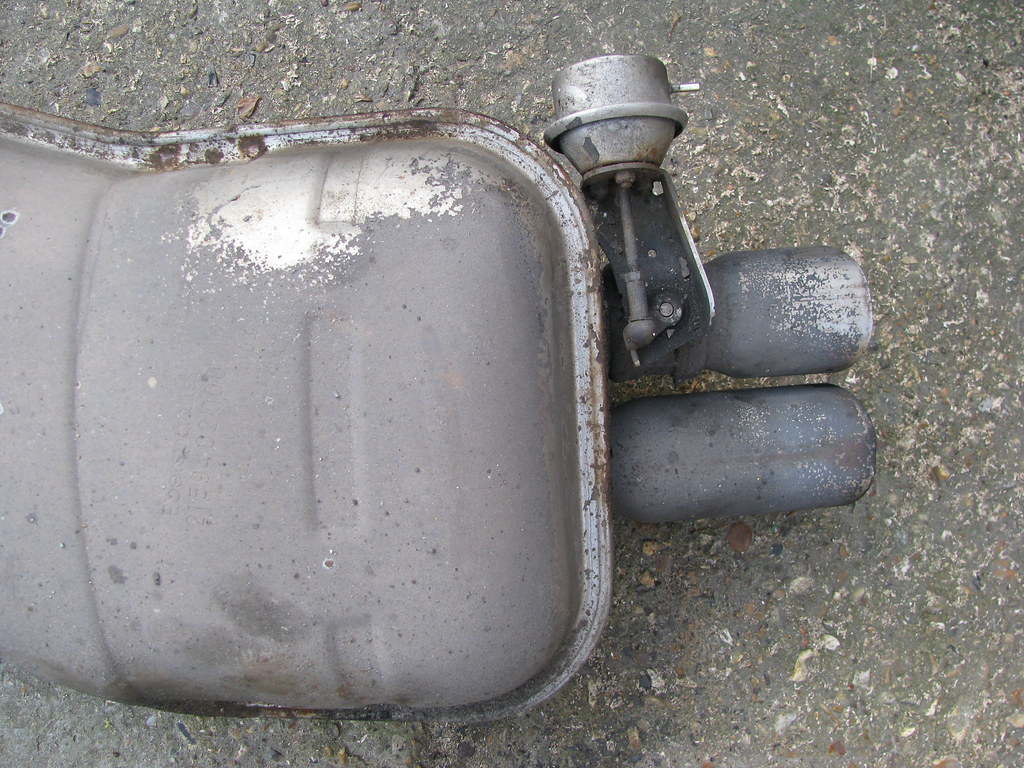
Back box has two routes to the tailpipes. One is only opened by a neat little flap controlled by vacuum from the inlet manifold and the ECU above 2500rpm. I believe it is to make the car quieter at low rpm.
I then made a start on removing the propshaft but ran out of light (and heat!!) so that's all for now but hopefully updates will be more frequent this year 
....peter

|
24th January 2015, 06:07
|
|
Member
|
|
Join Date: Jul 2014
Location: Ealing London
Posts: 54
|
|
 Good to see you are still at it.
Welcome back to the world of bespoke cars.
Like me, I am sure there are number of Royale Sabre lovers out there waiting to see more of your build.
Had an idea which I thought to share with you;
We all try to keep water out of the passenger compartment, and one place which is very hard to do anything about, once the build is complete, is three windscreen wiper spindle and the washer jet. Moving the washer jet onto the bonnet just above the heater, one on each panel, and filling the original hole, and fitting a gutter like channel to run under the three wiper spindles, which has to be done before the dashboard is fitted, with drain pipe either side which can then be guided out through hole in the floor.
Good luck and see you soon.
|
25th January 2015, 13:19
|
|
Senior Member
Enthusiast
|
|
Join Date: Mar 2005
Posts: 3,079
|
|
Quote:
Originally Posted by Amir Manzoori

Welcome back to the world of bespoke cars.
Like me, I am sure there are number of Royale Sabre lovers out there waiting to see more of your build.
Had an idea which I thought to share with you;
We all try to keep water out of the passenger compartment, and one place which is very hard to do anything about, once the build is complete, is three windscreen wiper spindle and the washer jet. Moving the washer jet onto the bonnet just above the heater, one on each panel, and filling the original hole, and fitting a gutter like channel to run under the three wiper spindles, which has to be done before the dashboard is fitted, with drain pipe either side which can then be guided out through hole in the floor.
Good luck and see you soon.
|
Thanks for the welcome back, I'm hoping to make better progress this year! Thanks for the tip about water leaks around the wiper spindles. I had not heard about this issue on Sabres. I'll try to remember when I get to that part of my build which is some way off 
|
15th March 2015, 21:12
|
|
Senior Member
Enthusiast
|
|
Join Date: Mar 2005
Posts: 3,079
|
|
Quote:
Originally Posted by peterux
....... so that's all for now but hopefully updates will be more frequent this year |
Famous last words!!
But dismantling now under-way again....
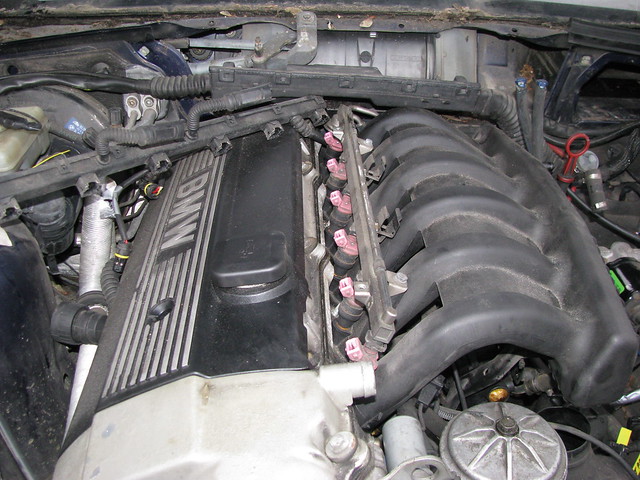
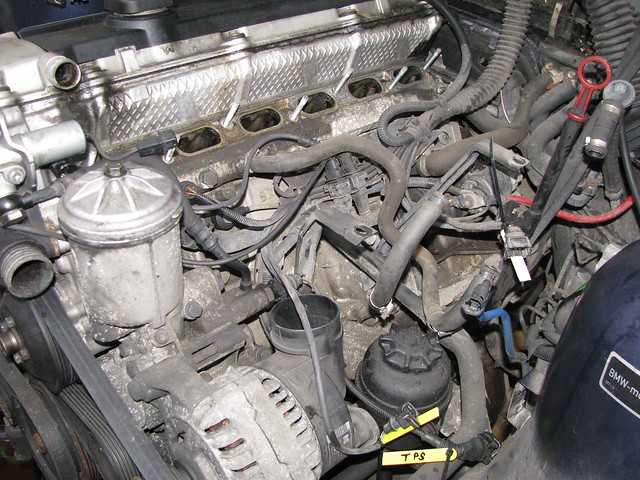
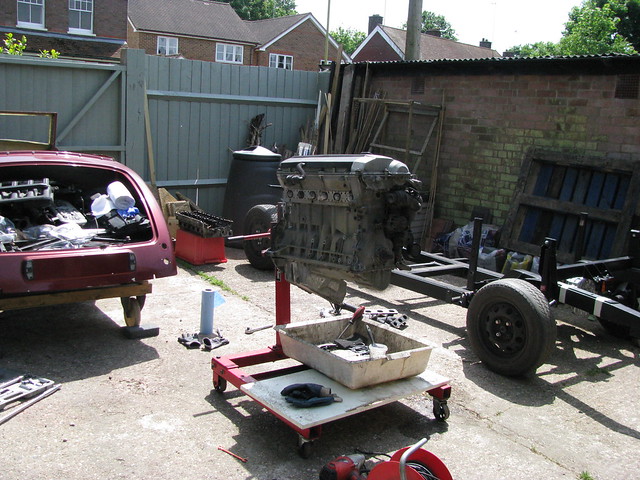
A shot of the engine and ancillaries after removing front grill, radiator, rad fan and aircon radiator, etc.
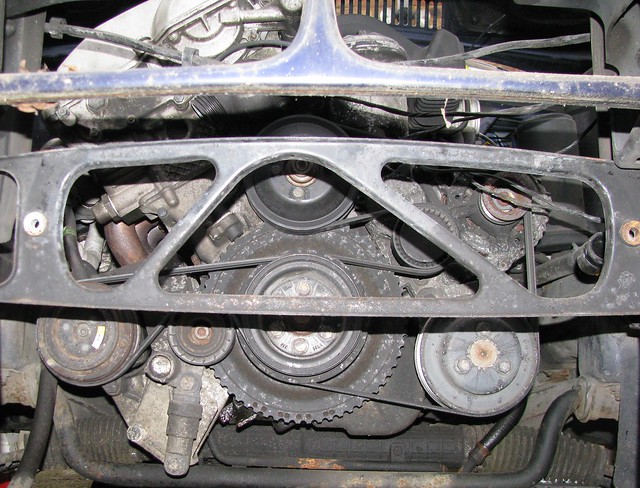 M52B28 Reference photo M52B28 Reference photo by marlinpeter, on Flickr
 M52B28 Reference photo M52B28 Reference photo by marlinpeter, on Flickr
I've been carefully labelling up the engine loom and taking lots of refrence photo's as I remove parts.
...peter |
20th March 2015, 21:22
|
|
Senior Member
Enthusiast
|
|
Join Date: Mar 2005
Posts: 3,079
|
|
Slowly, slowly.....
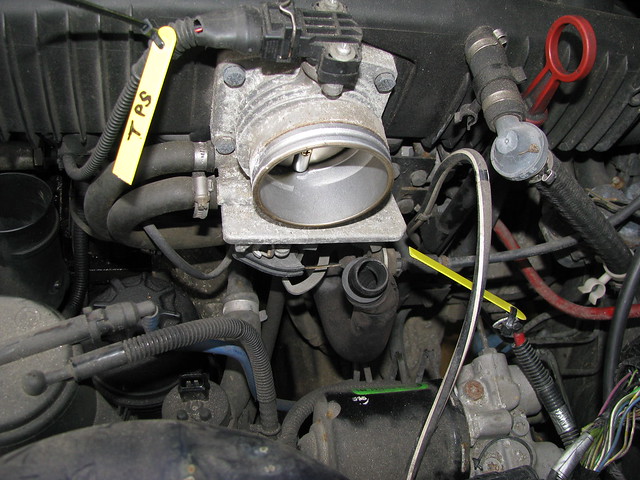
This week I've been focussing on labelling and removing the engine loom taking the opportunity to collect any useful parts for the rebuild. I've also been taking copious reference photo's to help my memory when it comes to re-assembly. From experience I know it can be months or years before the engine will be re-installed so just relying on your memory of where things go is not a good idea.
First to be removed was the throttle body and associated hoses....
 Reference photo Reference photo by marlinpeter, on Flickr
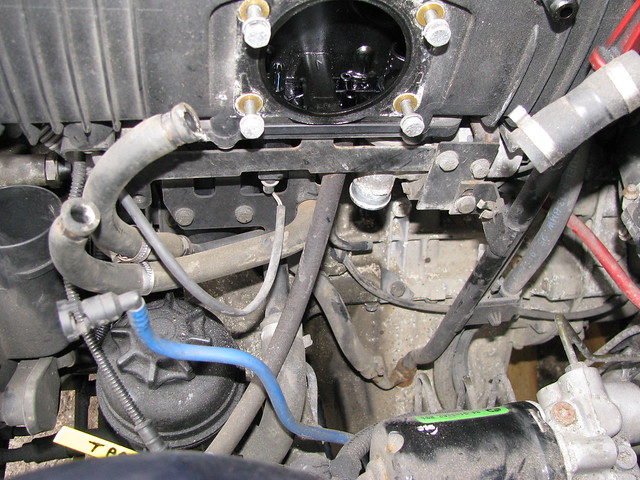
Next it was attacking the inlet manifold. You have to remove the heater fresh air scoop to be able to get to the rear manifold nuts and the fuel lines which are tucked right at the back of the engine bay.
 Reference photo Reference photo by marlinpeter, on Flickr
 Reference photo Reference photo by marlinpeter, on Flickr
 Reference photo Reference photo by marlinpeter, on Flickr
 Reference photo Reference photo by marlinpeter, on Flickr
With the inlet manifold removed I could remove all the remaining engine loom connections....The last was the reverse light switch which is mounted on the side of the gearbox and the lead is clipped to the top edge of the gearbox which makes it tricky to remove.
 Engine loom removed Engine loom removed by marlinpeter, on Flickr
And finally it was a spell back under the car to finish removing the propshaft....
 Engine Loom and propshaft Engine Loom and propshaft by marlinpeter, on Flickr
Getting closer to removing the engine in a couple of weeks time...
...peter
|
22nd March 2015, 20:27
|
|
Senior Member
Enthusiast
|
|
Join Date: Mar 2005
Posts: 3,079
|
|
Quote:
Originally Posted by peterux
I've not updated for a while due to moving house. I've still got a long list of jobs to do, not least is to empty and refurbish my garage.
But I couldn't resit this car as a donor car that came up on Autotrader.

It's actually a pretty cool car and I enjoyed the 75 mile drive home around the M25 and up the M1 
I plan to give it an oil service and then drive it around for a couple of weeks to see if it has any issues. It'll then be SORN'd and parked up in my back yard until I have time to start work on it.
Now, back to my list of DIY jobs....
P.S. it's a 1995 328i with a M52B28 engine and has clocked up 153k miles. |
Sales of the unwanted parts from my donor car have been very slow since Christmas but with the sale of the front foglights this weekend I have now recovered the full cost of the car and still have a small box of parts to sell. (Including an allowance for ebay and shipping fees)
So I've got my engine for free and would highly recommend buying a cabriolet donor as there is so much more to sell
|
29th March 2015, 21:33
|
|
Senior Member
Enthusiast
|
|
Join Date: Mar 2005
Posts: 3,079
|
|
Engine and Gearbox out!
My good friend Robin (aka Martinclan) came over last Friday to help remove my BMW engine and and gearbox.
With the engine hoist at the ready it didn't take us long before the engine and gearbox was out.
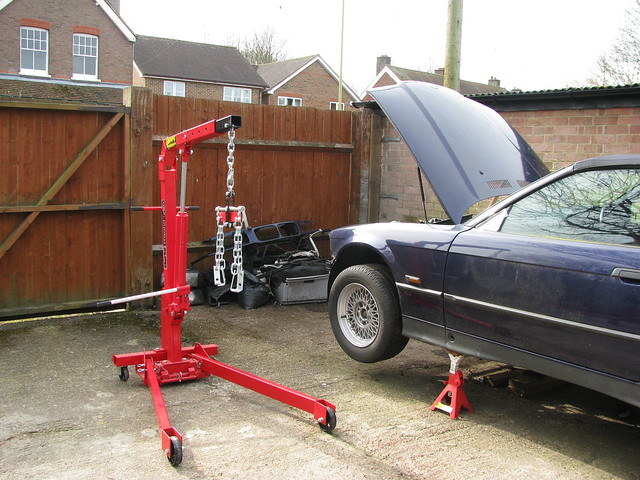 Engine crane and balance bar Engine crane and balance bar by marlinpeter, on Flickr
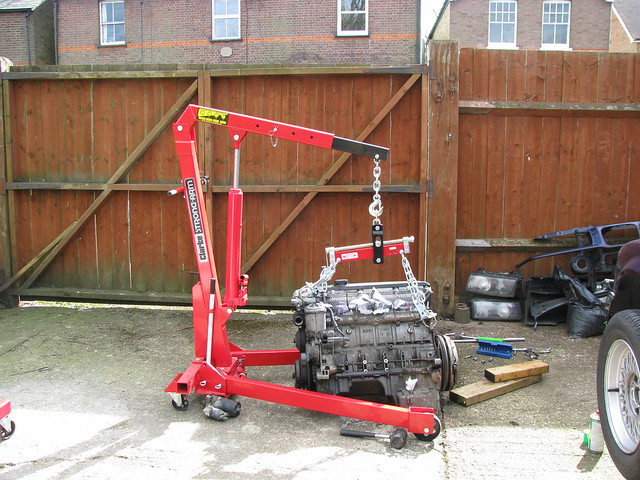 Engine out Engine out by marlinpeter, on Flickr
(Forgot to take a picture before we separated the gearbox)
The engine and gearbox are now safely stored in my garage pending the clean-up.
 Engine stored in garage Engine stored in garage by marlinpeter, on Flickr
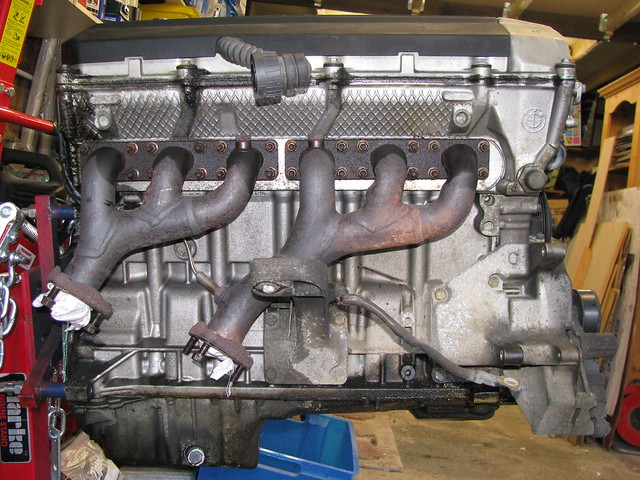 M52B28 Engine M52B28 Engine by marlinpeter, on Flickr
 Engine safely stored on stand Engine safely stored on stand by marlinpeter, on Flickr
We spent the rest of the day retrieving all remaining saleable parts. I've just got a few small parts left to remove and then it will be call to the local scrap yard to remove what's left.
...peter |
5th April 2015, 18:01
|
|
Senior Member
Enthusiast
|
|
Join Date: Mar 2005
Posts: 3,079
|
|
Engine Donor gone!
Finished stripping the engine donor car of any useful parts....
 Donor car stripped and ready to go.. Donor car stripped and ready to go.. by marlinpeter, on Flickr
....and there it was gone!
 Donor car gone..... Donor car gone..... by marlinpeter, on Flickr
Thanks to the local dissmantler.
Now onto organising the move of the Sabre chassis and bodywork from the lock-up.
....peter |
16th May 2015, 22:17
|
|
Senior Member
Enthusiast
|
|
Join Date: Mar 2005
Posts: 3,079
|
|
Well not a lot of car building progress but I have managed to get the Sabre transported from it's lock-up garage to my own garage at home. This is about 18 months after I moved house and it means my house move is now complete and it's finally goodbye to the lock-up garage I've had for over 11 years.
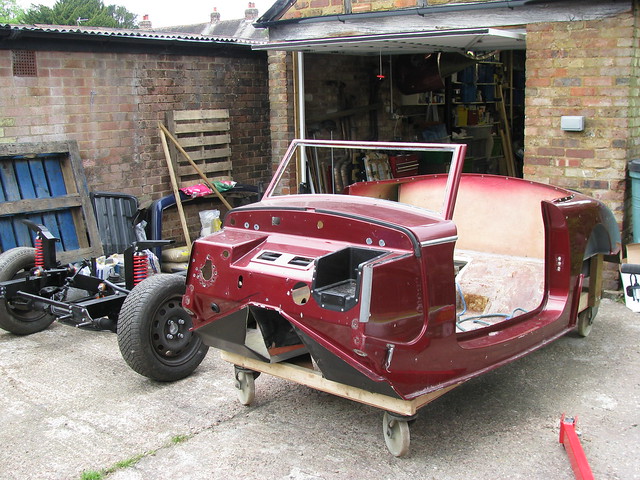
First job was bolt the main body tub and the front wings back on to the rolling chassis so that I could get the whole lot transported in one journey. I'd forgotten how many nuts and bolts there are but here it is just prior to collection and transportation.
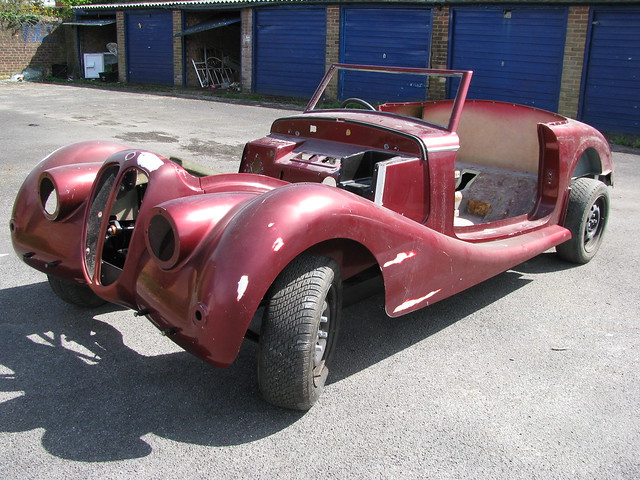 Re-assembled for transporting Re-assembled for transporting by marlinpeter, on Flickr
I found a nice man on ebay that promptly collected the car and delivered it back home. Excellent service!
And here it is back home.....
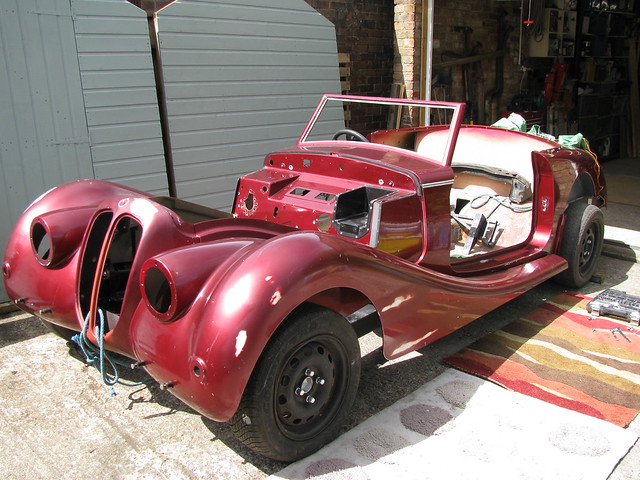 Relocated from lock-up to home garage Relocated from lock-up to home garage by marlinpeter, on Flickr
Then it was time to remove the front wings again.....
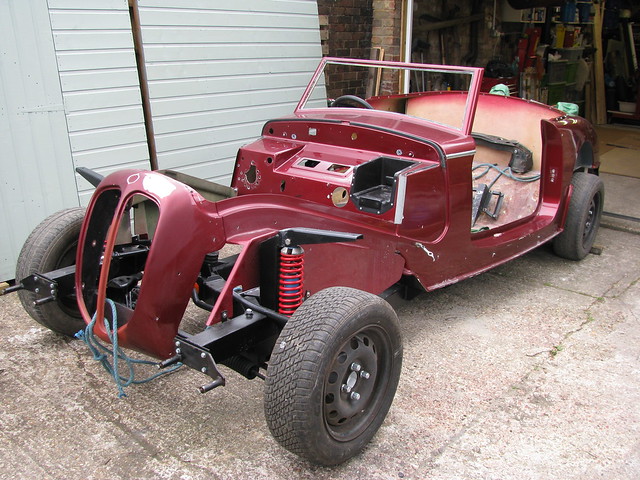 Wings removed again. Wings removed again. by marlinpeter, on Flickr
And store the wings in the roof space of my garage.....
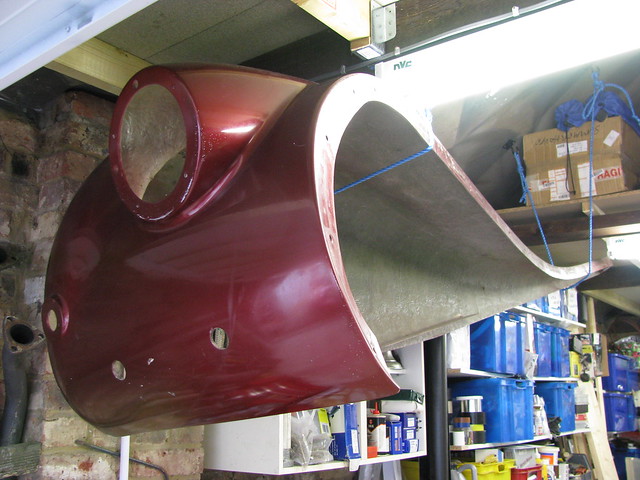 Nearside wing Nearside wing by marlinpeter, on Flickr
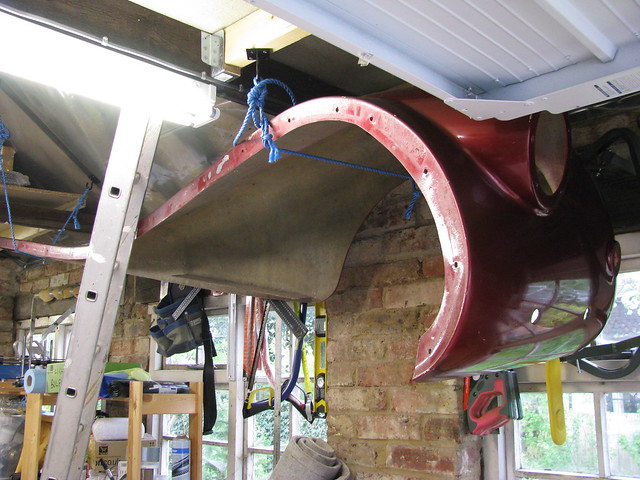 Offside wing Offside wing by marlinpeter, on Flickr
Finally, it was birthday time again and my wife got me some of these...
 Birthday present time! Birthday present time! by marlinpeter, on Flickr
....more soon....
...Peter
|
23rd May 2015, 20:21
|
|
Senior Member
Enthusiast
|
|
Join Date: Mar 2005
Posts: 3,079
|
|
Progress Report and a remarkable discovery....
The next job was to hoist the central body tub off the rolling chassis on to a trolley that I built from surplus timber and some old supermarket wheels that I've used before during my Marlin Sportster build.
 Body tub on trolley Body tub on trolley by marlinpeter, on Flickr
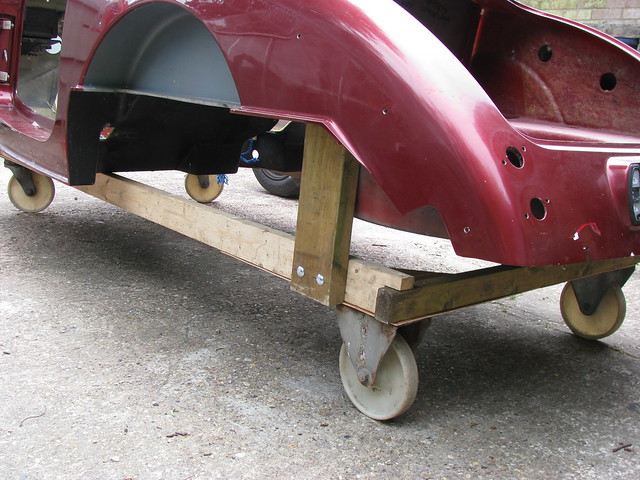 Body tub trolley Body tub trolley by marlinpeter, on Flickr
Which got me back to the rolling chassis stage where i was in January 2013 
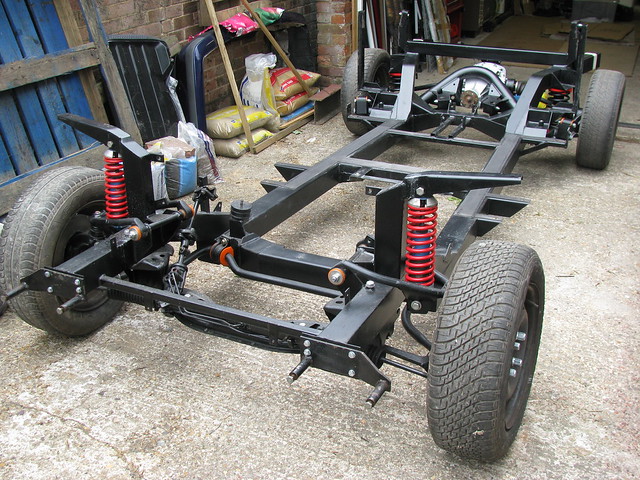 Rolling chassis May 2015 Rolling chassis May 2015 by marlinpeter, on Flickr
It has faired reasonably well in my damp unheated lockup garage but there is some surface rust on unpainted parts. It is also covered in spiders 'poo' which is surprisingly hard to remove.
 Rolling Chassis May 2015 Rolling Chassis May 2015 by marlinpeter, on Flickr
I next moved on to thinking about the engine mounts so thought I would try the BMW M52 mounts and amazingly discovered they are a near perfect fit  (Now the chassis was built in 1994 and designed for a Ford DOHC engine and the BMW was not built until August 1995 - how weird?)
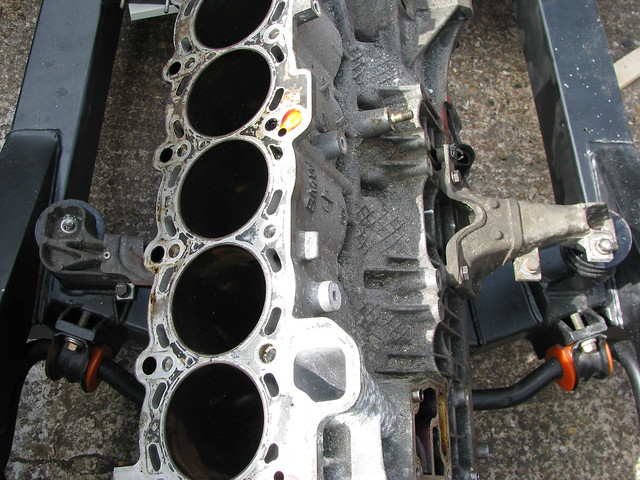 M52TU block with M52 engine mounts M52TU block with M52 engine mounts by marlinpeter, on Flickr
 M52 OS engine mount M52 OS engine mount by marlinpeter, on Flickr
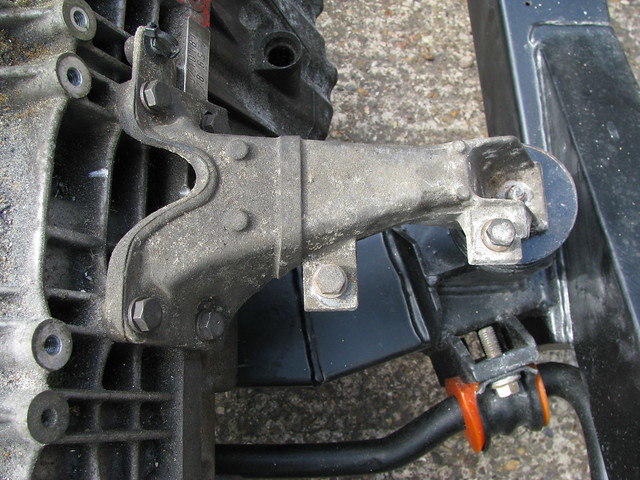 M52 NS engine mount M52 NS engine mount by marlinpeter, on Flickr
The sump is pefectly horozontal and the only issues are a slight angular mis-alignment.....
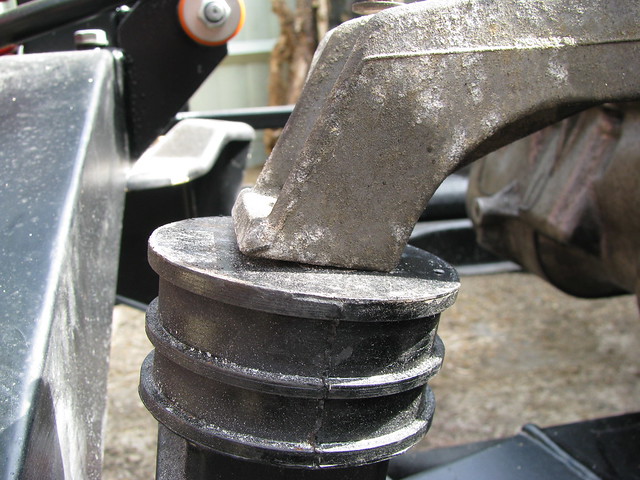 Slight angular misalignment Slight angular misalignment by marlinpeter, on Flickr
....and I have about 25mm clearance around the top and back of the crossmember which is a little too much as I want to get the engine as low and as far forward as I can get it.
Next job is to check the clearance with the 'real' engine as I've noticed a difference between the 1995 and 1998 sumps.
More updates soon.......
....peter
Last edited by peterux; 23rd May 2015 at 20:26..
Reason: grammer
|
25th May 2015, 11:05
|
|
Junior Member
|
|
Join Date: Mar 2015
Posts: 7
|
|
Looking good! Keep us posted peter.
|
25th May 2015, 11:50
|
 |
Senior Member
Enthusiast
|
|
Join Date: Feb 2005
Location: Hampshire
Posts: 2,497
|
|
Excellent progress  Nice |
26th May 2015, 08:10
|
 |
Senior Member
Enthusiast
|
|
Join Date: Sep 2004
Posts: 1,895
|
|
Quote:
Originally Posted by peterux
Progress Report and a remarkable discovery....
The next job was to hoist the central body tub off the rolling chassis on to a trolley that I built from surplus timber and some old supermarket wheels that I've used before during my Marlin Sportster build.
Which got me back to the rolling chassis stage where i was in January 2013
[It has faired reasonably well in my damp unheated lockup garage but there is some surface rust on unpainted parts. It is also covered in spiders 'poo' which is surprisingly hard to remove.
I next moved on to thinking about the engine mounts so thought I would try the BMW M52 mounts and amazingly discovered they are a near perfect fit (Now the chassis was built in 1994 and designed for a Ford DOHC engine and the BMW was not built until August 1995 - how weird?)
The sump is pefectly horozontal and the only issues are a slight angular mis-alignment.....
....and I have about 25mm clearance around the top and back of the crossmember which is a little too much as I want to get the engine as low and as far forward as I can get it.
Next job is to check the clearance with the 'real' engine as I've noticed a difference between the 1995 and 1998 sumps.
More updates soon.......
....peter
|
That chassis looks even better than the Marlin one. No wonder the kits were so expensive - there must be 100's of hours of work in there....
I wouldn't have thought that the slight angular misplacement would cause any issues. One andvantage of using rubber engine mounts.
I guess that once you mount the "real" engine along with all its ancilliaries the extra weight would cause it to drop a few mm - it might even gain you the few mm that you want to lower it.
Being able to use standard engine mounts is a big benefit!
Cheers, Robin
|
26th May 2015, 20:14
|
|
Senior Member
Enthusiast
|
|
Join Date: Mar 2005
Posts: 3,079
|
|
Quote:
Originally Posted by MartinClan
That chassis looks even better than the Marlin one. No wonder the kits were so expensive - there must be 100's of hours of work in there....
I wouldn't have thought that the slight angular misplacement would cause any issues. One andvantage of using rubber engine mounts.
I guess that once you mount the "real" engine along with all its ancilliaries the extra weight would cause it to drop a few mm - it might even gain you the few mm that you want to lower it.
Being able to use standard engine mounts is a big benefit!
Cheers, Robin
|
Hi Robin,
Well it's certainly no light weight sports car chassis!!
Being able to use the standard engine mounts is certainly a real bonus (and a big surprise  ) so I'm going try them with the full weight of the engine before making any other mods.
....peter |
26th May 2015, 23:20
|
|
Senior Member
|
|
Join Date: Dec 2013
Location: Sunny Cumbria
Posts: 470
|
|
At least it's on the 'heel' of the mount rather than the 'toe', you can, to could buy tapered washers to use with rolled steel Joists (RSJ's) to accommodate the taper of the flanges, not beyond the scope of an angle grinder to make some from thick washers.
Looking good! You need a little good luck from time to time.
|
27th May 2015, 21:30
|
|
Senior Member
Enthusiast
|
|
Join Date: Mar 2005
Posts: 3,079
|
|
Quote:
Originally Posted by 8 Valve Ed
At least it's on the 'heel' of the mount rather than the 'toe', you can, to could buy tapered washers to use with rolled steel Joists (RSJ's) to accommodate the taper of the flanges, not beyond the scope of an angle grinder to make some from thick washers.
Looking good! You need a little good luck from time to time.
|
Yes, I did find some of those 'I-Beam' tapered washers on ebay but like you thought I'd have a bash at making some, so I have ordered some thick square washers.
The material around the bolt hole in the mounts is are about 10 mm thick so I may just take a bit off the 'heel' |
31st May 2015, 21:27
|
|
Senior Member
Enthusiast
|
|
Join Date: Mar 2005
Posts: 3,079
|
|
Drivetrain trial fitting
So having discovered that the standard BMW engine mounts appear to work it was time to try the 'real' M52B28 engine, rather than my bits and pieces of a gash engine.
First job though was to clean up the engine and gearbox....
 Engine cleaning is progress Engine cleaning is progress by marlinpeter, on Flickr
Then it was out with the engine hoist and in with the engine....
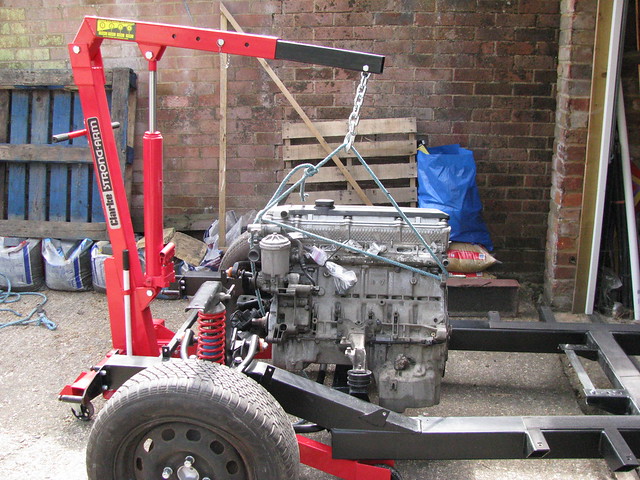 M52B28 engine installation. M52B28 engine installation. by marlinpeter, on Flickr
The engine will be cleaned up properly and painted before final fitting.
It was then a relatively simple task of bolting on the gearbox.....
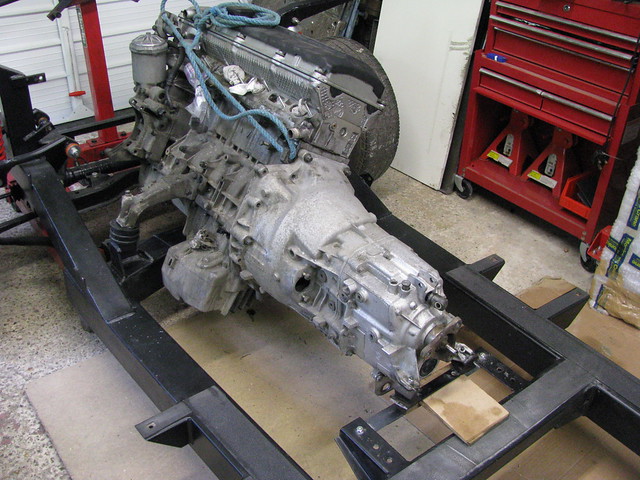 M52B28 and gearbox M52B28 and gearbox by marlinpeter, on Flickr
So far so good, but I still felt I needed to find a way of moving the engine forward a bit to clear the central body tub. The body tub is very heavy and is a three man lift so not easy to keep trail fitting.
To move the whole drivetrain forward a bit I bought some of these Volvo engine mounting rubbers that have offset mounting studs. The studs are offset by 35mm.
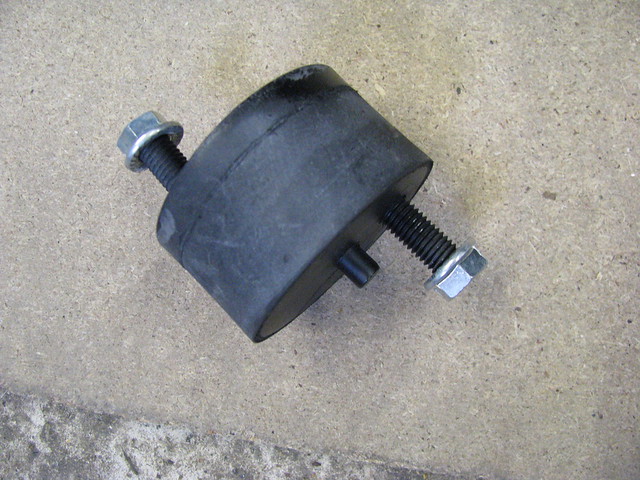 Volvo engine mount Volvo engine mount by marlinpeter, on Flickr
They look a bit odd but seem to work OK.....
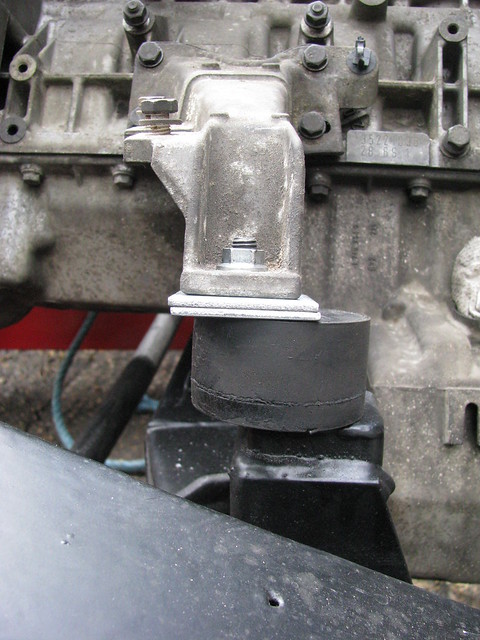 Volvo engine mounts Volvo engine mounts by marlinpeter, on Flickr
....more fitting trials this week......
....peter
|
|
Currently Active Users Viewing This Thread: 2366 (0 members and 2366 guests)
|
|
|
 Posting Rules
|
You may not post new threads
You may not post replies
You may not post attachments
You may not edit your posts
HTML code is Off
|
|
|
All times are GMT +0. The time now is 17:20.
|


 Linear Mode

