|
|
| Miglia Builds and discussion Miglia bodied builds |

29th November 2014, 09:00
|
 |
Senior Member
|
|
Join Date: Feb 2012
Location: Wembley, London
Posts: 5,058
|
|
UFO - Or you can look at the first post on the "Useful Info" sticky (On the Sammio/Ribble Page) where there is a photo of Dave's car and a "Click Here" link.

Actually, allow me...
davecymru - Click Here

Last edited by Paul L; 29th November 2014 at 09:02..
Reason: Adding link
|
30th November 2014, 17:23
|
 |
Senior Member
|
|
Join Date: May 2011
Location: Somerset
Posts: 1,671
|
|

Cheers all, and thanks Paul.
UFO - you may also be interested in my Sammio running report thread:
http://www.madabout-kitcars.com/foru...ead.php?t=3505
It's along the same lines as the "Mr Towed on the Road" thread, but was only over the space of a year and I wasn't quite as imaginative with my thread naming 
And bringing things up to date, this week has been all about the bodywork. The first round of filling and sanding has gone well and I've done the front-to-back seams. I even blasted them over with a bit of primer when they were done just to perk up my spirits!

Then it was more filling on the rear

and on the front edge of the bonnet

Then out came the fibreglass filler as I had to rectify a boo boo I made fitting one of the rear lights. A cardboard tube was made the same diameter as the hole I want. That was taped in place and some card taped behind the remaining gap. Then in was glooped the filler

Then I used the remaining mixed fibreglass filler to build up the top of the passengers door to the same height as the cockpit

more to come...

|
3rd December 2014, 12:11
|
|
Member
|
|
Join Date: Jan 2014
Posts: 41
|
|
Dave,awesome work so far. The bodies are advertised as 3x 900 layout,in my book that makes them around quarter of one inch(5-6mm) thick. My buddy assures me that is incredibly robust and is more than enough strength wise. So don't worry too much about the flex.
|
18th December 2014, 08:10
|
|
Senior Member
|
|
Join Date: May 2011
Location: Somerset
Posts: 1,671
|
|
humm... cheers matey.
No update for a while, but lots of little bits have been going on.
Firstly the doors, the catches are in place and i've decided to go for a pull-cord style handle utilising some of the old brake and clutch cables i have laying around. That needs a sturdy anchor point on the other side of the door, so i got a couple of big UNF bolts and drilled holes through them large enough to loop the cable through:

and then made up some large flat penny washers to spread the load. Job done

Those will now be painted the same colour as the body to make them blend in.
Then it's been lots of sanding / filling / sanding / filling / sanding ...
I'm getting there, with the bonnet now virtually done

And the passengers side door also nearing completion (ignoring the chunk i took out of the gel coat on the body when i accidentally wacked it with the powerfile  )

And Towed was right that the rear spring is starting to settle, but i think that some minor work may be needed with the rear of the rear wheelarch? We'll just have to wait and see...

|
18th December 2014, 08:15
|
|
Senior Member
|
|
Join Date: May 2011
Location: Somerset
Posts: 1,671
|
|
Can you tell what it is yet?

Yup, seeing as Poole is the black-hole of Grills,  i've had to take the plunge and make my own.
ATM i'm still experimenting. i've cut a load of slits ar regular intervals in alloy U channel.
Then attached L section brackets to those and L section bonded to the inside of the shell. The idea being that when it's all complete i could remove it by drilling out the pop rivets (at least that's the theory!)
Top bonded in place

Bottom bonded in place

I'm not going to fit the vertical slats until the shell is painted, so back to my filling and sanding |
18th December 2014, 15:09
|
|
Senior Member
|
|
Join Date: Feb 2012
Location: Wembley, London
Posts: 5,058
|
|
Spooky!
I was also playing with my grill today, and it too is an alternative to the beer grate one I ordered that never made it out of the Poole Triangle.
The good news is that your build is really coming together nicely. 
Good luck, Paul.
|
20th December 2014, 18:43
|
 |
Senior Member
Enthusiast
|
|
Join Date: Dec 2006
Posts: 1,130
|
|
Quote:
Originally Posted by Paul L

Spooky!
I was also playing with my grill today, and it too is an alternative to the beer grate one I ordered that never made it out of the Poole Triangle.
|
It just so happens that today I found a source of material to re-manufacture the old style "beer crate" grills, which I am going to use on my A1 Alpha.
As the A1 Alpha's bonnet is very similar (oops) to the Sammio range there's no reason why the new grills can't be retro fitted to the original Spyder/Pilot, Cordite/Navigator and even the Miglia's 
The big difference is this time the grills will be made of aluminium rather than the original steel, which obviously makes them much lighter but being aluminium the grill could be polished giving the "chrome" effect  |
19th December 2014, 08:35
|
 |
Senior Member
|
|
Join Date: Jul 2011
Posts: 5,328
|
|
Getting parts out of Poole needs to be done in John Le Carre stylee - you meet in a picturesque European City centre and your money walks slowly across the Town square only once you see that the parts are present and in one piece. And keep scanning the roof tops for snipers as double crosses are common...
|
19th December 2014, 15:44
|
|
Senior Member
|
|
Join Date: Dec 2013
Location: thurcroft, Rotherham South Yorkshire
Posts: 196
|
|
glad it's not just me then with the grill and headrest problems
|
19th December 2014, 20:28
|
 |
Senior Member
|
|
Join Date: Aug 2013
Location: Brisbane, Australia
Posts: 284
|
|
Me too, i was beginning to think it was personal!
Exercising my patience. Patiently.
Merry christmas all,
T
|
20th December 2014, 07:49
|
|
Senior Member
|
|
Join Date: May 2011
Location: Somerset
Posts: 1,671
|
|
It's a shame to hear there are minor supply problems as I don't' think it's any secret that I like Mike and I think he's making a cracking product! And while it is a bit annoying, it did make me chuckle as I had exactly the same issue with the grill for my Sammio.
Back when I did the Sammio I was much more naïve and I worried what I'd do without all of the 'factory' bits. This time around and with a bit of knowledge and experience under my belt it's not a big deal, just a bit irritating.
Right... I have an entire day today to work on the car  But first a quick trip to Halfrauds as I'm out of body filler and i'll need more for SWMBO's bl00dy camper van when I'm done with the Miglia! So hopefully loads of progress today |
20th December 2014, 10:01
|
|
Senior Member
|
|
Join Date: Jul 2011
Posts: 5,328
|
|
Quote:
Originally Posted by davecymru
It's a shame to hear there are minor supply problems as I don't' think it's any secret that I like Mike and I think he's making a cracking product! And while it is a bit annoying, it did make me chuckle as I had exactly the same issue with the grill for my Sammio.
Back when I did the Sammio I was much more naïve and I worried what I'd do without all of the 'factory' bits. This time around and with a bit of knowledge and experience under my belt it's not a big deal, just a bit irritating.
Right... I have an entire day today to work on the car But first a quick trip to Halfrauds as I'm out of body filler and i'll need more for SWMBO's bl00dy camper van when I'm done with the Miglia! So hopefully loads of progress today |
My own Poole Triangle mystery involved the amazing vanishing Sammio tonneau cover.
It seems a third party supplier let Gary J down and I did get my money back (eventually). Oh, and as far as I'm aware it was nothing to do with Mike btw.
|
20th December 2014, 12:16
|
|
Senior Member
|
|
Join Date: Jun 2011
Location: birchington, kent
Posts: 1,769
|
|
I drove down to Poole, had breakfast in the caf, put everything in a van, had a chat and drove home, sorted....
|
31st December 2014, 09:18
|
|
Senior Member
|
|
Join Date: Jul 2011
Posts: 5,328
|
|
Nice colour DC, I hope it stays shiny for you.
Very good point about raising the car up on axle stands to make spraying easier. That's exactly what I did, mainly as it just seemed sensible to keep the body as far off the (dusty) floor as possible -
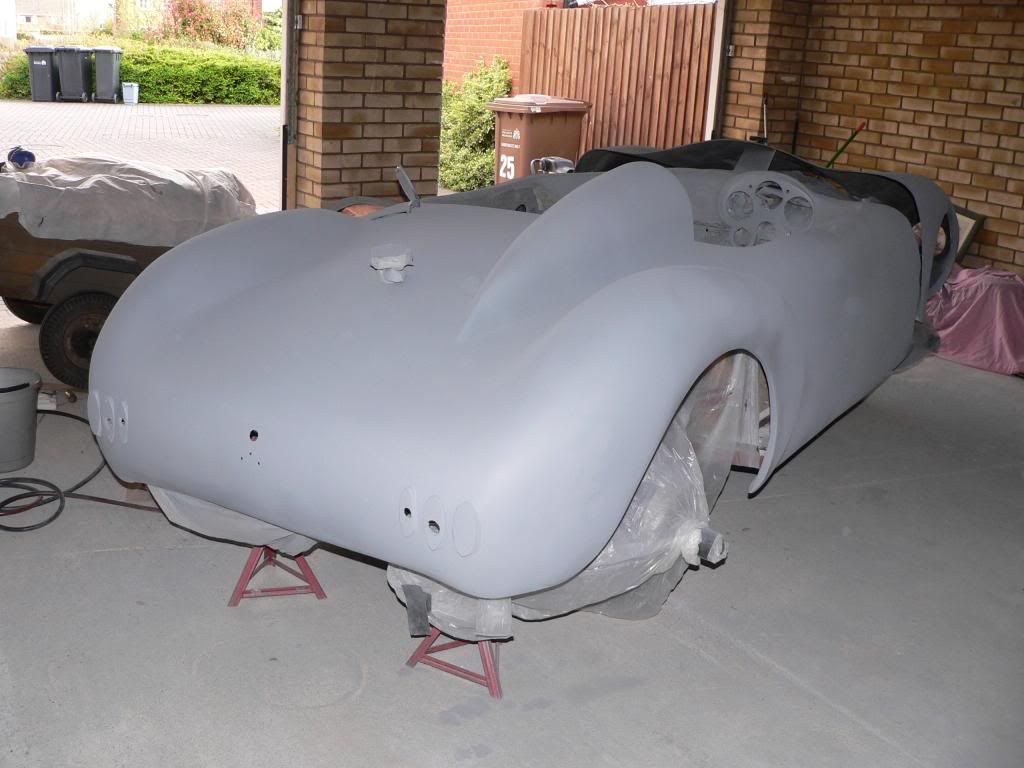
Keep up the good work and see you on the road soon! |
2nd January 2015, 17:19
|
|
Senior Member
|
|
Join Date: May 2011
Location: Somerset
Posts: 1,671
|
|
Ohhh plastic dustsheets, posh!
I just bought my bi-yearly copy of the Sunday Times as I find that provides enough masking materials and firelight paper to last a good few months
Progress update...
Painting, flatting, painting, flatting, correcting, painting...
Main tub just about done, started putting topcoat on bonnet. Will do doors last as I still suspect they'll be a faff!
In case its of any interest I've been using grey high build primer, then 180 grit wet-n-dry to shape and flat that and a final sand with 400 grit, before...
Then Cellulose top coat, with the light use of wet, 400 grit in between layers.
Then I have 1200 grit for the final fattening before I dig out the polish.
Fingers crossed the final coat on the body has no more drips as I want to start the flattening on that tomorrow!
Will get some pics then as well. |
4th January 2015, 13:34
|
|
Senior Member
|
|
Join Date: May 2011
Location: Somerset
Posts: 1,671
|
|
The main flatting with 1200 grit is now just about done and I've moved onto the cutting compound.
It's HARD work, so I've been finding other little jobs to do in-n-around it to keep my spirits up.
One of the first things I wanted to do was get the fuel filler refitted so that no gunk ended up in the tank.

Happy with that, I started to assemble the grill. I've still got the end pieces to fit, but I'm v.happy with the look of it so far.

Then I decided to start unwrapping and cleaning.

Forum members who've been on here since the start of the Sammio section will be glad to know that I've got a few bits of overspray! |
4th January 2015, 13:57
|
|
Senior Member
|
|
Join Date: May 2011
Location: Somerset
Posts: 1,671
|
|
Today has been cleaning, tidying and reassembling the steering.
The 2 areas of the Miglia build that originally unsettled me were:
1) Stretching the gear lever.
Well, I worked around that by opting for the angled Spitfire lever, so no cutting and welding required.
2) Altering the steering column.
Again, I was worried about cutting-n-welding the column, so I had a think about other options and as the result of looking at what a few others on here have done, coupled with an idea from a Herald owner (who advised me of the design of the collapsible Triumph column!) I settled upon a solution that needs no cutting or welding at all!!!
My Solution
The collapsible design of the original Vitesse column is achieved by the top section being hollow and the bottom section fitting inside it, with a cut-out in the top section and a flat filed in the bottom section, all held together with a chunky great clamp!
That design allows the column to collapse in case of a head-on collision by the inner shaft sliding up inside the outer one.
But as far as we're concerned, it also means that if we un-do that clamp we can 'shrink' the length of the column by simply sliding the lower shaft further into the upper one!
So once disassembled and the new length decided upon with a bit of trial and error I filed a new 'flat' on the inner shaft in it's new location:

And reassembled it with the original clamp.

Bobs your uncle, shortened without any cutting or welding
So while (as some of you will have figured out) that top section is no longer collapsible, it is now connected to the rack with an intermediary shaft (splined steering shaft from Car Builder Solutions!), and 2 new Steering Column UJ's to link them all together. Which is an accepted alternative column design if I did have to follow IVA guidelines! So a nice result and some peace of mind to boot
Here's it all is fitted in place, along with the pillow-block bearing on the bulkhead which makes for a very nice feel through the wheel!

Happy!
Last edited by davecymru; 4th January 2015 at 14:02..
|
4th January 2015, 14:28
|
|
Senior Member
|
|
Join Date: Feb 2012
Location: Wembley, London
Posts: 5,058
|
|
Dave - Nice result on the steering column.
It is really coming together now and your DIY grille looks very professional too.
Good luck, Paul.
|
4th January 2015, 18:21
|
|
Senior Member
|
|
Join Date: Jun 2011
Location: birchington, kent
Posts: 1,769
|
|
Very tidy.
|
11th January 2015, 17:03
|
|
Senior Member
|
|
Join Date: May 2011
Location: Somerset
Posts: 1,671
|
|
This week has been all about the bodywork.
After talking to one of the guys at work who is into "detailing" (posh car cleaning!!  ) I decided to modify the approach I took last time, to see if I could get a more professional finish this time around.
So...
Here's an example of how things generally look after painting, with a good 3 or 4 coats of colour:

To this I then do a rub down with 1200 grit wet-n-dry (used wet).
Then that is followed by a once over with Halfords Rubbing compound (also used wet)
That makes things look like this:

This in itself looks nice and is very flat, but it's hazy.
So after doing all of the bodywork on the Sammio by hand, and not wanting to go through all of that faff again! I was looking at investing in an electric polisher when I stumbled across this power drill adapter for £4.99 in Halfords!!

That coupled with a Hard (White) flatting pad, a soft (Black) polishing pad at £4.99 each and things came to considerably less than some of the admittedly very nice Random Orbit polishers I'd been day dreaming over!
A quick scan of my cleaning shelf threw up a bottle of Meguires Ultimate compound for the final flatting. and a huge bottle of Autoglym for the final polishing.

And with a lot of hard work, this is the sort of result I am now getting!!

TBH this is a whole leap ahead of the paint finish I achieved on the Sammio!
It's also surprising how quickly I get through power drill batteries, so I'm taking things a small area at a time and also refitting things as I go (while batteries recharge!)
|
|
Currently Active Users Viewing This Thread: 1 (0 members and 1 guests)
|
|
|
 Posting Rules
|
You may not post new threads
You may not post replies
You may not post attachments
You may not edit your posts
HTML code is Off
|
|
|
All times are GMT +0. The time now is 00:19.
|


 Hybrid Mode
