|
|
| Sammio Builds and discussions Sammio bodied car builds and specials |

24th July 2013, 07:52
|
 |
Senior Member
|
|
Join Date: Jul 2011
Posts: 5,328
|
|
Quote:
Originally Posted by pam983

I'm the customer and i'm really pleased to be able to follow the build of my car.
|
Welcome to the site Pam. It's a shame you're not able to build your car yourself - it's part of the experience - but you're going to love driving it once it's finished.
These cars really do look a million dollars on the road and drive like a racer from another era. They also get jealous looks from people driving very expensive modern cars. 
I hope it's completed in time for your birthday as it'll be the perfect gift to yourself. I look forward to watching the build progress. |
24th July 2013, 14:20
|
 |
Senior Member
|
|
Join Date: May 2012
Location: Preston
Posts: 139
|
|

Quote:
Originally Posted by pam983
Hi Andy great to see some pics of the car.
I hope i won't have to test the bomb proof ;-)
I'm the customer and i'm really pleased to be able to follow the build of my car. It's a long time i'm following the sammio/ribble cars and dream about mine for a while. For now my job and my children do not really allow me enough time to build it properly so i asked Andy if he could build one for me for my 30th (even slightly later it does not matter). I hope being able to build another one myself in the future and experience this great feeling of buiding is own car.
I think colour of the car will be really interesting, you will be updated soon with it.
With the number of car going to France i think we will be able to do a meeting soon 
I spent a lot of time on this forum dreaming on all the cars already built, all the other builder did a really great job and i'm waiting mine as a children waiting christmas ! |
Welcome Pierre,
glad to see you on here  I am AndyP57's son

|
24th July 2013, 15:46
|
|
Senior Member
|
|
Join Date: Jun 2011
Location: birchington, kent
Posts: 1,769
|
|
Arrgghh, not a 30 year old blonde called Pam....
|
24th July 2013, 15:48
|
 |
Senior Member
|
|
Join Date: Jan 2012
Location: Poole, Dorset
Posts: 615
|
|
Quote:
Originally Posted by garyh
Arrgghh, not a 30 year old blonde called Pam....
|

 Pierre |
24th July 2013, 16:36
|
|
Junior Member
|
|
Join Date: Oct 2012
Posts: 14
|
|
Don't worry i'm not blonde!
|
30th July 2013, 12:40
|
 |
Senior Member
|
|
Join Date: Dec 2011
Posts: 656
|
|
TK1 progressing well. I usually untangle the wiring loom before body fit so I can arrange the rear part of the loom to the frame. Don't you just love it when the washing dries so quickly

The rolling chassis has now been readied for body fit with Radius arms fitted, compensator lever mounted and floors fully bonded on:

Temporarily placed the seats in and marked out the line for the Steering column:

Fuel tank fitted now and all bare spots of the chassis and frame have been painted/treated where necessary:


Prior to fitting the shell, I marked out a possible outline for the luggage compartment which will be bounded by aluminium floor and sides to the rear frame:

As this car will have removable humps, it's quite possible to use all of this area but until we have a pair of newly moulded Left and Right hand humps, I won't be cutting it out.
With the shell in place, we thought it time to try the bonnet for approximate fit:

Which, bearing in mind it currently rides high due to having no engine and that it will ultimately be fitted with 14" wires, it looks pretty good.
As an experiment, we also tried the Pilot bonnet for fit:

I'm now up to my armpits in GRP mat and resin attaching the body so it won't be long before we get the cockpit lined with 9mm ply. More photos when that is done. Now where was I? Oh yes... Kettle's boiled 
|
3rd August 2013, 08:42
|
|
Junior Member
|
|
Join Date: Oct 2012
Posts: 14
|
|
Can't wait to get it!!!
A lot of progress, everything is going on quickly!
Pilot bonnet will be fitted finally.
|
5th August 2013, 06:07
|
 |
Senior Member
|
|
Join Date: Feb 2012
Location: Wembley, London
Posts: 5,056
|
|
AndyP57 - Looks like lots of good progress going on there. 
I'm looking forward to seeing how the front bulk head develops.
I take it there will be no clearance issues between the pedals and the "flat" front foot wells?
Good luck & keep the photos coming, Paul. 
|
11th August 2013, 08:09
|
|
Senior Member
|
|
Join Date: Dec 2011
Posts: 656
|
|
A little slower this week caused by my having to be on the road but the cockpit is now lined and the wiring loom is modified (Excess functions taken out and instrument wiring clustered to the centre. I have, however, been shopping whilst away so the box o' bits grows ever more.
We now have a pair of the ubiquitous bucket seats and a full set of rear lights. Headlight buckets have arrived and have a pair of LHD P700 lamps are on order. Pam has specified a particular shape for the front indicators and as we should be at the Donington show, I should pick a pair up there. This week we should see a Canley's Mark 9 Gearbox conversion kit pop through the door so we can work on the power plant. (We're keeping that away from the car at present so it doesn't get enveloped in the usual clouds of dust and GRP).
Plan for this week is to get the steering column mounted (With a bit of design work for the bolt on support structure) and pedals/master cylinders in. We should also get the front wiring loom strapped in place whilst the bonnet is off. Seat mounting holes should be finalised and the dashboard should start to take shape.
More photos soon
|
30th August 2013, 08:30
|
|
Senior Member
|
|
Join Date: Dec 2011
Posts: 656
|
|
It's been a little while since we posted photos but the build has been ongoing. We've initially mounted the pedals (Paul, you will see that there is a good 25mm clearance between the pedals and floor at full travel):


and positioned the steering column with an initial mount being directly to the forward frame. An additional mount will be fabricated nearer the Wheel and is currently being sketched:

The cockpit has been lined in the traditional way:


and Rear light set fitted (Landrover Defender lights):

As seen elsewhere on the forum, the Navigator hump set has now been modelled and will soon be moulded. The reduced length and improved spacing will accommodate the boot:

More soon |
30th August 2013, 12:34
|
|
Senior Member
|
|
Join Date: Feb 2012
Location: Wembley, London
Posts: 5,056
|
|
Looks like it is all coming together nicely Andy.
I think all the improvements will make a better kit & an easier build.
Will be good to see a complete car on the road.
Good luck, Paul. |
3rd September 2013, 20:10
|
|
Junior Member
|
|
Join Date: Oct 2012
Posts: 14
|
|
Good progress on the car Andy!
It's now time to speak a bit more about this project from my side. After a few discussions with Andy we thought it could be a good idea and a really nice wink to give a "modern colour scheme".
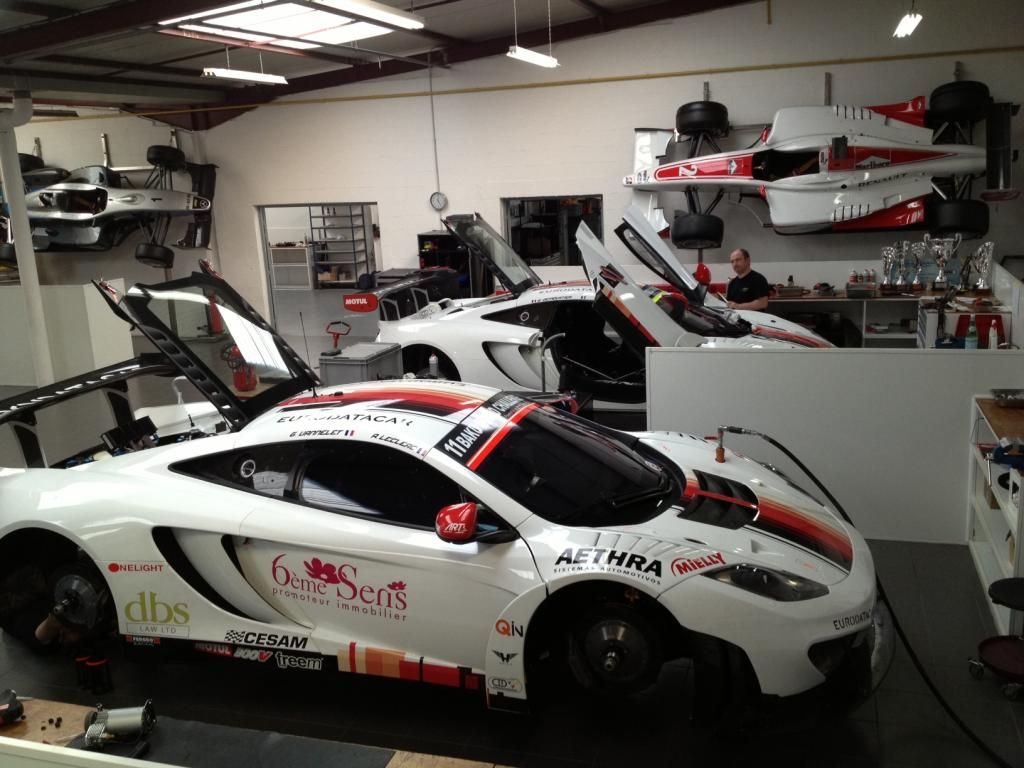
I'm working for a French motorsport team and we are running some single seater (GP2 and GP3) and Mc Laren GT3 in different championships. Here is a picture of our workshop :
The Mclaren color scheme would have fit properly to the Navigator so I did a few photoshop to try to it on the car:
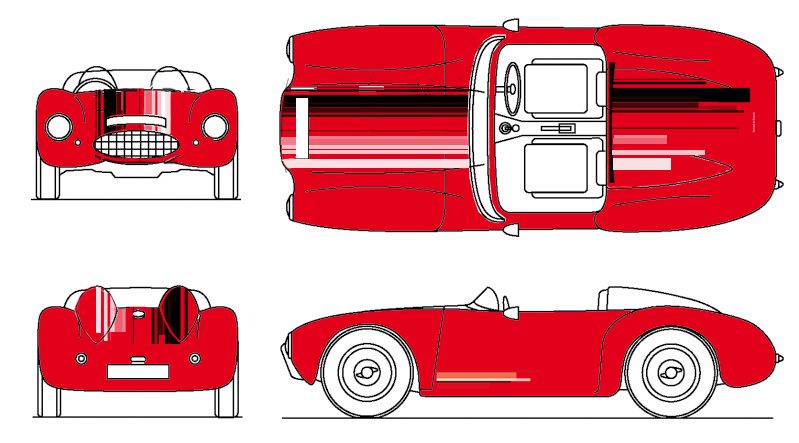
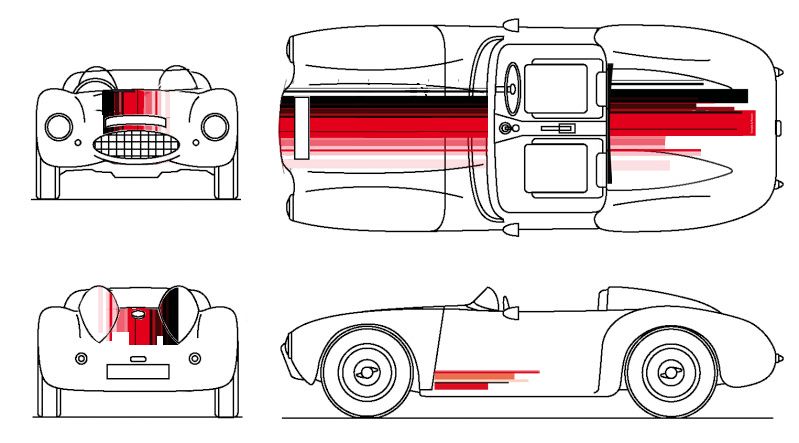
I'm still a bit not sure about the final color even if the red looks stunning so I wanted a feedback from other builders (even if you do not like it). 
I hope being able to do some historic regularity rally with the car next year. 
Last edited by pam983; 4th September 2013 at 08:15..
|
3rd September 2013, 20:29
|
|
Senior Member
|
|
Join Date: Jul 2011
Posts: 5,328
|
|
I rather like the white with the red graphics but the red looks good too. Either way it's going to look pretty darn good. |
4th September 2013, 07:35
|
 |
Senior Member
Enthusiast
|
|
Join Date: Dec 2006
Posts: 1,130
|
|
The white looks stunning
Can I steal it for my project??? |
4th September 2013, 19:45
|
 |
Senior Member
|
|
Join Date: Sep 2011
Posts: 1,446
|
|
Love the single sweater hanging on the wall in the workshop photo
|
4th September 2013, 19:48
|
|
Senior Member
|
|
Join Date: Dec 2011
Posts: 656
|
|
No Sweaters to be seen. Do you mean the single seater? |
4th September 2013, 20:36
|
|
Senior Member
|
|
Join Date: Sep 2011
Posts: 1,446
|
|
Quote:
Originally Posted by AndyP57
No Sweaters to be seen. Do you mean the single seater? |
Oops I pod and bloody predictive text
I'll leave it as is to give everyone a chuckle |
17th October 2013, 15:16
|
|
Senior Member
|
|
Join Date: Dec 2011
Posts: 656
|
|
As mentioned on another thread, Pam's car is currently in the Spray shop and will be photographed when it returns.
In the mean time, I've been working with the engine which has now had a good flush through and cleaned up externally in prep for fitting. we've also mated it with a Ford Type 9 gearbox so it would seem a good idea to show a few photos of that along with some notes along the way:
Firstly, research showed that there are various 'flavours' of Type 9 gearbox and the one that mates properly with the Triumph 2 Litre engine is the one with the long input shaft as fitted to the 2.8Ltr V6 Fords. These are starting to become rare but luckily I found a good one locally. The first job is (once separated from the Ford Bellhousing if purchased with it fitted) is to remove the input sleeve and gasket which is held by 4 bolts:

the extension is not needed so has to be removed (Angle grinder to the ready


This is then refitted with a new gasket and attention turned to the Canley's conversion plate. When aligned on the Triumph gearbox, you will find that 3 of the holes already line up but the remaining 2 do not. Holes must be marked and drilled for these, though Canley's recommend not drilling the one that potentially clashes with the Clutch Release Lever pivot. That's what I did, blanking the remaining bolt hole with a ground down bolt:


Once all required holes are drilled and cleaned of swarf, the plate is then taken off and bolted to the Ford Gearbox using the original bolts (If you don't have them, this one was fitted with 12mm, 1.5mm thread pitch bolts which may be difficult to find)
Next step is to bolt the bellhousing back on as before and reassemble the clutch in the usual way but using a Ford Driven plate (Supplied by Canleys)

Last step is to replace the existing Spigot Bush fitted into the end of the crankshaft with the one supplied by Canleys and sized to fit the Ford Input Shaft. Bolt the gearbox/Bellhousing combination to the engine and the next step awaits. Fitting it to the car (We'll cover that when we get it back but I have to measure the gearbox top diff gap to make sure I get the right prop shaft from Canleys. Chances are it will be the GT6 one)
As far as the actual conversion goes, it is far simpler than I thought it would be and results in a Five Speed box mated to a nice Triumph Six Pot!
Last edited by AndyP57; 17th October 2013 at 15:19..
|
17th October 2013, 15:51
|
|
Senior Member
|
|
Join Date: Jul 2011
Posts: 5,328
|
|
Ooh, that looks posh. Will the gear lever still line up with the hole in the gearbox cover?
|
17th October 2013, 15:58
|
|
Senior Member
|
|
Join Date: Dec 2011
Posts: 656
|
|
Apparently not, so I'll be waiting until it is fitted before deciding on the gearbox cover route. Also, as the lever is further back, the Handbrake also needs a bit of thinking.
|
|
Currently Active Users Viewing This Thread: 1 (0 members and 1 guests)
|
|
|
 Posting Rules
|
You may not post new threads
You may not post replies
You may not post attachments
You may not edit your posts
HTML code is Off
|
|
|
All times are GMT +0. The time now is 15:54.
|


 Linear Mode

