|
|
| Tribute Automotive Builds Discuss your Tribute kit build |

30th October 2017, 20:53
|
|
Senior Member
|
|
Join Date: Jun 2015
Posts: 1,401
|
|
looking really great!
|
30th October 2017, 22:38
|
|
Senior Member
|
|
Join Date: Nov 2016
Posts: 228
|
|
Can't believe how quick this is all coming together!! Looks awesome mate, can see a lot of hard work has gone into it.
|
31st October 2017, 06:21
|
|
Senior Member
Enthusiast
|
|
Join Date: Jun 2015
Location: Reading, Berkshire
Posts: 688
|
|
Looks very cool my compliments.
If any local football grounds need extra lighting in the winter they know who to call too 
Dave |
31st October 2017, 07:25
|
|
Senior Member
|
|
Join Date: Oct 2016
Posts: 181
|
|
Thanks guys, yes its been a long 10 days and i'm shattered now.
picking the car up after work tomorrow, and then off to the lockup where i can do the finishing bits at my leisure.Don't really know if it will ever be totally finished as there is always things to do and change.I do have a turbo kit for it but i think it will be too big as its will do 485BHP so i am told 
Maybe just add another 100 ish BHP as it needs to go woosh bang haha |
31st October 2017, 11:44
|
|
Senior Member
|
|
Join Date: Aug 2012
Posts: 2,143
|
|
Take a rest, 10 days is a record build time from start to finish including paint !
|
31st October 2017, 16:07
|
|
Senior Member
|
|
Join Date: Oct 2016
Posts: 181
|
|
[IMG] 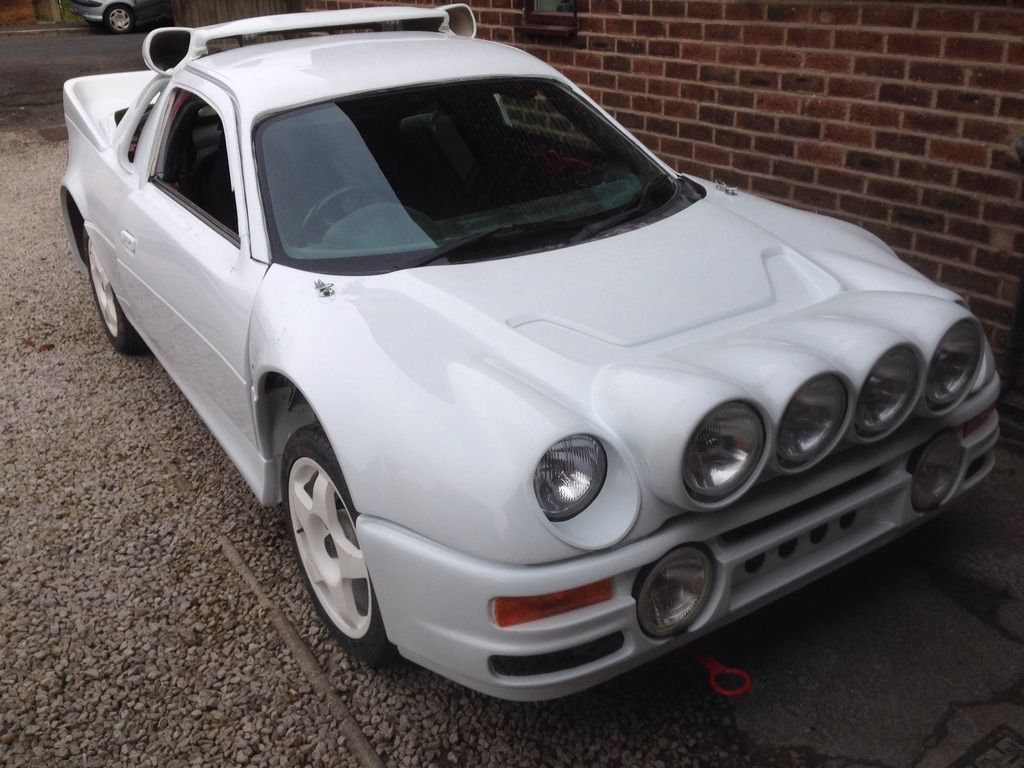 http://[/IMG]All ready for driving back home. 
I have now to fit the side windows and the mesh. Also need to sort the lights out as they don't seem to want to work properly on dip and main beam. Two wires to each on the original headlamp bulbs need 3 in total for the golf lamps.
i will look at it when my brain has had a rest 
Last edited by wozzy; 31st October 2017 at 16:08..
Reason: .
|
31st October 2017, 17:20
|
|
Senior Member
|
|
Join Date: Nov 2016
Posts: 228
|
|
Fantastic work mate!! The spacers will make a huge difference to its looks as well. I'm so jealous at how quick this has come on and you've got a great finish on the paintwork. Out of interest, what did you use to get all the waxy stuff off the shell? I've been scraping bits off whenever I pass it but there's still pockets of the stuff I can't get my finger in to.
|
31st October 2017, 19:02
|
|
Senior Member
|
|
Join Date: Oct 2016
Posts: 181
|
|
Hi Nick
the painter dealt with all that, he went all over with 180s on a DA and then started from there. I also started with a power file on all the joints, they are a great bit of kit
|
31st October 2017, 19:04
|
|
Senior Member
|
|
Join Date: Oct 2016
Posts: 181
|
|
Also used a power file, they are great for taking the edges back
|
31st October 2017, 20:59
|
|
Member
|
|
Join Date: Dec 2016
Location: halifax
Posts: 85
|
|
 mrs200 build
Quote:
Originally Posted by wozzy

[IMG] http://[/IMG]All ready for driving back home.
I have now to fit the side windows and the mesh. Also need to sort the lights out as they don't seem to want to work properly on dip and main beam. Two wires to each on the original headlamp bulbs need 3 in total for the golf lamps.
i will look at it when my brain has had a rest |
hi wozzy i had the same problem with the head lights just thinking back to how i sorted if you want i can give you the colour of the wires on to the h4 connectors if your struggling with it got my rad out at the moment started leaking on sunday luckily i was only a couple of miles from home new one arrives tomorrow quick build by the way its looking good "m sport" couldnt have done it faster lol all the best , mick .
Last edited by retro200; 31st October 2017 at 21:00..
Reason: spelling
|
31st October 2017, 21:15
|
|
Senior Member
|
|
Join Date: Nov 2016
Posts: 228
|
|
Quote:
Originally Posted by wozzy
Hi Nick
the painter dealt with all that, he went all over with 180s on a DA and then started from there. I also started with a power file on all the joints, they are a great bit of kit
|
180s on a DA... I have no idea what that means  |
31st October 2017, 21:40
|
|
Senior Member
|
|
Join Date: May 2013
Posts: 748
|
|
Quote:
Originally Posted by Nostromo
180s on a DA... I have no idea what that means |
180 grit paper on an electric sander, I guess . |
31st October 2017, 22:33
|
|
Member
|
|
Join Date: Dec 2016
Location: halifax
Posts: 85
|
|
sander
[QUOTE=Drummajor;91461]180 grit paper on an electric sander, I guess . DA = "dual action" air sander it oscilates as opposed to a "orbital" sander that will leave loads of circular scratches
|
1st November 2017, 07:57
|
|
Senior Member
|
|
Join Date: Nov 2016
Posts: 228
|
|
Gotcha  I've got a black and decker mouse somewhere. Would that be good enough for it or would I be better investing in something a bit more manly? |
1st November 2017, 08:29
|
|
Member
|
|
Join Date: Dec 2016
Location: halifax
Posts: 85
|
|
sander
Quote:
Originally Posted by Nostromo
Gotcha I've got a black and decker mouse somewhere. Would that be good enough for it or would I be better investing in something a bit more manly? |
i wouldnt use that its orbital it will leave loads of circular scratches use a DA or do it by hand |
1st November 2017, 09:50
|
|
Senior Member
|
|
Join Date: Nov 2011
Posts: 3,558
|
|
If you do it by hand get/make a flexible sanding sled*.
*basically a foam** block you wrap the sandpaper around. The flexible foam allows you to follow the curves of the body as opposed to a stiff bock that won't.
**I used lengths of foam pipe cladding as I was too cheap skate to buy the proper tools
|
1st November 2017, 12:14
|
 |
Senior Member
|
|
Join Date: Sep 2011
Posts: 1,446
|
|
Wow quick build
So it's all white and most people go the ford motorsport look to break up the white
Dare you be different? See below for an unusual colourshceme that works with the white
http://speedhunters-wp-production.s3...9/IMG_1870.jpg
Last edited by redratbike; 1st November 2017 at 12:17..
|
1st November 2017, 13:00
|
|
Senior Member
|
|
Join Date: Oct 2016
Posts: 181
|
|
Quote:
Originally Posted by retro200
hi wozzy i had the same problem with the head lights just thinking back to how i sorted if you want i can give you the colour of the wires on to the h4 connectors if your struggling with it got my rad out at the moment started leaking on sunday luckily i was only a couple of miles from home new one arrives tomorrow quick build by the way its looking good "m sport" couldnt have done it faster lol all the best , mick .
|
Hi Mick
that would be great if you don't mind, I have also decided not to use the side windows, i am adapting what is there to use the existing window. The door tops are quite loose when the door is shut, so i am going to chop them at the bottom where they come off the door. It will be quite good when they are finished as the frames will stay in place when the door is opened.
Just drove it home and the amount of people looking and nodding was great, it even had some workmen who were doing roadworks taking pics on their phones as i was sat at the traffic lights.

|
1st November 2017, 13:01
|
|
Senior Member
|
|
Join Date: Oct 2016
Posts: 181
|
|
Quote:
Originally Posted by WorldClassAccident
If you do it by hand get/make a flexible sanding sled*.
*basically a foam** block you wrap the sandpaper around. The flexible foam allows you to follow the curves of the body as opposed to a stiff bock that won't.
**I used lengths of foam pipe cladding as I was too cheap skate to buy the proper tools
|
haha
like it |
1st November 2017, 13:02
|
|
Senior Member
|
|
Join Date: Oct 2016
Posts: 181
|
|
Quote:
Originally Posted by redratbike
|
Looks good, but not for me |
|
Currently Active Users Viewing This Thread: 1 (0 members and 1 guests)
|
|
|
 Posting Rules
|
You may not post new threads
You may not post replies
You may not post attachments
You may not edit your posts
HTML code is Off
|
|
|
All times are GMT +0. The time now is 02:31.
|


 Linear Mode

