|
|
| Sammio Builds and discussions Sammio bodied car builds and specials |

28th September 2012, 19:06
|
|
Senior Member
|
|
Join Date: Sep 2012
Posts: 424
|
|
 Hi to you all
Hello and welcome, Im garys other half  . Ive been working with gary for two and a half years now, and i thought it would be about time i joined this wonderful friendly sammio forum . Garys done such a great job with what i can say i think a very unique and clever and simple kit. Well thats the ass kissing done  .
If anyone would like to ask and questions on fibre glass, bodywork prep and paint im your man . Also any problems that come up on your build , beleave me you will, also just ask . Anyway lets rock 
Last edited by mikmiglia; 28th September 2012 at 21:20..
|
28th September 2012, 19:43
|
 |
Senior Member
|
|
Join Date: Jul 2011
Posts: 5,328
|
|
Hi Mike-e-miglia, welcome to the forum, although I sense that you may already have had some involvement...
I am about to embark on my first ever spray paint job and I could really do with some advice. Everything I've read about spraying says that the preparation is everything. What they don't say is how you go about that preparation.
So, treat me as if I know nothing (true) and please give me the low-down on how you prepare the fibreglass shell for paint. And before you tell me to flat it with wet 'n' dry, what the 'king 'ell does that mean?
|
28th September 2012, 21:18
|
|
Senior Member
|
|
Join Date: Sep 2012
Posts: 424
|
|
Hello ,yes i missed the e, to be honest i dont know how to change the username  perhaps you could advise me .
Any way this is the basics to prepering you kit prior paint.
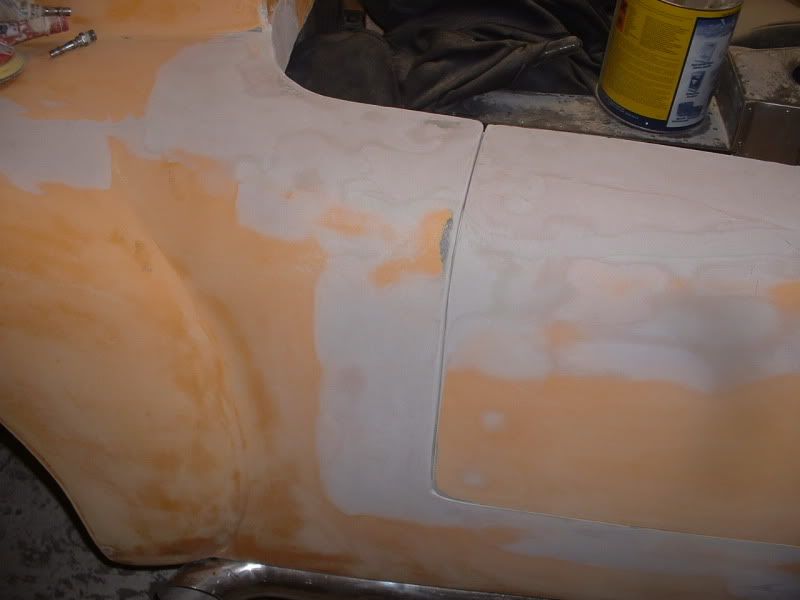
(1) First make sure you wast the body down with some degreaser or sometimes none as panal wipe, making sure all plastercine is removed.
Next get a heat gun and a ring spanner, ok you will run the heat gun over each panal of the body , the reason if there is any air left under the gel it will expand and rise to the surface. Get a flat screwdriver and pick out the damage area. This is crutial as once painted your get it out in the sun and this can come up under the paint , worst for the obvious dark colour as they will heat up faster. last of all tap all hard edges with the back of a spanner, ant voids will be picked out . If ant found just grind back and you can use conventional body filler to repair.
(2) next sand using an orbital sander with 80 grit discs the whole car , so your left with no shine on the gel coat. The reason for this is when body filler is applyed it will etch to the surface. For the areas that needs building up i would suggest using a 4 " flaper disc on an elctrical grinder . this will key into the gel, and as the surface has been sanded with 80 grit the filler will blend into the origanal gel with no flaking edge.
(3) Once filler has been sanded , i sugest long block using 40 grit for start , and when close to shape mist a guide coat over the filler. You ask what s a guide coat. Well when you block the filler down if any low patches are left they will be left with the paint. This can be two things add more filler to the low patches ,or you havent blocked enough of the surrounding area. This is the hard bit , the skill is also sliding the palm of your hand keeping your fingers straight and your get a feel naturely all the low patches.
(4) Once your happy with your finish of the body, give it a bloody good blow of with an airline and hoover your cockpit area. Next is to sand the filler areas with a block and using 240 grit paper. This helps any rubing down marks
sink through the paint. Make sure you go over with random sanding rather than just straight strokes. This is so you dont put ruts in the filler .
Blow of car again and once happy that the car have no pin holes in filler or small marks the depth of you finger nail in the gel coat start your maskin up.
(5) I sugest apllying a high build primer, this will coat the car in a thick but tough surface. As this has a high denstity your will need to spray witha a spray gun with a 2.1 nozzel . Next its the return of the guied coat. Mist all over the body . You will need 600 wet and dry paper , small rubber block , bucket and warm soapy water. If your left with ant sags in the primer block with a bit of 240 first and 600 wet and dry. I cant stress anough apply lot of guide coat inbetween blocking down , this will help get a smoove finish pryor
paint.
(6) Dry of body blow any water from under edges and make sure no water is left. degrease again , make sure all is masked up and you ready for the top coat. yippy""
(7)When i paint i put a small amount of water on the floor around the car, brush around making sure not to splash on the car. This keep any dust being picked up from shoes and air line. You will need a half desent spraygun if your looking for spraying any good, also at least a compresser 300 litres with a water trap. I can only advice , im not saying you cant mange , but this will help.Also at least something like a 3 m twin filter mask. Next ventalation , make sure well ventalated . Right the fun bit,once paint is in the gun apply nice even coat s making sure to over lap each section (otherwise your will get dry edges. I normaly start the back end, mist around the rear arches and start in the middle of the car and work to the side , once you got to the outerside get yourself around the otherside and overlap the paint flow over your first , work your way to the side again. Repeat the same process with the bonnet, side s start from the top working to the sill. Leave 10 mins inbetween coat. I recone three coats would be good .
(8) sorry for any grammer mistakes and bad spelling im hopeless.
This is a crash coase into bodywork , its not easy to explain , but
just make sure the prep is good , otherwise your be very pissed of once painted.
Cheers mike 

|
28th September 2012, 21:19
|
 |
Senior Member
|
|
Join Date: Feb 2012
Location: Wembley, London
Posts: 5,056
|
|
Hi Mike & welcome,
I can't believe it is over 5 months since I first met you & Gary and set off on the Sammio building road.
Like Mister Towed lots of this is very new to me too.
But if I had one initial question for you it would be what sort of filler do you use?
Plus do you have any tips for getting such nice "gaps"?
Some examples below (including your own build).
Cheers, Paul. 
 |
28th September 2012, 21:21
|
|
Senior Member
|
|
Join Date: Feb 2012
Location: Wembley, London
Posts: 5,056
|
|
D'Oh!
Sorry too slow typing, I'll go go and read your reply above...
|
28th September 2012, 21:46
|
|
Senior Member
|
|
Join Date: Sep 2012
Posts: 424
|
|
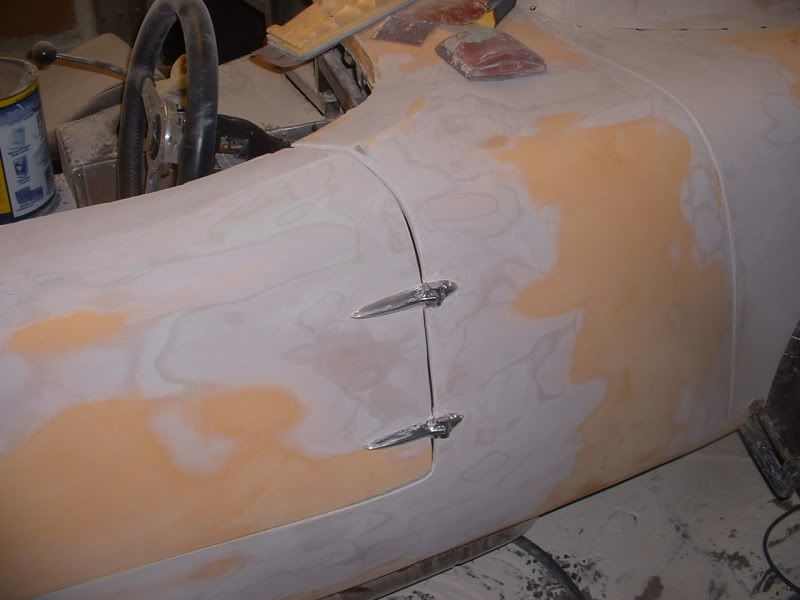
Hi paul how are you ? i think ive just answed one question about the filler i use on my car section miglia. As for the gaps, well if your trying to gap a door make sure you run at least a grinder with corse dise to etch the inner door shut suround, Fit your door so it fits in the hole, when happy apply Filler over the two surfaces to bridge gap. Once nearly seting just run a sharp knife against the (door edge not the door shut edge to cut first gap). I normaly sand over the top with a d a sander withan 80 grit disc.
This takes time but the end resolt worth it i think, takes it away from the normal kitcar standard door shuts. I hope this helps .
|
29th September 2012, 07:27
|
|
Senior Member
|
|
Join Date: Feb 2012
Location: Wembley, London
Posts: 5,056
|
|
Quote:
Originally Posted by mikmiglia

... I hope this helps ...
|
Cheers Mike, it sure does.  |
29th September 2012, 07:31
|
 |
Senior Member
|
|
Join Date: Oct 2011
Location: Surrey
Posts: 363
|
|
Wheel arches
Mike we met when we came down last year with my son Charlie and our friend Mark.
You may have seen our thread, not added to for some while, we have worked out loads of detail from our own knowledge but most from others ideas on this forum and Gary's Lancelot link items (your work).
We have to come up with a solution to all the wheel arches and wings we have re profiled, having cut out the return angle, they have obviously lost thier strength we have looked at just about everything we can.
Ideally we would love to use say a rounded bead 4mm or 6mm in diameter with a flat tail that could be bonded to the inside of the arch and the outer face blended into the bead, found this in an unsuitable rubber but nothing in fibreglass or ally.
I have found a pre made fibreglass un-equal angle which would be ideal the longer leg up the back of the wing leaving a 7mm long to bend around the profile and then bland the arch to it, the only problem is that only make it in 300mm lengths as they sell it in modelling shops.
Mike you are the man!!!!! everyone building a G46 is going to have this problem at some stage.
You could corner the "world market" for manufacturing a solution to the problem.
Keep on rocking the only way is V8
|
29th September 2012, 07:39
|
|
Senior Member
|
|
Join Date: Jul 2011
Posts: 5,328
|
|
Sound advice so far Miglia, and thanks for taking the time to reply in such detail. I'm now quite looking forward to getting on with the prep and putting some silver paint on the car |
29th September 2012, 08:05
|
 |
Senior Member
|
|
Join Date: May 2011
Location: Somerset
Posts: 1,671
|
|
Quote:
Originally Posted by mikmiglia
Hello and welcome, Im garys other half :
|
That would explain SOO much..... 
Just kidding! Good to see you on here matey just don't spend too much time here as I want to see that Spyder-beast of yours on the road soon! Ready for Exeter perhaps? |
29th September 2012, 09:54
|
|
Senior Member
|
|
Join Date: Jun 2011
Location: birchington, kent
Posts: 1,769
|
|
Morning Mike, thanks for starting this thread, it's going to be very useful. Nearly had the kit one whole year now... Looking forward to doing lots of body mods.
|
30th September 2012, 09:17
|
|
Senior Member
|
|
Join Date: Sep 2012
Posts: 424
|
|
Hi dave, you were right i would come out the closet some time. And yes more time on here means not working on your cars, let that be a leason to you all  only joking its a very helpful forum . |
20th October 2012, 06:53
|
 |
Senior Member
|
|
Join Date: Jul 2011
Location: Marmande 47200
Posts: 501
|
|
Quote:
Originally Posted by WorldClassAccident
No Void

Heat Gun

Void

The void wasn't at all visible originally. I was running the heat gun over the body when I saw it just start to rise. I removed the heat and then took the photos to show what it looked like.
Of all the voids circled on this picture only the ones on the dashboard were really obvious and most weren't apparent at all
 |
WCA Have responded here as it ties in nicely with the advice given in this thread, I was suprised to see the size of these voids, I expected pin head size, will wait and see what pops up on mine when I get angry with the heat gun...
Pops |
20th October 2012, 10:45
|
 |
Senior Member
|
|
Join Date: Jan 2011
Location: Cullompton, Devon
Posts: 328
|
|
Hi Mike, well it saves me asking again about how to do this and that. the tip with the hot air gun will be my saviour.
I used 900 gram mat it was a f$%*ing pain, I'll be putting a 450gram top coat over the lot should I heat gun it before that? the 900gram that is left will be converted to 450 and hopfully no bubbles. ho well back to the (warrior) "arm chair" having just had another NHS stay, are you and Gary going to make Exeter? regards PAT.
|
6th November 2012, 21:19
|
|
Senior Member
|
|
Join Date: Feb 2012
Location: Wembley, London
Posts: 5,056
|
|
Hello again Mike,
Have you got any tips for fitting doors & door hinges?
As I don't think my current arrangement will last very long. 

Cheers, Paul. |
6th November 2012, 21:59
|
 |
Senior Member
|
|
Join Date: Nov 2011
Location: Emsworth
Posts: 810
|
|
Thanks for bringing this thread up Paul, I had missed it. Great advice on paint prep Mike. What primer undercoat do you use? There has to be an alternative to the reassuringly expensive marine stuff we use??
Thanks, from next door!
|
6th November 2012, 22:35
|
|
Senior Member
|
|
Join Date: Sep 2012
Posts: 424
|
|
Quote:
Originally Posted by Paul L
Hello again Mike,
Have you got any tips for fitting doors & door hinges?
As I don't think my current arrangement will last very long.
Cheers, Paul. |
Hi paul First block the door skin back so the door fits in the hole. Once happy
i would stick some 2inch asking tape on the area on the door and a post area.
You need to look on the inside of the hinges as they are sided, and top and bottom. As you look the shape of the hinge , they camber from top to bottom . Basically to fit a lightly curved door, I found the flatter area the better.
Get yourself and spirit level and mark a straight and level line across the door to a panal. Then work the next hinge position of that, so basicaly the hinges work together without fighting each other..
I find if purchased with the hinges the plastic seals can be mark around also for marking the bolt holes, if not just make a card template.
I hope this helps alittle, |
6th November 2012, 22:38
|
|
Senior Member
|
|
Join Date: Sep 2012
Posts: 424
|
|
Quote:
Originally Posted by seanick
Thanks for bringing this thread up Paul, I had missed it. Great advice on paint prep Mike. What primer undercoat do you use? There has to be an alternative to the reassuringly expensive marine stuff we use??
Thanks, from next door!
|
Hi seanick , i use a primer called reface, its like a high build primer, but it s
great on grp and rubs down like tac.. |
7th November 2012, 17:03
|
|
Senior Member
|
|
Join Date: Feb 2012
Location: Wembley, London
Posts: 5,056
|
|
Quote:
Originally Posted by mikmiglia
... I hope this helps a little...
|
It sure does Mike, thanks.
Can I just check if you usually leave access to the hinge bolts?
Or do you just make sure they will not come out & seal the cockpit / door around them?
Cheers, Paul.
PS
Quote:
Originally Posted by seanick
... Thanks for bringing this thread up Paul, I had missed it...
|
I will add this to the useful links thread when I'm next updating that. |
7th November 2012, 17:39
|
|
Senior Member
|
|
Join Date: Sep 2012
Posts: 424
|
|
Quote:
Originally Posted by Paul L
It sure does Mike, thanks.
Can I just check if you usually leave access to the hinge bolts?
Or do you just make sure they will not come out & seal the cockpit / door around them?
Cheers, Paul.
PS
I will add this to the useful links thread when I'm next updating that. |
Sorry about any spelling mistakes by the way, its not my best point lol.
Anyway, i would use say 9mm ply to line out the inside, and maybe cut an acess hatch , the end of the day the car is fibreglass and things can come lose and at lease you can re-tighten the bolts if needed. |
|
Currently Active Users Viewing This Thread: 1 (0 members and 1 guests)
|
|
|
 Posting Rules
|
You may not post new threads
You may not post replies
You may not post attachments
You may not edit your posts
HTML code is Off
|
|
|
All times are GMT +0. The time now is 03:51.
|


 Linear Mode

