|
|
| Miglia Builds and discussion Miglia bodied builds |

9th August 2019, 17:03
|
|
Member
|
|
Join Date: Feb 2014
Location: South Derbyshire
Posts: 40
|
|
 Better than a Haynes manual!
Wow! Thank you, Paul!
I was hoping for a few pointers and you took the time and effort to produce such a detailed guide - that's fantastic! 
Just hope that my wife won't notice when her yoga mat gets a little bit shorter!
Onwards and upwards...
Richard |
13th August 2019, 16:56
|
|
Member
|
|
Join Date: Feb 2014
Location: South Derbyshire
Posts: 40
|
|
Front end progress
On a bit of a roll...
Having sorted the rear, I fitted the screen using Mr. Towed's trusty rubber well nuts and suddenly things are looking better! Before I left my job, I printed the housings for very discrete LED indicators which will be painted in body colour (now decided - more later). These will need an inline resistor to work with the flasher unit, but I can mount these on the frame inside the engine bay.
front end.jpg
Need to address the negative camber and I have re-read davecymru's thread so will have to take the plunge for new adjustable shocks and springs at some point, although I see that Canley's do an adjustable top wishbone - anyone tried one?
Just waiting on some more aluminium to make a mounting for the fusebox. I opted to keep the original bulkhead (it was the only one I had!) so have drilled a big hole to route the loom inside the footwell and there were some conveniently placed holes already there to bring engine bay cables back out again - result!
fuse box.jpg
A slight conundrum withe the brake master cylinder - I bought a 3/4" uprated one to replace the original very big 5/8" one in the hope that it would fit under the front wing but alas, still a bit of a clash...I could move the frame rail but it would still make removing the lid / filling with fluid difficult. Guessing a remote filler version would be the answer - Wilwood seem to do a good range - all thoughts welcome!...
master cylinder.jpg
Hopefully, the weather will hold, so I can crack on 
Richard

|
13th August 2019, 19:26
|
|
Member
|
|
Join Date: Oct 2017
Location: Cornwall
Posts: 69
|
|
The adjustable top wishbone works well and you can always get some spacers for the bottom wishbone brackets but may need to extend the bolt through the chasses. look at www.wolfitt.com he has some good information on Triumph.
Last edited by keith; 13th August 2019 at 19:30..
|
19th August 2019, 08:35
|
|
Member
|
|
Join Date: Feb 2014
Location: South Derbyshire
Posts: 40
|
|
A few bits
Thanks for the suspension info Keith - will take a look at Wolfitt.
In between tidying the garage, whilst labourer is back from Uni, I have finalised a few more bits and pieces...
The nearside wheel arch has never fitted the wheel (which I showed previously), so out with the jigsaw and more surgery:
Wheel arch profile.jpg
Much better!
Mounted the screen and finalised the profile for the weather/retaining strip:
Windscreen profile.jpg
This made a bit more space for fitting a rearview mirror which I bought as a blind spot mirror. Unfortunately, the field of view is just about the width of the two headrests, so it creates more blind spots than it solves! Thinking about an early Beetle oval one...
Dashboard.jpg
Finally cut out vents on wings and test fitted my 3D printed grilles - the centre one has a modification for an LED indicator repeater (the same type used on the front) which I thought might be an added safety feature:
Indicator vent.jpg
And finally...a bit of bling...found a local metal laser cutter in Derby who was able to cut out the front trident from my DXF file:
Aluminium trident.jpg
Chip, chip, chippin' away!
Richard
|
20th August 2019, 06:33
|
 |
Senior Member
|
|
Join Date: Jul 2011
Posts: 5,328
|
|
Starting to come together nicely. Not sure if you've thought of this, but a 'rubber' sealing strip along the bottom edge of the screen frame stops water coming through underneath it and gives a more finished look.
My trimmer gave me a suitable length of open 'P' shaped seal and I can't seem to find it online now, but there are lots of options. Check out E Type edge seal ATJ1927 in the link as it looks suitable -
https://www.sealsdirect.co.uk/shoppi...rtmentId=68#86
Keep up the good work! |
20th August 2019, 20:50
|
 |
Senior Member
|
|
Join Date: Feb 2012
Location: Wembley, London
Posts: 5,069
|
|
Richard - Looks like your progress is started to gain some momentum. 
So keep plugging away, as every job done is one less to do.
Good luck, Paul. 
PS
The side indicator should work well and I like your cockpit mirror too.
|
20th August 2019, 23:00
|
|
Senior Member
|
|
Join Date: Jun 2015
Posts: 308
|
|
[QUOTE=DerbyDreamer;101684]On a bit of a roll...
Attachment 6284
Hi Richard,
Nice to see you are back on the build and on a roll. I'm not as far as you are, but I'm constantly thinking of ways to approach mounting of the body and find the best position to minimize the effects of symmetry (or a lack of it  ).
I was wondering if you have any photos of your front inner arches you've attached to the frame please? Are they flush with the top of the frame rails or did you raise the front of the body (closer to the radiator) above the frame at all?
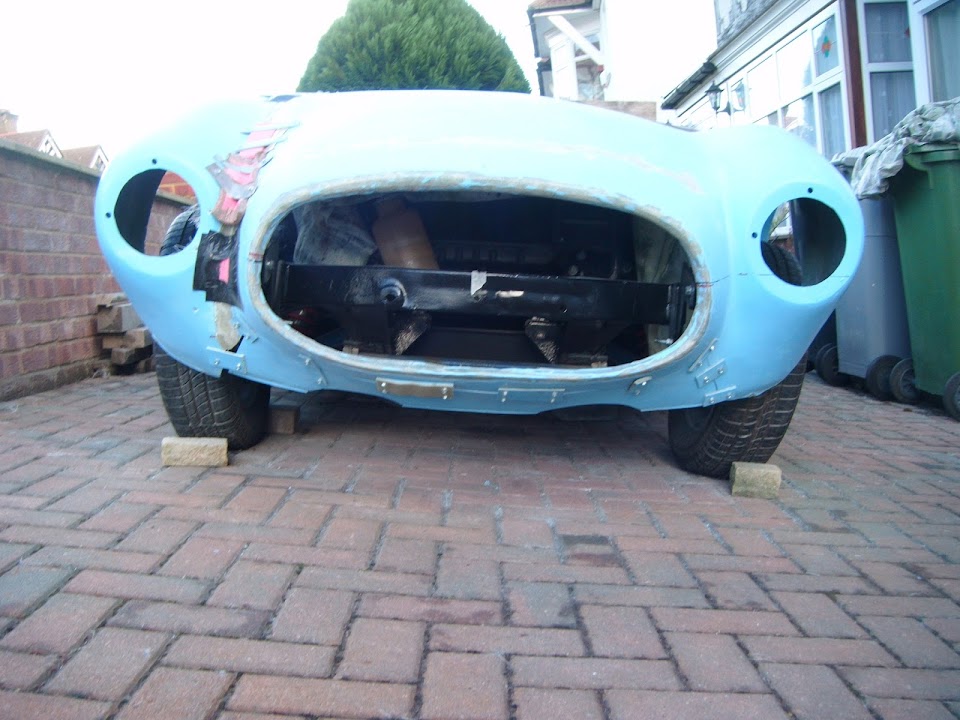
Also, if you have any photo of the body position by radiator area (without bonnet), that would be great. Did you have such a difference in distance from the frame from one side to another, like in the photo below?
IMG_1758.jpg
The photo above shows my body just resting on the frame and follows the frame lines by the front and back bulkhead area. The inner (back) side of my dashboard panel is parallel and against the frame, which should provide a reference for forward/back position of the body, but there is obvious issue with the alignment at the front....
Any advice would help.
Thank you.
Cheers, Deni
|
21st August 2019, 16:27
|
|
Senior Member
|
|
Join Date: Feb 2012
Location: Wembley, London
Posts: 5,069
|
|
DerbyDreamer & Deni – I hope the following helps.
Without wishing to drag up a big row from the past, the original Sammio Cordite bonnet…

Was used as the starting point for developing the Miglia Speedster bonnet.

This was a big improvement in the area between the driver’s side headlight & the bonnet opening.
But the ‘wonky’ nose remained.
- - - - - - - - - - - - - - - - - - - - - - - - - - - - - - -
My top tip would be to just ignore the symmetry issues if you can.
Because, in the real world, no one else notices the same things that we see when building the cars.
I know there is an issue with the nose, so I can see it in this photo.
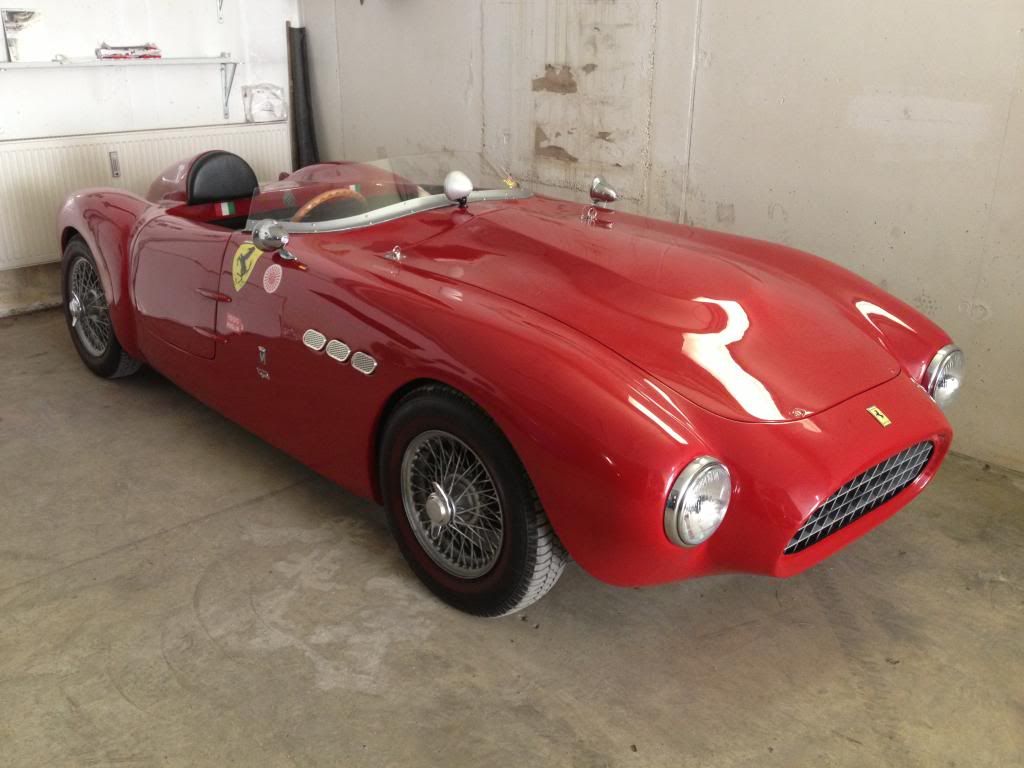
Thankfully, most people will simply see a great looking car and many will believe it is a Ferrari.
- - - - - - - - - - - - - - - - - - - - - - - - - - - - - - -
However, if you really want to straighten things out, the joy of fibreglass is you can do what you want.
Note: It is always a mistake to put a straight line anywhere near these cars. 
As this will always lead to more work, even if the cut and join is straight forward.


- - - - - - - - - - - - - - - - - - - - - - - - - - - - - - -
In the end, I spent a lot of hours butchering my bonnet and then piecing it back together again.
But, by the time you finish all the work, you can’t see the joins.

Please Note:
Despite throwing a HUGE number of hours at this, I still didn't achieve perfect symmetry. 
So the key thing to remember is that back in the ‘50s, these cars were built like this…

Not like this. 

So if anyone does ask, just say the body shell for the car was hand built. 
Good luck, Paul.
|
22nd August 2019, 15:04
|
|
Member
|
|
Join Date: Feb 2014
Location: South Derbyshire
Posts: 40
|
|
Thanks for the lip seal idea, Mr T - will have a measure up!
Deni, I will get hold of some more detailed photos for you.
Thanks for the 'grounding' Paul! It pays to remind ourselves where 'specials' started!!
|
22nd August 2019, 16:07
|
|
Member
|
|
Join Date: Feb 2014
Location: South Derbyshire
Posts: 40
|
|
Frame details for Deni
Deni,
I have tried to show some details of the bonnet frame - they are different and I think I will end up moving one of them, in order to create some space for my brake master cylinder, as I am using the original Vitesse bulkhead which seems to set the pedals higher?
Miglia left bonnet.jpg
Miglia right bonnet.jpg
The front cross bar will also need to move forward when I adjust the side frames, as I opted for the original style radiator and want to fit a fan to the front of it, so need to make a bit more room.
Miglia radiator frame.jpg
I don't have any front wheel arches but have read of others adapting trailer wheel arches to fit inside the front wings. I do have a pair of these for the rear and they will fit over the rear axle when I take the body off to complete the rear end surgery...
Miglia rear arches.jpg
Let me know if I can take any more photos or measurements and I will have a look at mine.
Cheers
Richard
|
22nd August 2019, 17:20
|
|
Senior Member
|
|
Join Date: Jun 2015
Posts: 308
|
|
Paul L - Thank you for your sound advice and the photos, valuable as always.
I'm intending to keep it as simple as possible and I'm hoping to avoid cutting the body and wheel arches if possible. I'm ok with it not being perfect, and I know I would end up chasing my own tail if I would try to make it perfect. However, it is good to get as much info/references as possible (not many Miglia builds are on the forum compared to Sammio) in order to find the best position before bonding the body permanently.
DerbyDreamer - thanks a lot, the photos are very helpful.
My frame also has different left and right bonnet rails, but luckily it is not difficult to modify this if necessary.
I saw you are using the original bulkhead, but I can't see any of photos from your old posts on your thread, so I thought I'll ask a few questions.
You can see in the picture I've posted that I have an alignment problem at the front. There is a big difference in distance from the front bonnet opening edge to the front frame rail on the left side compared to the right.
Can I just ask, now you have the body in position, how much difference in distance have you ended up with please? The measurement will do, but if you have a photo similar to mine, that would be great.
Thanks.
Deni
|
22nd August 2019, 18:20
|
|
Member
|
|
Join Date: Feb 2014
Location: South Derbyshire
Posts: 40
|
|
Body alignment
Deni,
I have made some measurements: the line on the green tape marks the centre of the metal frame and the orange tape shows the distance from the centre of the frame to the edge of the bonnet opening; as you can see, there is 50mm difference. That said, the centre of the radiator (also marked in orange) is not far off the centre of the frame, leading me to think that the opening is off centre, which I can live with!
Body alignment.jpg
The other useful thing to check is that the front edge of the wheel arches actually tuck around the front chassis 'horns' quite well on each side and I think this will be a useful body mounting point...
Front chassis fitting.jpg
Hope that helps...
Richard
|
22nd August 2019, 20:00
|
|
Senior Member
|
|
Join Date: Jun 2015
Posts: 308
|
|
Thanks for your reply Richard.
So sorry, but I meant the measurement length-ways (please see the arrows in photo below).....no rush, just when you have time.
IMG_1758-1.jpg
Thanks.
Cheers,Deni
|
23rd August 2019, 08:51
|
|
Member
|
|
Join Date: Feb 2014
Location: South Derbyshire
Posts: 40
|
|
Body alignment update
Apologies, Deni - I misread your original question!
I have added the forward measurements here and there is a 20mm difference between the two sides (the measurements were taken at the edge of the radiator to the furthest forward edge of the opening, effectively where the bonnet will sit).
Body alignment 2.jpg
I did also check the distance from the front frame to the bulkhead and this is within 10mm on either side.
Hope that helps!
Richard
|
23rd August 2019, 11:20
|
|
Senior Member
|
|
Join Date: Jun 2015
Posts: 308
|
|
Thanks a lot Richard, it's a great help. I was unable to work on my car since March now, but will start again in a few days hopefully - looking forward to it!
Your car is coming together well so far and it will look great when when it's finished. I like your dash design and its position, looks really good.
Looking forward to following your progress and good luck with the 'plastic (fibreglass) surgery' .
Cheers, Deni. |
16th May 2020, 10:56
|
|
Member
|
|
Join Date: Feb 2014
Location: South Derbyshire
Posts: 40
|
|
Progress
Well...all this time at home has led to me running out of excuses!
The good news.....she runs!! It looks like the carbs have been rebuilt at some point though and from what I can see looking at Vitesse photos, there should be a choke lever on the left hand side?...Hoping the wise collective will be able to advise...maybe someone even has one in their box o' bits? A close up photo would also help!
Carb setup.jpg
Choke position.jpg
Body is currently upside down on the drive and awaiting the completion of surgery to the rear wing - following Paul's yoga mat trick - photos to follow 
|
20th May 2020, 13:01
|
|
Member
|
|
Join Date: Feb 2014
Location: South Derbyshire
Posts: 40
|
|
The body beautiful...
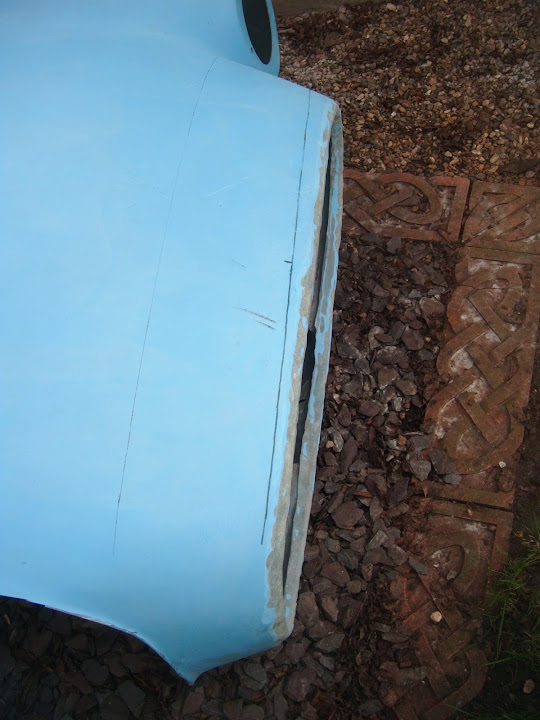
Having performed surgery on the rear wing last year (no point rushing these things!..) I have now filled in the gaps. Paul's 'yoga mat and parcel tape method' was brilliant:
Wing surgery.jpg
Having enough bodies at home at the moment allowed easy flipping of the tub to create access from underneath, with the body suspended on trestles:
Wing surgery 2.jpg
The great reveal the following day left a really strong valley which I can now add fibreglass filler and body filler to:
Wing surgery 3.jpg
Whilst the body was inverted, I was also able to bond in the bulkhead extension which will hide the original Vitesse bulkhead which I have used:
Bulkhead bonding 1.jpg
Having created a return lip on the front of this, I can now get the bonnet to fit, although it does have a 3-inch gap at the front, so will need some cuts to get it to follow the wing curve, I suspect:
Bulkhead bonding 2.jpg
Have run out of polyester resin for now so turning my attention to modifying/remaking the steel frame that sits on the chassis....more soon!
Richard
|
20th May 2020, 19:01
|
 |
Senior Member
|
|
Join Date: Feb 2017
Location: Corsham, Wiltshire
Posts: 100
|
|
Hi Rich, ref your post about the choke I think you have the throttle cable attached to the choke, the one to the left you are looking for is for the throttle. I have attached a picture of mine but you have got me wondering now if mine is the wrong way round, it runs perfectly so I am convinced mine is correct, hopefully a lot more knowledgeable than me will have the answer
|
20th May 2020, 21:18
|
|
Member
|
|
Join Date: Feb 2014
Location: South Derbyshire
Posts: 40
|
|
Got my cables crossed...
Alex, thank you - you have saved me a lot of head-scratching! You are right, I had put the throttle cable into the choke position 
Now the problem I have is that the bracket on the manifold that supports the throttle cable and the one on the end of the butterfly spindle are missing....any close-up photos or dimensions would be great - thinking I might have to fabricate something....not short of time at the moment!....
Richard |
21st May 2020, 05:18
|
|
Senior Member
|
|
Join Date: Feb 2012
Location: Wembley, London
Posts: 5,069
|
|
<Flash Back>
<Shudder>
<Nervous Tic>
Jokes aside, glad to see the yoga mat suggestion helped.
Don't forget to grind off the edges of 'channel' on the sunny side of the bodywork.
That way you can build up layers of fibreglass across the width of the join.
Good luck, Paul.
|
|
Currently Active Users Viewing This Thread: 2 (0 members and 2 guests)
|
|
|
 Posting Rules
|
You may not post new threads
You may not post replies
You may not post attachments
You may not edit your posts
HTML code is Off
|
|
|
All times are GMT +0. The time now is 03:45.
|


 Linear Mode

