Are you madabout kit cars      
 "We've Got Kit Cars Covered" Information about Madabout-Kitcars.com Contact Madabout-Kitcars.com         Home of UK kit cars - madabout-kitcars.com Various kit car write ups All the latest kit car news Kit car related and general discussion

Search
Manufacturers
Kit Cars
Kit Car Data sheets
Picture Gallery
SVA Knowledgebase
Clubs & Communities
Build cost estimator
Kit cars for sale
Knowledge Base 
KitcarUSA.com
Classic-Kitcars.com
 

Go Back   Madabout Kitcars Forum > Mad Build Area > Sammio Builds and discussions

Sammio Builds and discussions Sammio bodied car builds and specials

Reply
 
Thread Tools Display Modes
  #481  
Old 14th May 2014, 20:02
slartibartfast's Avatar
slartibartfast slartibartfast is offline
Senior Member
 
Join Date: Aug 2012
Location: Surrey/Sussex border
Posts: 169
slartibartfast is on a distinguished road
Default

Viatron
Sorry I missed this .... trust all is well.
Gwet well soon.
GB
Slarti
Reply With Quote
  #482  
Old 14th May 2014, 22:04
Mister Towed's Avatar
Mister Towed Mister Towed is offline
Senior Member
 
Join Date: Jul 2011
Posts: 5,328
Mister Towed is on a distinguished road
Default

Quote:
Originally Posted by Viatron View Post
Thanks Oxford and Paul, Towed hmmm don't think I can publish my reply on an open forum......:-)
Sorry, s'pose I should've added OUCH! Take it easy and get well soon.
Reply With Quote
  #483  
Old 15th May 2014, 06:38
oxford1360 oxford1360 is offline
Senior Member
 
Join Date: Mar 2012
Posts: 1,152
oxford1360 is on a distinguished road
Default

I guess the moral of this story is, never use an angle grinder whilst naked.
Reply With Quote
  #484  
Old 15th May 2014, 10:05
Viatron Viatron is offline
Senior Member
 
Join Date: Apr 2012
Posts: 1,163
Viatron is on a distinguished road
Default

Nah that's the scar on my left knee and the other one on my left index finger the one on my badger sack is far worse!
Reply With Quote
  #485  
Old 17th May 2014, 06:53
phil9 phil9 is offline
Senior Member
 
Join Date: Mar 2012
Posts: 745
phil9 is on a distinguished road
Default

ouch get well soon .....
Reply With Quote
  #486  
Old 3rd June 2014, 20:33
Viatron Viatron is offline
Senior Member
 
Join Date: Apr 2012
Posts: 1,163
Viatron is on a distinguished road
Default

And I'm back!
Spent the day in the workshop Saturday and with assistance from Dave and my mate Sean we got the passenger side ali panel in and also the panel on the outside of the drivers foot well. Totally forgot about pics I was so happy to be back in the workshop.
I'm on a project in Dudley for the next 6 weeks which is as close to home as I seem to get work these days so the plan is to spend 2 evenings a week in the workshop for just a couple of hours so that I can accelerate the build. Did my first stint tonight and managed to get 85% of the filler and fibreglass work done on the sides where the body meets the Ali panelling.
Started with this, I filled it before leaving on Saturday with bridging
filler:


a bit of a go with the Da using a 180 grit pad saw it looking like this:


Skim of normal filler


Filler all applied using my trusty silicone bakers scraper thingy, really flexible so good for curves and cleans up really easily. This ones about 5 years old now and still going strong.


A bot more sanding work had them looking like this:


Nice and straight


You can see here how the body now fits to the ali with no gap and the panel gives a good reference to sand to to get a straight edge.


A good couple of coats of primer filler:


TTFN
Mac
Reply With Quote
  #487  
Old 4th June 2014, 06:20
Paul L's Avatar
Paul L Paul L is offline
Senior Member
 
Join Date: Feb 2012
Location: Wembley, London
Posts: 5,056
Paul L is on a distinguished road
Default

Mac - Great work, it always amazes me that you can go from such a rough starting point to such a smooth finish at the end.

Although I am still trying not to think about the "opportunities" to practise this sort of thing my body shell is going to give me.

Hope you get the chance to mix work with garage time.

Good luck, Paul.
Reply With Quote
  #488  
Old 4th June 2014, 07:44
mas123mas's Avatar
mas123mas mas123mas is offline
Senior Member
 
Join Date: Aug 2012
Location: Teesside
Posts: 234
mas123mas is on a distinguished road
Default

Mac, What make of bridging filler and top filler do you use?

Looking good
Reply With Quote
  #489  
Old 5th June 2014, 20:22
Viatron Viatron is offline
Senior Member
 
Join Date: Apr 2012
Posts: 1,163
Viatron is on a distinguished road
Default

Mas, pictures below of what im using, both are a little sloppier than im used to but seem to be working really well especially the fibreglass filler as it being a little runnier makes it easier to get a smooth finish when applying it and less chance of voids.
HTH
Mac


Reply With Quote
  #490  
Old 5th June 2014, 20:27
Viatron Viatron is offline
Senior Member
 
Join Date: Apr 2012
Posts: 1,163
Viatron is on a distinguished road
Default

So couple of hours up the workshop tonight as I managed to get away from site early. Managed to make a good template for the rear panel so it all fits nicely around the tunnel.
Rear panel is in place now and managed to get a good wedge of fibreglass filler in between the top of the panel and the body so that it will be a seamless join like the sides. Gardening tomorrow night but am up the man cave all day Saturday so am hoping to get the drivers side of the cockpit done and signed off including replacing the front of the bulkhead. fingers Crossed!


Oh and on the way home I popped into machine mart as the amount of dust im now generating is scary and invested in a non too expensive wet and dry shop vac.


TTFN
Mac

Last edited by Viatron; 5th June 2014 at 20:32..
Reply With Quote
  #491  
Old 6th June 2014, 05:10
davecymru's Avatar
davecymru davecymru is offline
Senior Member
 
Join Date: May 2011
Location: Somerset
Posts: 1,671
davecymru is on a distinguished road
Default

MAN-VAC!!! Nice
Reply With Quote
  #492  
Old 6th June 2014, 07:36
Mister Towed's Avatar
Mister Towed Mister Towed is offline
Senior Member
 
Join Date: Jul 2011
Posts: 5,328
Mister Towed is on a distinguished road
Default

Just don't bend down too close to it...

http://www.youtube.com/watch?v=43NX-Y9eopo
Reply With Quote
  #493  
Old 6th June 2014, 09:46
Viatron Viatron is offline
Senior Member
 
Join Date: Apr 2012
Posts: 1,163
Viatron is on a distinguished road
Default

That's just wrong!
Reply With Quote
  #494  
Old 7th June 2014, 17:00
Viatron Viatron is offline
Senior Member
 
Join Date: Apr 2012
Posts: 1,163
Viatron is on a distinguished road
Default

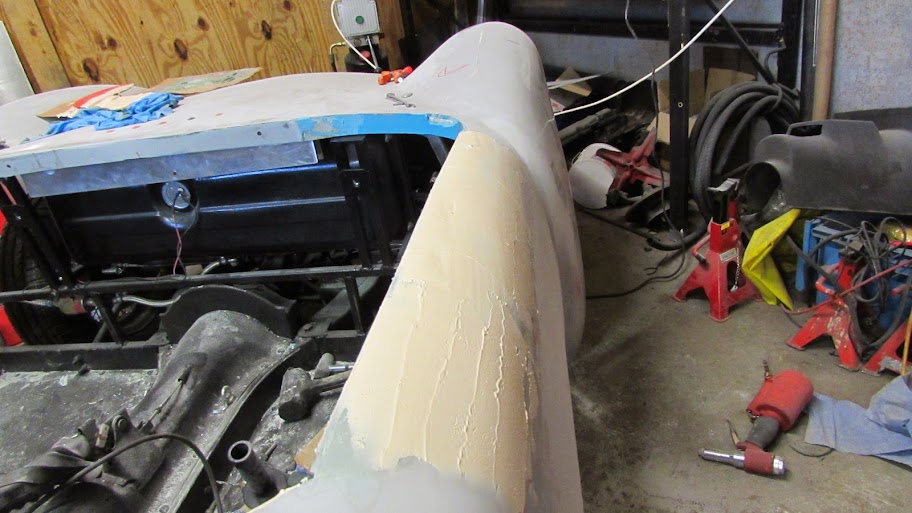
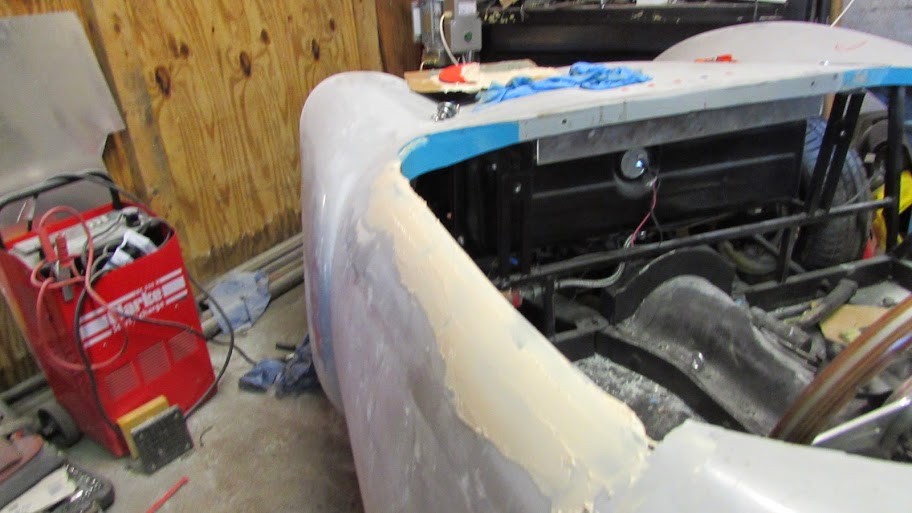
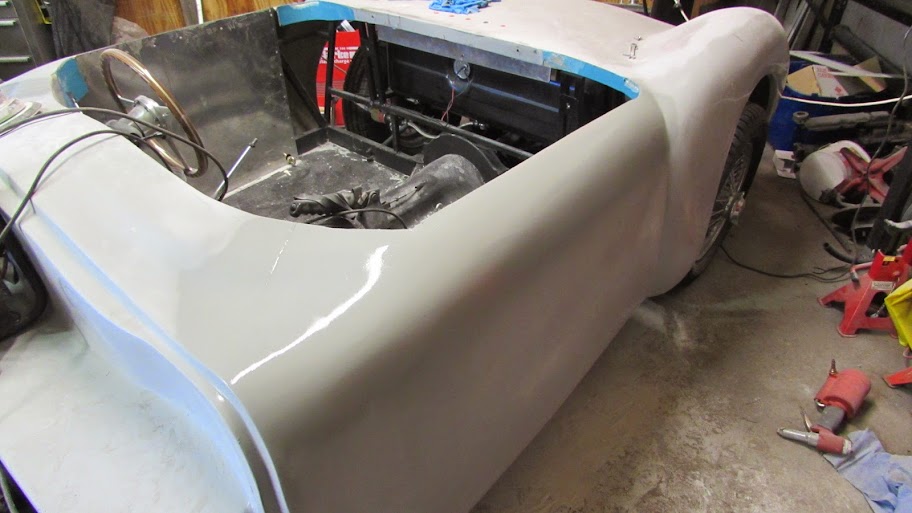
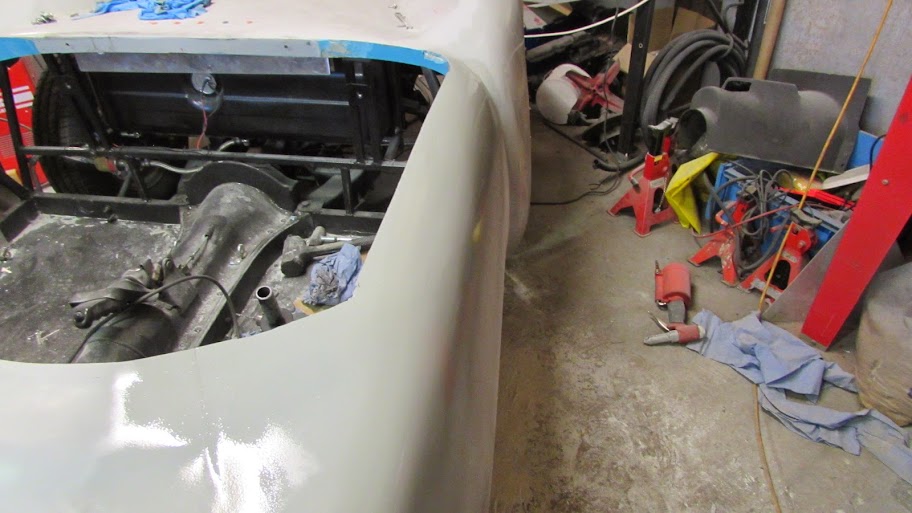
Good progress today. Got the rear deck filling finished. The large rivets I used to attach the rear deck to my ali rear body mount pulled down a bit more than I wanted in places. I originally was going to leave the rivets exposed as a features but that's not an option now so some fiberglass filler last time left it like this:


10 minutes with some 180 grit on the DA saw it knocked back and looking ready for final filler.


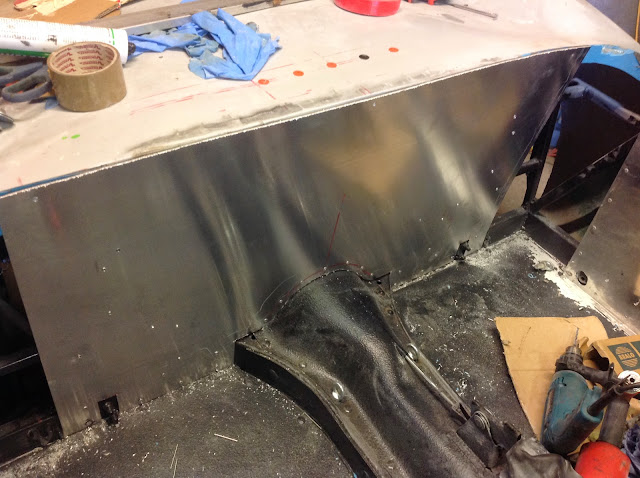
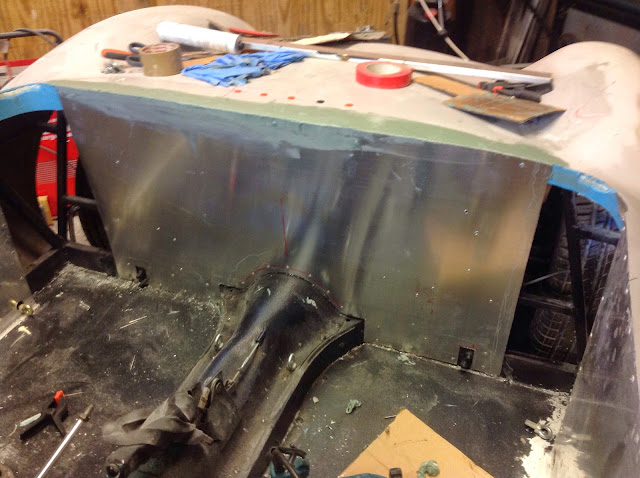
Before I filled it I decided to tackle the rear corner panelling behind the passenger. I have used 2mm ali for all of the flat panels but 2mm isn't very easy to curve unless you have the right kit so just for the corners I have gone down to 1mm sheet. I forgot to tack pictures of the bottom support which was made of ali angle slit on the back edge so it will form a curve. I left the top over long so I could fill against it.


One mistake I had made previously was riveting the rear edge of the side panel, had to drill them all out so I could now rivet through both the corner panel and the side panel as one.

I riveting the edge to the rear of the side panel first then found that just by pressing in the middle of the panel it formed a really nice curve so quickly riveted the other side in and job done! much easier than I was expecting.

The gap between the top of the panel and the side of the body was to say the least not a tight fit but I never expected it to be.


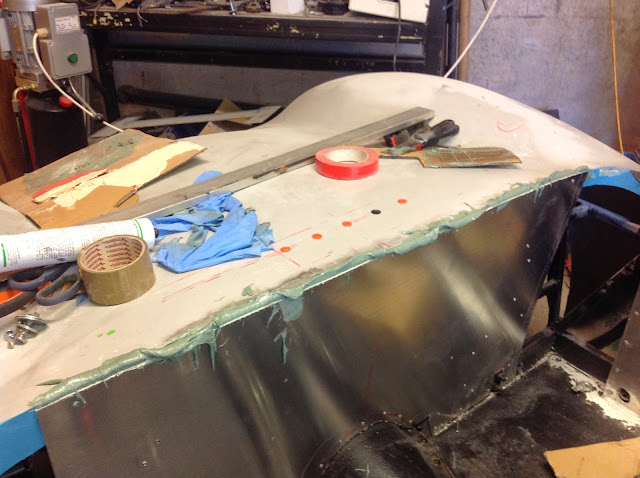
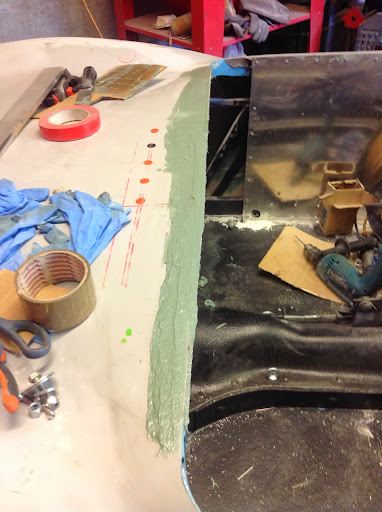
Out with the trusty fibreglass filler again.


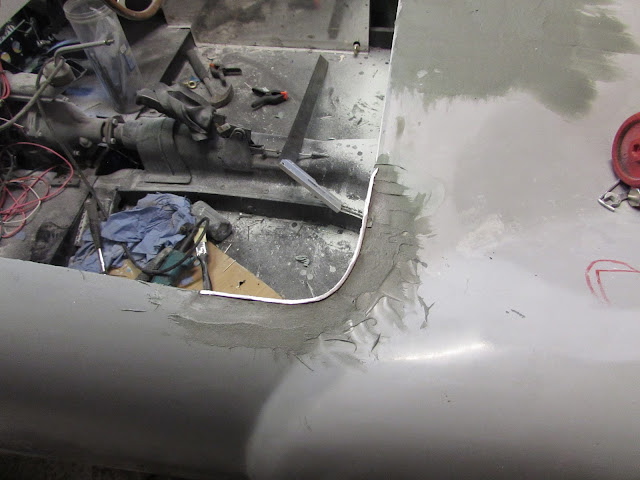
obviously in between I had trimmed the top back a bit.


a bit of sanding work and it looked much better.


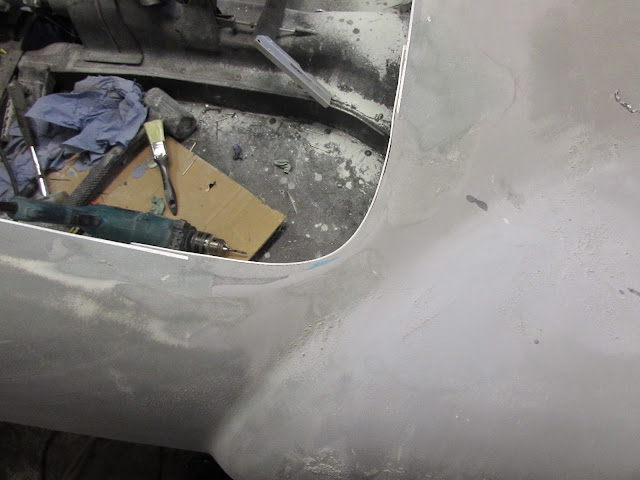
Its still a little green but next time I'm up I will pilot drill and fix the top of the ali corner panel into the fibreglass using some stainless screws.

My original plan was to crack on and get the other corner panel done but I decided to stay in the area I was and tackle the hump.

Stay tuned for part 2....
TTFN

Mac
Reply With Quote
  #495  
Old 7th June 2014, 17:14
Viatron Viatron is offline
Senior Member
 
Join Date: Apr 2012
Posts: 1,163
Viatron is on a distinguished road
Default

My original plan for the humps was to rivet them on and make a feature of the flange, ooh err snigger snigger. After looking at the aforementioned paart though the thickness wasn't as consistent as I would have liked and would have needed a ;lot of work to get it looking right and even then the end result may not have been as good as I hoped so decided to go with bonding them on. First stage was to trim the , ooh err missus, flange off and sand the sides down. before and after shot below. You can also see that prior to tackling this I did some final filler work to the rear deck.


Some careful marking and I had the position set. I bonded and riveted a piece of angle at the front then made up 3 inch right angle brackets to go along the side in a similar manner. The only reason I made these rather than use the angle I had used for the front is that the angle is very heavy gauge and I needed to be able to bend the mounting tabs in a bit to make a good flush fit with the interior of the hump. At this stage I got carried away and forgot to take pics. I will try and remember when I do hump 2.

End result is that it all went together very well. covered the mounting angles in PU then slide the hump over and drilled, countersank then riveted along the edge approx. every 2 to 3 inches. Used and extra long rivet to secure the tail of the hump. By the time I was finished it was absolutely rock solid and even though the PU hadn't set I could push the hump and the whole car rocked! Fitting the humps has also added massively to the rigidity of the rear deck. A bit more fibreglass filler after roughing up the sides of the hump and the corresponding area on the rear deck and it looked thus:-)


The filler work looks quite rough in the last pic but before I left and whilst it was still a bit green I added a second coat and used my silicon spreader to good effect and got a nice smooth transition between the hump and the rear deck, and then promptly forgot to take any pics as I was too busy congratulating myself on such a good job...doh!

Hopefully up again on Tuesday evening so more updates then.

TTFN

Mac
Reply With Quote
  #496  
Old 7th June 2014, 19:54
swifty's Avatar
swifty swifty is offline
Senior Member
 
Join Date: Dec 2013
Posts: 839
swifty is on a distinguished road
Default

Looking good Viatron, the filler around the edges make a difference to the over all look.

Are you going to paint the ally panels or leave as is?
Reply With Quote
  #497  
Old 7th June 2014, 20:53
Viatron Viatron is offline
Senior Member
 
Join Date: Apr 2012
Posts: 1,163
Viatron is on a distinguished road
Default

Cheers Swifty, my original plan was to leave the Ali panelling bare but the more I see how easily it marks the more inclined I am to use the remaining 1/2 pack of bed liner I used on the floors and tunnel to do the interior panels, I just think it will result in a clean finish that is pretty much maintenance free.
TTFN
Mac
Reply With Quote
  #498  
Old 8th June 2014, 14:25
davecymru's Avatar
davecymru davecymru is offline
Senior Member
 
Join Date: May 2011
Location: Somerset
Posts: 1,671
davecymru is on a distinguished road
Default

huh huh huhhuh huh you said flange huhhhuh huh huh


....sorry, grew up on too much Bevis & Butthead to resist!
Reply With Quote
  #499  
Old 8th June 2014, 18:16
Mister Towed's Avatar
Mister Towed Mister Towed is offline
Senior Member
 
Join Date: Jul 2011
Posts: 5,328
Mister Towed is on a distinguished road
Default

Quote:
Originally Posted by davecymru View Post
huh huh huhhuh huh you said flange huhhhuh huh huh


....sorry, grew up on too much Bevis & Butthead to resist!
http://www.youtube.com/watch?v=XvVhKYmr8cE
Reply With Quote
  #500  
Old 8th June 2014, 18:40
Paul L's Avatar
Paul L Paul L is offline
Senior Member
 
Join Date: Feb 2012
Location: Wembley, London
Posts: 5,056
Paul L is on a distinguished road
Default

Mac - You are making this look very easy.

Quote:
Originally Posted by Viatron View Post
... At this stage I got carried away and forgot to take pics. I will try and remember when I do hump 2...
That would be helpful as I do have a spare hump to play with.

Good luck, Paul.
Reply With Quote
Reply


Currently Active Users Viewing This Thread: 2 (0 members and 2 guests)
 

Posting Rules
You may not post new threads
You may not post replies
You may not post attachments
You may not edit your posts

BB code is On
Smilies are On
[IMG] code is On
HTML code is Off

Forum Jump


All times are GMT +0. The time now is 06:22.

copyright © madabout-kitcars.com 2000-2024
terms and conditions | privacy policy