|
|
| Sammio Builds and discussions Sammio bodied car builds and specials |

11th October 2013, 16:44
|
|
Senior Member
|
|
Join Date: Mar 2012
Posts: 1,152
|
|
I don't think I'm going to sleep tonight...... Ronald Macdonald's pubes in a tin of grease. I used to like P38.
|
11th October 2013, 16:46
|
|
Senior Member
|
|
Join Date: Sep 2012
Posts: 424
|
|
Maybe a great name for a new product mr shadow
|
11th October 2013, 17:13
|
|
Senior Member
|
|
Join Date: Apr 2012
Posts: 1,163
|
|
Bodykits aren't normally fitted with Epoxy its a Polyurethane adhesive, that said I have just seen this on the EBay shop I bought my last lot of PU to do an X19 bodykit with:
http://www.ebay.com/itm/BODY-KIT-BOD...-/220413894309 |
11th October 2013, 18:22
|
 |
Senior Member
Enthusiast
|
|
Join Date: Dec 2006
Posts: 1,130
|
|
That's the stuff but I didn't know Ronald Macdonald had anything to do with it. 
I got my info from the body shop next door and thought I'd try it.
I just removed all the paint from metal surface using a sanding wheel (which also left the surface rough), then did the same on the fiberglass mating surfaces.
Whipped the whole lot down with acetone which cleans and de-greases the surfaces and also softens the fiberglass.
Stuck them both together, 1/2 hour later it done! It appears to be stronger then fiberglass bonding paste.
That said I am told it's now common practice in body shops bond panels on using some sort of "sticky stuff" instead of welding them on. Must be good stuff |
15th October 2013, 12:45
|
|
Senior Member
Enthusiast
|
|
Join Date: Dec 2006
Posts: 1,130
|
|
Most of the hard work is now done so started playing with the light.

 .
Still after a pair of Spitfire seats and some carpet, can anybody help?  |
15th October 2013, 13:22
|
 |
Senior Member
|
|
Join Date: Jul 2011
Posts: 5,328
|
|
Nice, particularly like the adjustable bonnet brackets.
Can't help with the Spitfire seats I'm afraid, Just be aware that they might be a bit big.
|
15th October 2013, 14:00
|
|
Member
|
|
Join Date: Aug 2013
Posts: 76
|
|
hi wow looking good, does the tank come out with the body fitted?
looking forward to the next step ikon 246
|
15th October 2013, 16:06
|
|
Senior Member
Enthusiast
|
|
Join Date: Dec 2006
Posts: 1,130
|
|
Quote:
Originally Posted by Mister Towed

Nice, particularly like the adjustable bonnet brackets.
.
|
The ajusting bolts are for a gate hinge!!.
I thought the ajustment might help in the final fitting and I wanted to be able to remove the bonnet if needed. |
15th October 2013, 16:13
|
|
Senior Member
Enthusiast
|
|
Join Date: Dec 2006
Posts: 1,130
|
|
Quote:
Originally Posted by ikon246
hi wow looking good, does the tank come out with the body fitted?
|
No, it was a new tank so should be good for several years yet but then you'll have to cut the body open to remove the tank.
You can still get to the sender unit and the other pipe work with the tank in place. |
19th October 2013, 17:56
|
|
Senior Member
Enthusiast
|
|
Join Date: Dec 2006
Posts: 1,130
|
|
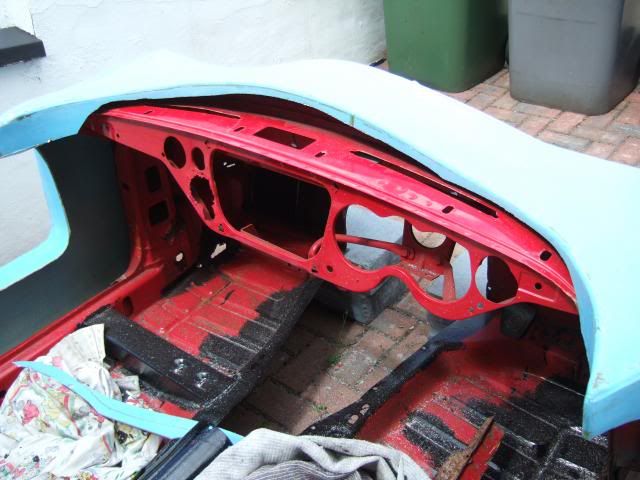
The rear end.
I like it simple 
 |
21st October 2013, 18:42
|
|
Senior Member
Enthusiast
|
|
Join Date: Dec 2006
Posts: 1,130
|
|
Quote:
Originally Posted by The Shadow
so , is it getting a roof ? lots of people have talked about hardtops but I don't think anyones started one yet. Tribute got as far as propping one together and the original Sammio guys and Miglia have talked about it , will you be the first ?
 |
I keep think about this and as I have some time I might as well have a go so has anyone got a roof canvas and frame I can play with??  |
23rd October 2013, 16:00
|
|
Senior Member
Enthusiast
|
|
Join Date: Dec 2006
Posts: 1,130
|
|
Fitted an exhaust today.
Again it's a simple one can system so should give a nice sound 
 |
23rd October 2013, 16:24
|
 |
Senior Member
|
|
Join Date: Feb 2012
Location: Wembley, London
Posts: 5,056
|
|
This is coming together nicely. 
You have also provided me with a great idea for my own build, so thanks for sharing your work with us.
Good luck, Paul.  |
25th October 2013, 17:00
|
|
Senior Member
Enthusiast
|
|
Join Date: Dec 2006
Posts: 1,130
|
|
Just fitted the fuel filler.
It look so simple but it's taken several attempts and a few days to get it sorted out 

And after all that the filler cap is not straight 

Oh well. |
19th January 2014, 17:10
|
|
Senior Member
Enthusiast
|
|
Join Date: Dec 2006
Posts: 1,130
|
|
Finally got the engine to run today 
The simple one box exhaust system worked very well, maybe to well.
Turned out the valve timing was the problem, the cam was out about 1/4 of a turn. It took a while to find this out as when No1 piston was on TDC both valves were on the rock so every thing look as is should, so be were 
At one stage we tried towing the car around the block. I'd fitted a seat but found the whole cockpit very small, I could hardly drive it as it was so tight, do all Navigators such have a small cockpit area or are the pedals and steering column moved forward when the Navigator is built using the original cage frame supplied by Ribble |
20th January 2014, 17:47
|
|
Senior Member
|
|
Join Date: Feb 2012
Location: Wembley, London
Posts: 5,056
|
|
Mike - Good news on the engine re-start.
When I first test fitted my Spitfire pedals in the Cordite frame they hit/fouled the front foot wells. 
But I do know there were some frame mods done after my kit was build (#7).
Not sure it this photo is any help, this was my attempt to fit the body over a cut down tub.
If anything, the cockpit looks a bit bigger than the Spitfire.
This was AndyP57's original Cordite/Navigator demonstrator at the Stoneleigh show.
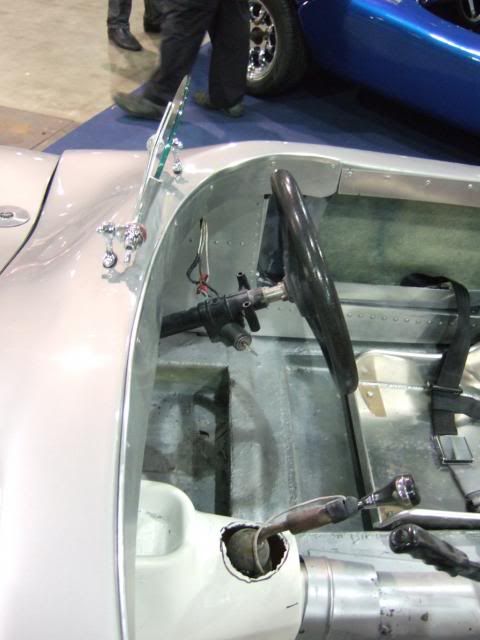
I think the steering column is still in the original position which would tie in with my bulkhead photo above.
Not sure if that is any help.
Good luck, Paul.
|
20th April 2014, 12:49
|
|
Senior Member
Enthusiast
|
|
Join Date: Dec 2006
Posts: 1,130
|
|
Finaly got some time to spend on my projects 
Fitted the standard Spitfire seats.
More room than I first thought and the fit quite well, although when pushed fully rearward the edge of the body digs you in the back.


 |
21st April 2014, 16:37
|
|
Senior Member
|
|
Join Date: Feb 2012
Location: Wembley, London
Posts: 5,056
|
|
Micky1Mo - Good to see some more progress on this build.
|
11th July 2014, 07:39
|
|
Senior Member
|
|
Join Date: Feb 2012
Location: Wembley, London
Posts: 5,056
|
|
Micky1Mo - Is there any chance you could take a few photos showing how your bonnet hinge works?
Now I have finally cut the Spitfire bonnet brackets off my chassis, I am not sure how this so supposed to work.

The mounting brackets inside my bonnet were "factory fitted", but you have attached yours much lower.
Similarly, did you need to trim away any of the bodywork below the nose?

Cheers, Paul.
|
5th August 2014, 18:13
|
|
Senior Member
Enthusiast
|
|
Join Date: Dec 2006
Posts: 1,130
|
|

Hi Paul, sorry I have only just noticed your request. 
There are a few photo on this thread showing how I fitted the bonnet to this little beasty.
But to help here's the way I fixed the bonnet on the BMW Pilot.

I fitted a 40x40x3 bit of angle across the bonnet edge held in place with a few bolts.

I then tack welded the top of a pair of 3" door hinges to the original bonnet bracket ( remember this is a Herald and not a Spitfire) lined up the bonnet and tack welded the lower hinge to the angle

When happy I pulled out the hinge pins so was able to remove the bonnet completely giving room to fully weld the hinges in place. I also added some resin around the angle iron fixing for a little extra strength.
Now when ever I want the bonnet off I just pull the hinge pins and lift it off 
Although I did fit the standard "bonnet ring" to start with I soon realized it is not necessary and this way should save a lot of time and effort. It might even work with the Spitfire bonnet chassis mounts.
If you look closely you will see the difference in the way each hinge is welded in place this was done the keep the bonnet "looking right".

|
|
Currently Active Users Viewing This Thread: 1 (0 members and 1 guests)
|
|
|
 Posting Rules
|
You may not post new threads
You may not post replies
You may not post attachments
You may not edit your posts
HTML code is Off
|
|
|
All times are GMT +0. The time now is 00:08.
|


 Linear Mode

