|
|
| Sammio Builds and discussions Sammio bodied car builds and specials |

12th March 2014, 15:16
|
 |
Senior Member
|
|
Join Date: Feb 2012
Location: Wembley, London
Posts: 5,056
|
|
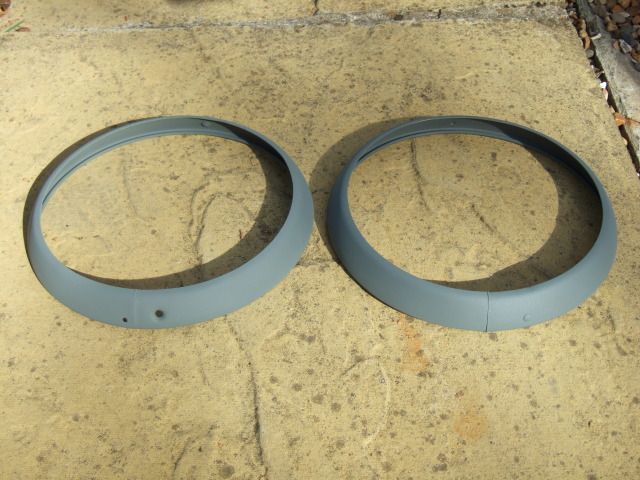
Mac - I may have got the wrong idea about my own headlights, but...
I was under the impression that the outer trim ring "tucked in" to the rubber headlight gasket.
Here are some photos of the gasket & headlight "bucket" from my build.


So there are no screws at all used to hold the blue headlight trim in place in this photo.

Note: Obviously my trim may fall off on the way to the MOT station if I was meant to screw it in somewhere. 
Not sure it that helps, Paul. 
|
12th March 2014, 18:41
|
|
Senior Member
|
|
Join Date: Apr 2012
Posts: 1,163
|
|
Pretty sure there will be at least one screw Paul, I really don't think the ring will be held on by the rubber seal, I'm sure there must be a clip or the like as well as the screw, anyone else want to chip in?
TTfN
Mac
|
12th March 2014, 19:08
|
|
Senior Member
|
|
Join Date: Feb 2012
Location: Wembley, London
Posts: 5,056
|
|
I'm sure you're right Mac.
My problem was I got my outer rings second hand and there were not the same.
One had a screw hole in it, but the other one didn't.
So I'd be as interested as you in finding out how there are supported to work.
Note: My Spitfire 1500 donor had a completely different set up.
Cheers, Paul. |
14th March 2014, 07:09
|
 |
Senior Member
|
|
Join Date: Jul 2011
Posts: 5,328
|
|
Better picture of how snug the headlight trim rings fit (courtesy of Phil J) here -

They're secured at the bottom with a small screw and located at the top with a couple of lugs on the inner ring. |
14th March 2014, 07:10
|
|
Senior Member
|
|
Join Date: Apr 2012
Posts: 1,163
|
|
That's what im missing, my bowl has no lugs for it to hook onto :-(
|
15th March 2014, 17:33
|
|
Senior Member
|
|
Join Date: Apr 2012
Posts: 1,163
|
|

Finished welding up the mount for my Ford gen II coil pack the other day
Gave it a coat of etch primer than several coats of gloss black, Dave fitted it this morning whilst I went to to the nut and bolt shop. It also acts as a cover for the hole in the block the now defunct mechanical fuel pump fitted into.

We then fitted the nice custom leads I had to have made by Autoleads as funnily enough leads don't exist that are triumph spitfire one end and Ford Gen II coil pack the other!
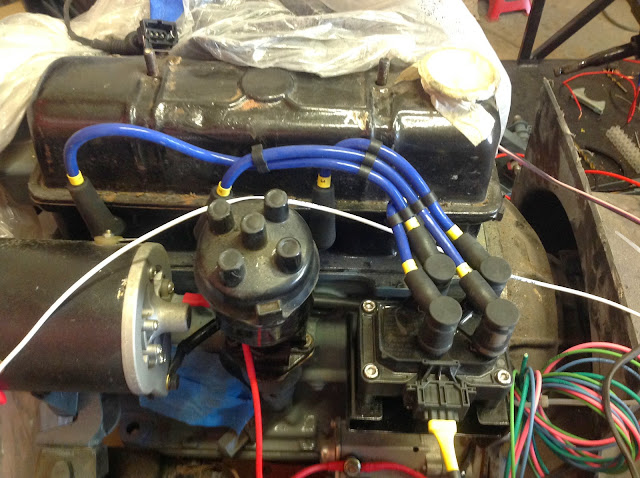
Decided I didint like the red spiral wrap around the rear of the loom so we took it off and replaced it with nylon overbraid which looks much more OEM to my eye.


Got all the column wiring apart from the overdrive switch squared away using some nice connectors I got of AES, they mke a neat job, I was hoping to fit multi plugs but the size of some of the wiring and the fact some would have had multiple wires to each terminal meant that these along with forked terminals actually ended up neater.

My trigger wheel has arrived at last! Thanks to Thom at H2O Profiling who knocked it out in about 3 days to my door fom ordering it, and didn't exploit the fact I wanted it in a hurry when quoting.

It fits nicely on the back of the front pully, was hoping to get it welded up but we ran out of time so that will be a job for early next week.

Also had delivery this week of the crank position sensor fom my local ford dealer.

With all these parts now delivered the plan was to fire the motor today but I was nervous about doing it with no oil pressure switch or gauge so ordered a cheap gauge kit off a marine parts supplier down South who swore blind I would have it for the weekend, guess what, not arrived yet...
Dave and I did chat about just going for it but decided that to risk a first start on a fairly hot freshly built engine with not a clue if we had any oil pressure was bordering on stupid :-)
Last job of the day was to cut the parts up to make the rear body support as fitting the body is becoming something I can't put off for much longer.
Cut and profiled some 5mm Ali plate so that it follow the curve of the rear of the body, the piece of Ali box is just to keep it all together and aligned until it's tigged up.
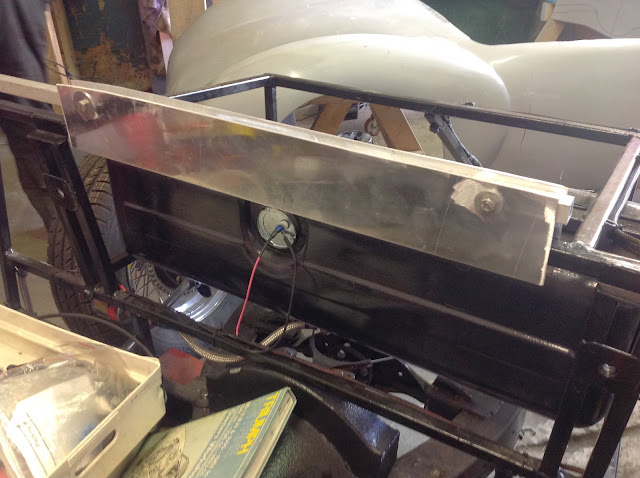
The top plate will be tigged on so that the rear of the cockpit has a good strong surface to be bonded and riveted too, it will also mean that leaning on the rear cockpit edge to get in and out won't be an issue.

That's it for now.
TTFN
Mac
Last edited by Viatron; 15th March 2014 at 17:39..
|
15th March 2014, 19:54
|
|
Senior Member
|
|
Join Date: Feb 2012
Location: Wembley, London
Posts: 5,056
|
|
It is definitely coming together very nicely.  |
18th March 2014, 17:34
|
|
Senior Member
|
|
Join Date: Apr 2012
Posts: 1,163
|
|
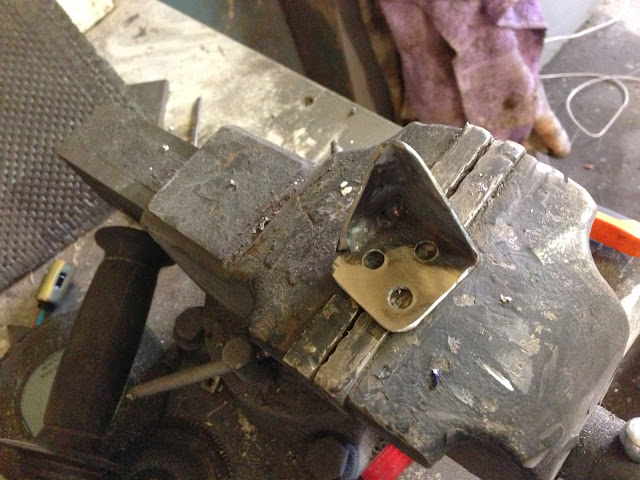
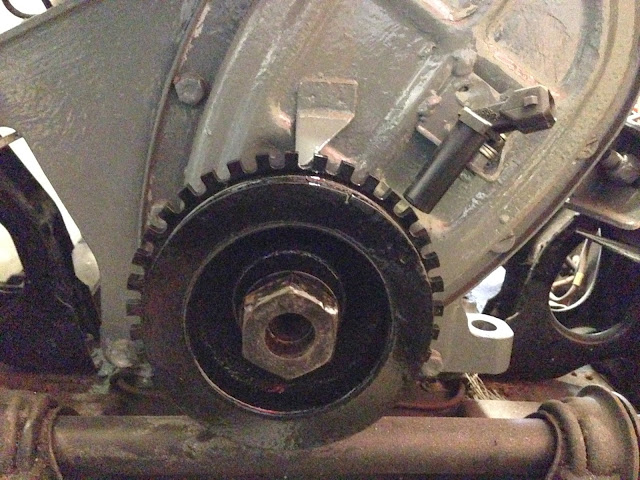
Just catching up.
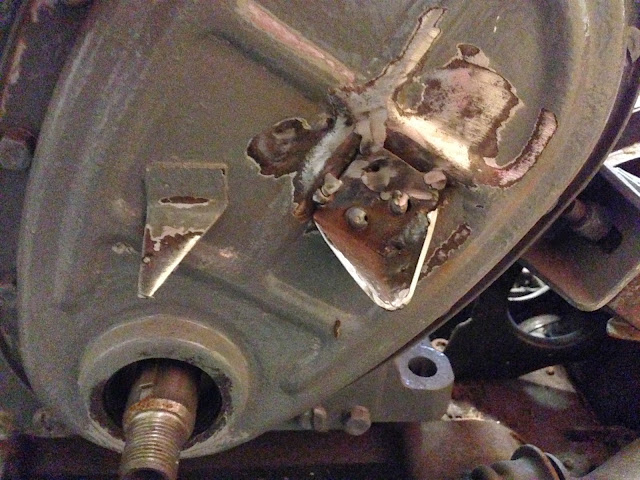
Made the crank sensor bracket out of some 2" box I had lying around, the 3 holes were for puddle welding it to the front timing chain cover:
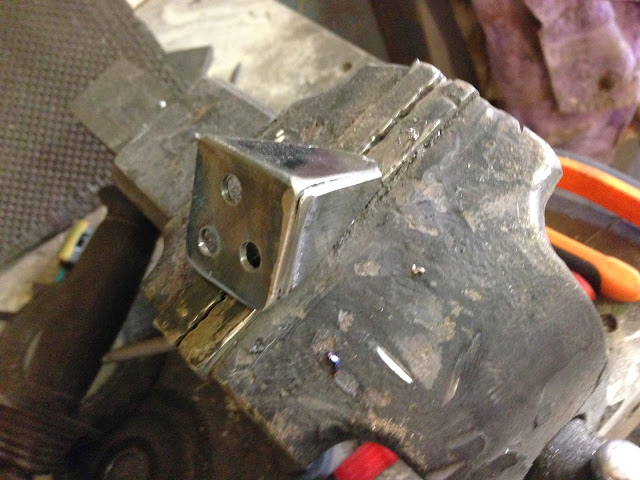
The welding isnt the prettiest but it aint coming apart.....ever!
Cleaned up the area on the front cover I was going to weld to:

Again not my prettiest welding but it will clean up fine with the flap wheel:
Trial fitted the crank sender, the bolt wont be that long by the time im finished :-)

Welded on the trigger wheel, I found the best way to centralise it was to fix the wheel to the pully using blue tack, I then put it in the lathe and used a tool to act as a fixed point, after a few minutes of repositioning it was as close as makes no difference to perfect, 3 good welds and job done.

A clean up with the flap wheel and a couple of coats of paint and its all coming together.
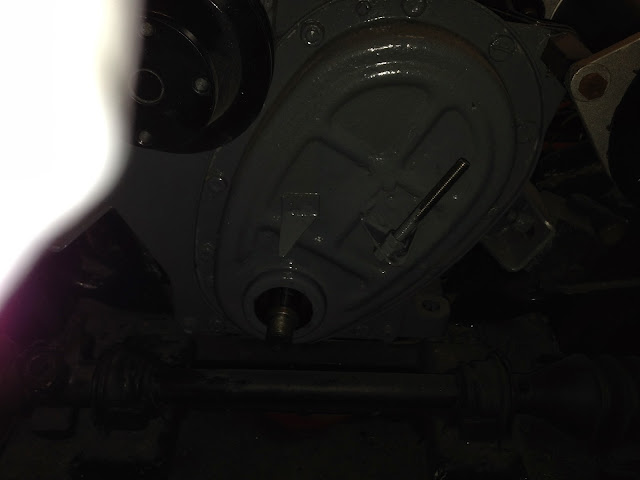
Put the freshly painted pulley back on, now with its trigger wheel and after a few minutes of washer juggling had the sensor just over 1mm away from the teeth of the trigger wheel which should be fine. Also trimmed back the super long stainless bolt.
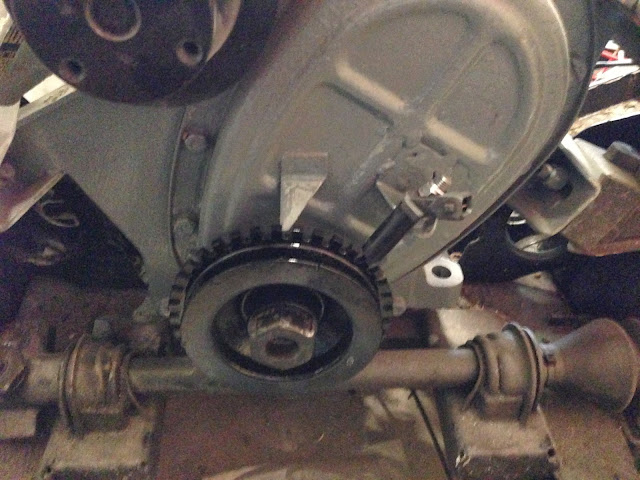
Also got my temporary oil pressure gauge rigged up and ordered a replacement threaded tube to replace the one missing from where the oil filter goes on the block, its apparently quite common for them to come off with the filter so ill be using some oil resistant thread lock to make sure it stays put.
Picking up some Morris Lubricants running in oil tomorrow so apart from fitting a junior timer plug to the crank sensor wiring I'm ready for the start up once the threaded tube arrives.......
TTFN
Mac

|
19th March 2014, 17:16
|
|
Senior Member
|
|
Join Date: Mar 2012
Posts: 159
|
|
Hello Mac,
Very nice job. Well done.
Michiel
Last edited by christinedmc; 19th March 2014 at 19:35..
|
19th March 2014, 19:50
|
|
Senior Member
|
|
Join Date: Apr 2012
Posts: 1,163
|
|
Michael, thanks I was very please how it all went together.....until today...
Managed a couple of hours this morning before going to a meeting in Birmingham, trying to work on the car in meeting clothes was interesting so thought I would stick to electrics, how messy can you get with wire....
Managed to figure out which way round to wire the crank position sensor plug as it basically only has 2 wires, the right way will work and wrong way wont.
Got the plug all coupled up, flashing lights on the NoDiz told me that it was receiving the crank signal when I spun the motor over on the starter with no plugs in. The motor really spins with the geared starter and no plugs in!
Thought it was all going really well but couldn't get a spark..
Check resistance on the coil pack, all good
Check resistance on the crank sensor, all good
Tried hooking up the monster jump starter in case battery was a little low, all good
Even put the front pulley on next doors lathe and turned the trigger wheel teeth up in case I was getting an inconsistent gap, took less than a quarter of a mm off in total so not far out enough to really make a difference, and it didn't.
Checked continuity of the wiring between the nodiz and the coil and the nodiz and the crank sensor ...all good
Checked I had 12v on the centre pin of the coil all the time whilst cranking, all good.
Several calls later to Simon and Nodiz had me taking the front plate off the unit and hey presto, big old scorch mark around one of the coil drivers!
£&&);/:;?!!.?!>$<~%%+}+#>€?~€~>~€ ell!
So the Nodiz is on the way back already via special delivery, they are going to try and turn it around and get a replacement or mine fixed and out tomorrow for delivery Friday so may still be on for a first start at the weekend, especially now the missing thread tube for the centre of the oil filter housing has arrived and I have 5 litres of Morris's Lubricants Golden Film running in oil in the back of the van.
Quite miffed but can't blame NoDiz as I got it at a reduced price as it was a beta unit and from the conversation I had today I think they will just send me out a new current model that has some improvements so guess I'll be better off in the end....
Grrrrrrrrrrrr
Mac
|
19th March 2014, 20:10
|
|
Senior Member
|
|
Join Date: Mar 2012
Posts: 159
|
|
this is bad luck. Hope the problem is fixed and you can fire the engine up quickly. I loved the moment it turned on and produced that neat sound.
Michiel
|
20th March 2014, 08:08
|
|
Senior Member
|
|
Join Date: Jun 2011
Location: birchington, kent
Posts: 1,769
|
|
V, i think you should set the camcorder up... for posterity.
|
20th March 2014, 08:16
|
|
Senior Member
|
|
Join Date: Apr 2012
Posts: 1,163
|
|
Not a bad idea!
On a positive note I forgot to mention that the headlamp trim ring conundrum has been solved, user error, there are in fact 2 small plastic tangs on the edge of the plastic bowl that the trim rim hooks over, I couldn't see them clearly with the gasket fitted, ill post pics next time I'm up the workshop.
TTFN
Mac
|
20th March 2014, 17:09
|
|
Senior Member
|
|
Join Date: Mar 2012
Posts: 159
|
|
Hi mac,
Glad you found the edges I told you about. In the end 
Michiel |
20th March 2014, 17:45
|
|
Senior Member
|
|
Join Date: Apr 2012
Posts: 1,163
|
|
Michael, Yep once I had found them it was obvious!
Had a delivery thus morning of my bulkhead connector for my bonnet sub loom, basically the 5 wires powering the indicators, side and headlamps will terminate at the bulkhead and the bonnet will have its own sub loom so that if it needs removing you can do so with a simple twist of the coupling.
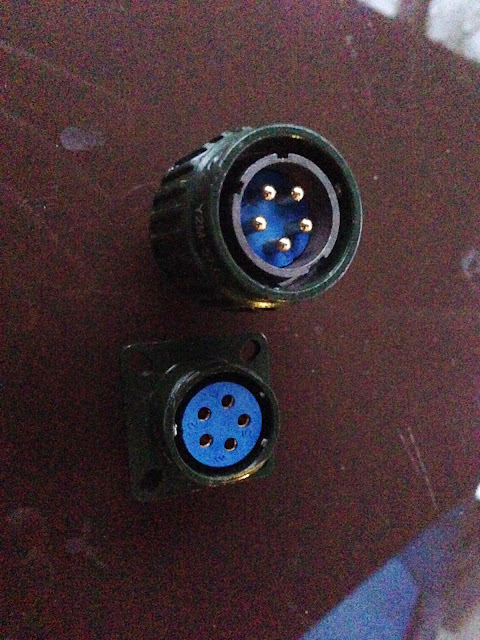
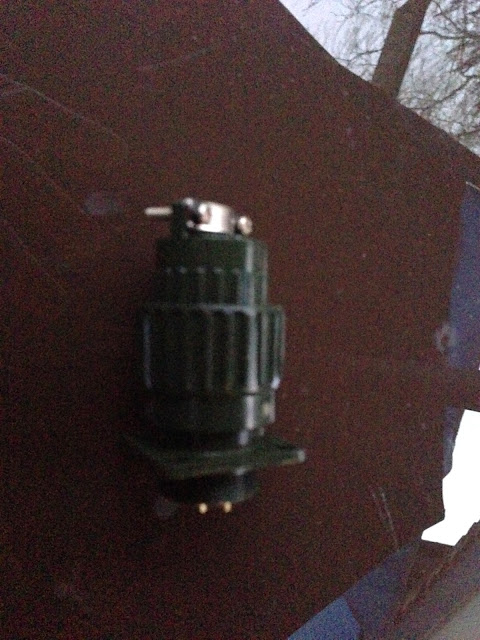

I got it from trigger wheels.com and it's described as Mil Spec, have to say I think only the Chinese military would use one in a military application but its plenty good enough for an automotive application and at a tenner I don't think I can grumble.
TTFN
Mac |
21st March 2014, 18:46
|
|
Senior Member
|
|
Join Date: Apr 2012
Posts: 1,163
|
|
New replacement NoDiz due on a pre 10am in the morning, fingers crossed for a first start mid to late afternoon tomorrow!
|
22nd March 2014, 19:10
|
|
Senior Member
|
|
Join Date: Apr 2012
Posts: 1,163
|
|
Courier turned up at 10:30 replacement nodiz blown up by 16:00. Suspect brand new coil is faulty causing it to feed back to the coil driver
<>~|<%%|~>€$$+$><|\[]}%^><^ ollocks
:-(
|
22nd March 2014, 21:48
|
|
Senior Member
|
|
Join Date: Feb 2012
Location: Wembley, London
Posts: 5,056
|
|
I hope your luck with these new parts starts to change soon. 
But I'm sure that the sound of the engine running will make up for all the hassle.
Good luck, Paul. |
24th March 2014, 21:23
|
|
Senior Member
|
|
Join Date: Feb 2012
Location: Wembley, London
Posts: 5,056
|
|
Mac - Can I ask what sort of battery you are going to use?
I was told to buy a replacement battery with a UK015 code, which turns out as 42AH.
I've also seen a 48AH battery listed as Triumph Spitfire 1500 compatible that I like the look of.
But I just wanted to double check following your previous advice to me about possible upgrades to the electrics.
Cheers, Paul.
|
26th March 2014, 05:38
|
|
Senior Member
|
|
Join Date: Apr 2012
Posts: 1,163
|
|
Paul,
I'm currently using one of our oddest racing batteries for testing but will order one of these these week.
http://www.ebay.co.uk/itm/1511272067...84.m1423.l2649
The electrics on these cars are fairly basic and the race car runs full data logging electronic dash etc with a battery roughly this size and has no issues. I'm running a hi torque starter which in my experience tends to make starting up something you don't have to worry about as it spins over very quickly meaning there is little danger of killing the battery trying to get it started. On top of that I also have a brand new dynamotor so all the electrics are basically new. It also means I don't have to worry about making a battery well as it will bolt straight onto the bulkhead horizontal surface.
HTH
Mac |
|
Currently Active Users Viewing This Thread: 1 (0 members and 1 guests)
|
|
|
 Posting Rules
|
You may not post new threads
You may not post replies
You may not post attachments
You may not edit your posts
HTML code is Off
|
|
|
All times are GMT +0. The time now is 19:12.
|


 Linear Mode

