|
|
| Sammio Builds and discussions Sammio bodied car builds and specials |

16th November 2013, 08:34
|
 |
Member
|
|
Join Date: Sep 2013
Posts: 87
|
|
mate , your epic threads are awesum . if anyone thinks they cant own one of these because they got no garage or shed whatever. this thread with all its detail proves them wrong. I must admit I find it hard work going through everything. you even tell us if you stop for a piss brake ! but its epic chief. take my hat off to you for it. Ribble boys must love this . this forum is an absolut jem for anyone selling this type of car. and the list of bodys being offered is growing all the time.
|
16th November 2013, 17:29
|
 |
Senior Member
|
|
Join Date: Feb 2012
Location: Wembley, London
Posts: 5,056
|
|

Mac - Thanks for the foam feedback, I might just get some plastic end caps for the frame's box section.
The new welder seems to be working well, I just need to get used to the new settings required.
The Shadow - Cheers, I learnt a lot from the detail in other builds, so wanted to do the same here.
There are certainly challenges with working outside & given the choice I'd take a warm garage every time.
But provided you accept that everything takes a lot longer, it is possible to make progress.
One thing to remember is that the new Spitfire based Ribble Navigator is a long easier to build than this.
Similarly, the Miglia is also straight forward, whereas Micky1Mo's new kit will be a real test of skills.
There were less that 20 Cordite kits sold before production stopped and the new version was developed.
Again, given the choice, I'd prefer an easier build, but I've learnt a lot doing it the hard way!!
- - - - - - - - - - - - - - - - - - - - - - - - - - - - - - -
Managed to get quite a bit done today, so here is a summary grouped by activity...
Painting:
All the repair work is now done on this section of the bulkhead, so time for some black.
Before:

After:

The "front" side of the recess panel doesn't look too bad now after a first coat.

The "back" side of the recess panel was given a rough sanding & coat of primer.
 Bulkhead Holes:
I am leaving these 5 holes as they are for the moment.

The 3 vertical ones on the right were originally for (top to bottom):
- Heater Control Value Cable
- Choke Cable
- Screen Wash Hose
The 2 horizontal ones on the left appear "surplus", as my 1500 donor shell didn't have them?
I just need two of them, one for the choke & one for the heater control.
However, I wanted to switch the choke lever to the right of the steering wheel.
( Personally I found it a pain having both the ignition key & the choke on the left. )
Plus I haven't finalised the layout of the heater yet.
Once I know what I am doing, I will weld up 3 of the holes & finish painting this area.
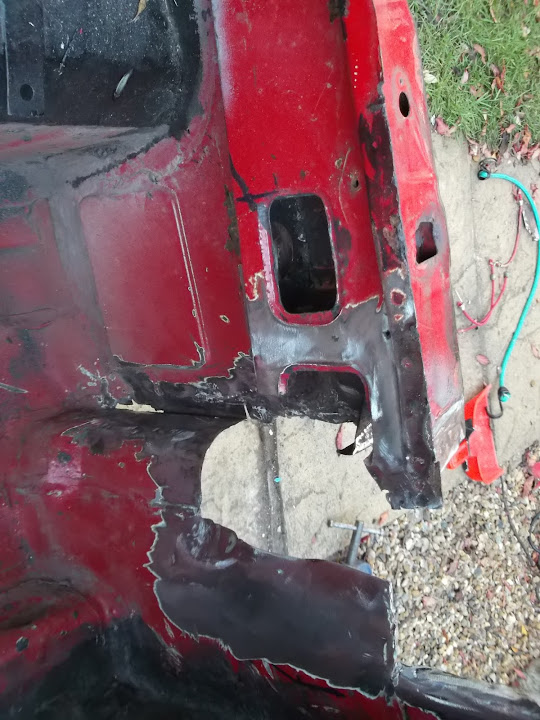
Bulkhead Repairs:
The next area I have to tackle is on the drivers side and is a real mess.
It doesn't look too bad from this angle, just a small oval hole to patch.

But the real horrors are here.


I want to use some box section as an external "brace" for this whole area.
In keeping with my recycling tradition I found some "spare" box section to use...

Also by cutting up the Cordite bulkhead I am committed to making this Spitfire bulkhead work.
With a few sections cut out, this is the general idea of what I have in mind.

But more on that later as I started with a simple patch repair.


Then it was time to start building my support structure.


With a bit of luck I will finish this off tomorrow as the weather closed in after dark.
( Thankfully I was able to pack everything away for the night just before it rained. )
The box section will start at this end of the bulkhead.

But I have now cut this outside section of metal off.

It was only a few inches wide and I will replace it with something similar, but running the full length of this side section.
I also started cutting the worse of the rot out.

The small square in the middle of the hole is attached to a bracket in the pillar above.
By now I was working under spot light & decided to clean this up when I could see properly.
Getting this mess repaired to a good standard will be a big test of the skills I've learnt so far.
( Which is why I started with the more simple repairs first. )
Hopefully I'll have another update tomorrow, cheers, Paul. 

|
17th November 2013, 19:29
|
|
Senior Member
|
|
Join Date: Feb 2012
Location: Wembley, London
Posts: 5,056
|
|
Sunday Summary:
Mainly a family day today. 
But I still managed to get a few quick jobs done...
I plan to trim my box section support "structure" after I know it all fits.
So it was a bit of a struggle to get it all lined up for the position of the final length.

But with it all marked up I could clamp & weld it.

This is the view of the bracket looking from the back to the front.

And this is the equivalent view of the bulkhead.

I also cleaned all of the box section up & got the first 3 caps welded to the ends.

Before I can weld this bracket into position, I needed to fix something else first.
It seems that one of the panels is only a press fit and it is coming away at the bottom edge. 

However, now that I have welded this bottom edge, I hope I am actually adding some strength back in.

I also fixed the last remaining hole just above the driver's side floor.

I also managed to get a first coat of black in the back of the recess panel.
( Not easy to see now that everything is black and this is inside the bulkhead. )

Note:
The two brackets at the bottom originally supported the under dash cubby hole.
I will keep them for now as they may be useful for something else later on.
Next Steps:
I'd really like to finish the welding / repairs on this side before the snow arrives!!
However, there is quite a bit of beard scratching required to ensure I do this in the correct order.
Otherwise I will end up with sections that I can't get at to weld up, or have boxed things in before treating the insides. 
Until then, take care, Paul.
|
17th November 2013, 19:50
|
|
Senior Member
|
|
Join Date: May 2013
Posts: 2,161
|
|
I salute you Paul! Brilliant stuff, you really will have earned your car when its done!!
|
18th November 2013, 16:36
|
|
Senior Member
|
|
Join Date: Feb 2012
Location: Wembley, London
Posts: 5,056
|
|
Scottie - Cheers, these bulkhead repairs are certainly hard earned!
- - - - - - - - - - - - - - - - - - - - - - - - - - - - - - -
3D Puzzle Solving:
The rot on the driver's side of the bulkhead is actually worse than it initially looked.
So I will have to cut out a lot more than I expected which will not leave me much to work with.
But I do not want to make the final cuts until I have all the replacement panels ready to weld.
However, getting my head around what panels I need and how it will fit together is hard work.
I'm sure it would be very straight forward if you knew what you were doing, but I don't.
As before, I seem to be coming up with an over-engineered solution to the problem.
I started by cleaning up & applying some anti-rust treatment inside the pillar.
( I will be cutting some more of this pillar away later on. )

I then added two small sections of box section to my external support structure.

Quickly followed by a flat section of metal on top of the "square".

This plate will now provide the support to the bracket inside the pillar that you can see in the middle of the first photo.
So clearly I am not rebuilding the bulkhead to original spec.
All I want to do is make it water tight & retain the strength of the structure.
After a few attempts, I finally had a cardboard template for the first repair panel that I could transfer to metal.

Obviously I hadn't spotted the section of Spitfire I picked was caked in filler.

Eventually it was cleaned and ready to go.

I clamped it to some wood before hitting it with a hammer to create the first bend.


Eventually I had most of the bends I needed in the panel.

Unfortunately darkness was falling so the photos are not great under spot light.
This is a very blurred photo of the support structure clamped into place.

This is how the panel I have made will replace the bottom of the rotten section.

Fixing it this way allows me to weld an edge to the right of box section at the bottom.

I will also be hammering this edge down so it can be welded to the box section too.

There are still two repair sections I need to make before I can start welding.
The first just needs to be cleaned up and trimmed to fit as I cut it out earlier today.
This will replace the bottom of this vertical outside edge which needs to be cut out.

I will be able to weld the top edge of this section of Spitfire to the bulkhead.
Plus the bottom edge will be welded to the box section.

That just leaves a curved panel to fill in the remaining "gap" in the bulkhead.
Which I should be able to tie in with the new panel section & the box section support.
Overall, this is one of those areas that you wish you had never started.
However, now I am committed to fixing it, I will try to do the best job I can.
But first I need to lie down in a darkened room as my head hurts!
Cheers, Paul.
|
19th November 2013, 17:28
|
|
Senior Member
|
|
Join Date: Feb 2012
Location: Wembley, London
Posts: 5,056
|
|
Epic Bulkhead Repairs - Part 1:
As I said yesterday I wanted all the repair panels ready before I cut the last bit of rot out.
So first job of the day was to work out the shape of the final panel in cardboard & mark out the shape.

After cutting & cleaning it looked like this.

Then after hitting it with my hammer a bit, it looked like this.

After cleaning up the area & marking up two reference points it was time to take a deep breath & cut... 

Then it was time to start fixing the bloody great hole I'd left in the bulkhead.
I clamped the external support structure in place, making sure my reference points were the same distance as before.

Then I welded the left "arm" of this box section to the bulkhead both top & bottom.
Then what remained of the edges of the bulkhead were hammered over the box section.
This gives you the idea, even though it is not the final position of the lip.

This allowed me to weld one section of this edge to the box section.
( I'll come back to do the edge on the left of this photo another day. )

I welded the bulkhead to the box section where ever the edges met.

Sorry this next photo is so blurred, but hopefully you can still see a few more welds in place.

I was even able to weld the support bracket inside the pillar to the flat plate on the box section.
( I did finish off welding the right hand side of this bracket after the photo was taken. )

At this point, the bulkhead was already more solid than it was before and I've still got more welding to do.
So I am now confident that by the time I weld in the rest of the panels it will be good to go.
Talking of the repair panels, this is roughly where my pillar extension will go.

Note:
There is an area on the top right of the panel which will be hammered over to meet the box section.
The final panel will fit in like this.

There will be a bit of shaping required at the right hand side of the panel to blend in with the shape of the bulkhead.
For once I made my life easier by not trying to replicate the original Spitfire shape exactly.
As long as it is all joined together, the final shape makes no difference what so ever.
Having said that, the shape should not stand out to the untrained eye once it is painted.
Until next time, take care Paul.
|
19th November 2013, 18:33
|
|
Senior Member
|
|
Join Date: May 2013
Posts: 2,161
|
|
Smack on Paul, great stuff!
Last edited by Scottie22; 20th November 2013 at 16:29..
Reason: typo
|
20th November 2013, 16:48
|
|
Senior Member
|
|
Join Date: Feb 2012
Location: Wembley, London
Posts: 5,056
|
|
Scottie - Cheers and I see you have spotted your typo.
I was about to ask if "Smack on Tony" was the modern equivalent of "Rock on Tommy"?

- - - - - - - - - - - - - - - - - - - - - - - - - - - - - - -
Epic Bulkhead Repairs - Part 2:
Well after the hailstones finally stopped I had a chance to start welding my panels into place.
First up was the pillar section, which required me to crawl inside the bulkhead to weld all edges.

This is the view from the outside looking in, showing one of this panel's "lips" wrapped around the box section.

Next I welded about 2/3rds of the other panel into place.

This is because I need to cut & shape this end of the panel to merge it with the curves of the bulkhead.
( Something similar to the curve in the recess panel I made. )

Not easy to see in this blurred photo, but there is currently a "void" between the old & new metal.

Depending on how the shaping goes, I may simply add a patch to the outside.
But fixing that will have to wait for another day, as darkness also brought back the rain.
One thing I will say is that I can't believe the difference this has made to the bulkhead.
It feels significantly stronger than before, so I'm really happy that this approach has worked.
Obviously it is over engineered, but I have never attempted anything like this before.
Cheers, Paul.
|
20th November 2013, 17:58
|
|
Senior Member
|
|
Join Date: May 2013
Posts: 2,161
|
|
Paul! The shear volume of work you churn out is amazing, it really is.
You make me feel like a real skiver, 'cos I know I could do more!
|
21st November 2013, 16:56
|
|
Senior Member
|
|
Join Date: Feb 2012
Location: Wembley, London
Posts: 5,056
|
|
Scottie - This is the most "spare" time I've had to work on my car as I'm currently "between jobs".
It is just a shame that this isn't June, or July when I'd have more daylight and better weather.
Unfortunately, I will have to head back into the working world again shortly & my progress will slow down.
Which is why I'd really like to finish repairing this bulkhead ASAP.
- - - - - - - - - - - - - - - - - - - - - - - - - - - - - - -
Epic Bulkhead Repairs - Part 3:
I made a few cuts in the end of the panel that I didn't fully weld in yesterday.

Then I hammered each of the tabs into place & welded them up.
This what it looked like after the first two tabs were done.

When all four were done it looked like this from the inside.


This gives me the basic shape to smoother in filler.
And this is what it looked like from the outside.

I still need to decide just how I will put a second skin of metal over this section.
Next job was to seal up the holes above the "top" supporting arm.
( I'd already cut the rot out by this stage. )

I cut out a different section of an old Spitfire panel to cover this.

As this allowed me to continue around the corner like so...


Note: It was a much better fit when clamped into place.
I started the welding on the bottom / box section edge.

I then hammered the panel along the top edge to match the bodywork and welded that too.


There is still a bit of work to do to get a tidy finish on the front corner.

This is the view of the repair from the inside.

The final job for the day was to slap on some Kurust.


I know I haven't finished work on the outside panel yet.
However, as this is where the bulkhead lives overnight, so I am a bit worried about the weather.

Until next time, take care. Paul.
|
21st November 2013, 17:18
|
|
Senior Member
|
|
Join Date: Jul 2011
Location: Belgium
Posts: 103
|
|
Paul, this looks like the worst condition Spitfire bodytub that anyone has ever attempted to bring back to life! Good on you for sticking into it and just getting it done! Wow...
But wouldn't it have been simpler to get hold of one that didn't have quite so many holes?
Baz from Brussels
|
21st November 2013, 18:17
|
|
Senior Member
|
|
Join Date: May 2013
Posts: 2,161
|
|
That's just what I thought Baz, but I can identify with Paul here, it's the CHALLENGE!!!
I have sometimes spent 4 days welding and making a panel when they are available and cheap, but its always more rewarding to
to do a "PAUL" and repair the impossible, right Paul?
|
22nd November 2013, 15:47
|
|
Senior Member
|
|
Join Date: Feb 2012
Location: Wembley, London
Posts: 5,056
|
|
Baz - There is a great expression in Ireland that goes something like this...
If you wanted to go there, you shouldn't be starting from here.
When I started this project I had no idea of the problems the original Cordite had.
With hindsight I'd be on the road by now if I'd just chopped my original donor in two!
I could have simply left the bulkhead in place and just removed the windscreen.
I wouldn't need to disconnect the dashboard, steering, pedals, electrics, etc.
So apart from when I refitted the petrol tank it would still be able to run and drive.
This bulkhead was effectively "free" as I bought the body shell for just the rear arches.
But you are right, one with a lot less holes would have been miles easier to work with.
Plus I'm finding that this bulkhead has a number of bad repairs which are not helping either.
Scottie - Another expression I like is Necessity is the mother of invention.
Given the fact that I am an accountant by trade, this repair work is beyond my imagination.
But I am simply following the trail blazed by Mister Towed who gave everything a go.
The scary thing is when I now look back at the state of the chassis on MrT's Herald.
I can't believe how much stronger the driver's side of the bulkhead is after my repair work.
So Mr T is right to say he donor car was a potential death trap before he got it.
- - - - - - - - - - - - - - - - - - - - - - - - - - - - - - -
Weather Watch:
The wind today made welding outside pretty tricky.
But its main effect was to made me very cold indeed.
Still, looking on the bright side, it wasn't raining so some progress was made...
I removed the remains of the original seam sealer near my repair panels.

Then I applied filler over the area to smooth out the welding.

As it was so cold I added some extra hardener just to be on the safe side.
It looks like this will do the trick, as the filler seems to have gone off much quicker than before.
Then I made some repair patches to cover some of the remaining "factory" holes in the repaired pillar.
I have put anti-rust treatment & weldable primer on the inside of the pillar as I've been going along.
Plus I will spray more waxoyl inside it before attempting to seal it off at the the top of the pillar.
My thinking is to seal up the whole pillar to help the water & therefore the rust out.
Anyone care to confirm whether, or not, this is a good idea?
I don't want to accidently create a perfect breeding ground for rust to develop from the inside.
Whilst I haven't sealed the whole pillar yet, I have started welding patches in & treating the surface.


The final bit of welding for the day was to seal up the holes for mounting the bonnet catch.


Then it was time for the final round of filler for the day.
I covered the inside of the floor repair panel work from a while back.

Plus the top edge of this bulkhead repair panel.

Note:
As I had a bit of filler left over I simply covered the bonnet catch repair while I was there.
Until next time, take care, Paul.
|
22nd November 2013, 15:56
|
|
Senior Member
|
|
Join Date: Apr 2012
Posts: 1,163
|
|
Paul, don't use waxoyl anywhere near your welding until the welding is finished or you will end up with a fire!
If you want to waxoyl it do it after by drilling some holes then fill them with plastic bungs after application.
PS actually managed to get some done on mine today check later tonight for an update :-)
|
23rd November 2013, 16:50
|
|
Senior Member
|
|
Join Date: Feb 2012
Location: Wembley, London
Posts: 5,056
|
|
Mac - Cheers.
I did start a small Waxoyl fire welding somewhere else a while back.
- - - - - - - - - - - - - - - - - - - - - - - - - - - - - - -
Close, but no cigar...
I really wanted to get all the areas I covered in filler yesterday sanded down & painted in primer today.
But it was not to be despite generating my own snow storm of white filler dust as I smoothed it out.
But there were a couple of areas that I wanted to add a little bit of extra filler to.
So I was only able to get primer on the outside edge and driver's floor.


Sorry the picture is blurred, but can see the two areas that I "topped up".

I also welded up two more of the pillar's factory holes.


It was a real pain getting inside the bulkhead to access this area.
I also put some filler over the patches I welded in yesterday.


As before, there was a bit of filler left over that went on the holes I welded up today.
Whilst trying to work out how to finish off the outside of these repairs...

It became clear that the bottom edge needs to be removed as it is rusted through in places.
Along with the previous repair patch to the bottom right of the photo.
( Which is hiding some rust on the panel below it. )
But I will worry about that another day.
Cheers, Paul.
|
24th November 2013, 17:54
|
|
Senior Member
|
|
Join Date: Feb 2012
Location: Wembley, London
Posts: 5,056
|
|
Small Odds & Ends:
Luckily I was able to see properly this morning after a comedy injury last night.
I'm pretty good at wearing gloves, masks, ear plugs, safety glasses etc. when working on the car.
But yesterday I somehow managed to wash some crap from my head/face straight into my eyes whilst in the shower.
Nothing I did would shift it and I had to sit on my hands to stop rubbing my eyes & making it worst.
Thankfully mother nature's eye self cleaning mechanism kicked in over night while I slept.
Only had a little time available today, so roughly sanded down all the filler that went on yesterday.
And with a coat of primer over the top I am really pleased with the way it all looks now.
Before:
During:
After:


Next I am going to remove the remaining seam sealer / surface rust in this side of the bulkhead.
Then I can get the whole of the driver's side in primer and then give it a coat of black paint.
I also need to decide what I will do about joining the bulkhead to the Cordite frame.
I've left the original mounting points for the door hinges untouched up until now.

As I know the Spyder builds use these to mount the frame to the bulkhead.
( This is Mister Towed's car. )
However, the rear Cordite frame framework will not reach this far forward.
It ends at the vertical angle iron you can see just at the front edge of the door opening here.

So I need to build a "join" between the two sections, which raises a couple of questions.
- Would it be OK to weld the "floating" attachment plates to the side of the bulkhead?
( I will be making the bracket to fit, so there would be no need for any adjustment. )
- Would it be OK to cut a bit off the top of that vertical frame rail?
( At the moment the frame prevents access to where the lower door hinges would mount?
Shopping News:
I have just ordered the same micro heater & associated bits that Mr T fitted.
This will allow me to make all the bulkhead alterations required to fit it at this time.
Which will be a lot easier than waiting until the bulkhead it fitting to the chassis.
This work will also allow me to finalise how the dash is going to look / function too.
Finally, I'd like to share one of many build threads I read for inspiration.
I can only dream of doing this kind of "factory finish" standard of work.
http://www.rodsnsods.co.uk/forum/gar...pick-up-134874
Until next time, take care, Paul.
|
24th November 2013, 18:08
|
|
Senior Member
|
|
Join Date: Mar 2012
Posts: 159
|
|
Hi Paul
With the amount of work you put into, it would be difficult to keep hold on the "body replacement strategy". It's more a new build! 
Michiel |
26th November 2013, 16:45
|
|
Senior Member
|
|
Join Date: Feb 2012
Location: Wembley, London
Posts: 5,056
|
|
Michiel - Thanks.
One thing is for sure, I don't envy people who restore rusty wrecks to original spec.
Whilst I know all this bulkhead work is to get around problems with the kit I have learnt a lot.
It has also convinced me that I will be able to finish this build one day.
Although when that day will be is another story entirely!
- - - - - - - - - - - - - - - - - - - - - - - - - - - - - - -
Restricted Duties...
I am coming down with the traditional cough / head cold combination at the moment.
Which I am sure is connected to working outside on the bulkhead & getting a chill.
So nothing done yesterday, and just a few odd jobs today.
But every job done is another small step towards the finish line...
I removed what was left of the old seam sealer.

Is this stuff really such a good idea?
As it seems to be a breeding ground for rust. 
Removing it exposed another hole in one corner of the bulkhead.


Notes:
I just put some note paper behind the hole to make it easier to see in the photo.
Also I had made the hole worse by cleaning it up ready for welding a repair patch.
Eventually I cleaned up the worst of it and applied some Kurust.


Thankfully that had dried before close of play, so I just had time to get a quick coat of primer on the area.

Another little job was putting a temporary seal over the top of the repaired "A" pillar.

As I was finding that all the debris from cleaning the other areas was going down the inside.
I got some modelling mesh which needs to be cut and shaped for my first attempt at fibreglassing.

Hopefully I can get a nice curve covering the end of the windscreen supports & the top of the pillar.
I found another area on the driver's side that needs some welding.
There is a split around these holes in the edge of the bulkhead that the gearbox cover mounts to.

After I have fixed the passenger side of the bulkhead I will have a better look at the fitting of that cover.
I also cut away a large chuck of a previous repair patch as it was covering rust.

I just had enough time to get some Kurust on it before calling it a night.

The only other thing I did today was to dig out my original donor car's dash board.

When all the parts for the micro heater arrive I want to have a good think about how it will all fit together.
I need to add some new switches, remove some old stuff & move somethings around a bit.
Whatever I end up doing I want to make sure that the dash will be removable for ease of fitting/wiring.
Finally AndyP57 send me some brackets to use on the chassis for the bonnet hinge.

I only need two, but figured it would be a good idea to practise welding on a spare one.
Until next time, take care, Paul.
|
27th November 2013, 15:59
|
|
Senior Member
|
|
Join Date: Feb 2012
Location: Wembley, London
Posts: 5,056
|
|
Just Resting
Funny how working outside in the cold when you are not feeling well actually makes you feel worse.
Who knew?
So after a little bit of tinkering yesterday, I stayed indoors today.
Still, a nice man in a van delivered parcels from T7 Design & Car Builder Solutions.
So here is everything I could possibly need to install a micro heater in my car...

Well, when I say everything, there are still a few nuts & bolts required to secure some of these things.
When I have finished all my rust repairs on the bulkhead I will work out where all this lot is going to go.
I want to add some bracing to stiffen up the dash as the original Spitfire had an extra support column.
This connected the dash to the chassis (through the bulkhead floor) and was where the radio lived.
My current vague plan is to build "something" to mount the heater vents & to support the ducting.
This work will also tie in with my other vague plan for the dash board area itself.
I know I want the dash to be removable to make fitting everything behind it easier.
But I also need to rearrange, remove and add things to the existing dash layout too.
The only other car related thing I did today was speak to VOSA & the DVLA.
I had a number of questions, but not many answers, so it looks like I still need to send an email.
Hopefully the email will give me the definitive response to the Spitfire bonnet brackets.
As long as the officials agree they are not part of the chassis, I can safely remove them.
( This was the view of Tribute & Mr T on Scottie's A352 build "next door". )
If I feel up to it, I will try to weld up the final repairs on the driver's side of the bulkhead tomorrow.
Cheers, Paul.
|
27th November 2013, 18:29
|
|
Senior Member
|
|
Join Date: May 2013
Posts: 2,161
|
|
Paul, is that an after market dash? It looks like walnut? Difficult to tell with the light reflection.
|
|
Currently Active Users Viewing This Thread: 3 (0 members and 3 guests)
|
|
|
 Posting Rules
|
You may not post new threads
You may not post replies
You may not post attachments
You may not edit your posts
HTML code is Off
|
|
|
All times are GMT +0. The time now is 10:49.
|


 Linear Mode

