|
|
| Sammio Builds and discussions Sammio bodied car builds and specials |

25th July 2012, 16:17
|
 |
Senior Member
|
|
Join Date: Dec 2011
Posts: 656
|
|
 Cordite Demonstrator
|
25th July 2012, 16:20
|
|
Senior Member
|
|
Join Date: Mar 2012
Posts: 1,152
|
|
Brilliant. Looking forward to a time lapse build!
|
25th July 2012, 17:52
|
 |
Senior Member
|
|
Join Date: Jul 2011
Posts: 5,328
|
|
Good luck getting it ready for the show in September. Having a donor that's practically fresh off the Triumph production line a mere thirty years ago should help  |
25th July 2012, 20:28
|
 |
Senior Member
|
|
Join Date: Feb 2012
Location: Wembley, London
Posts: 5,056
|
|
At this pace you will have overtaken me by the weekend! 
Looking forward to seeing your build Andy.
Good luck, Paul. |
26th July 2012, 14:27
|
|
Senior Member
|
|
Join Date: Dec 2011
Posts: 656
|
|
Halfway through day 2 and Cordelia is laid bare. 
Thanks for your help Gaz, we've made great progress and within about 4 hours of effort since driving her in yesterday, the donor is down to the bare chassis with only a bit of instrument strip to carry out on the shell. Both master cylinders have been detached from the bulkhead without breaking into any hydraulic circuit so I remain hopeful of not having to bleed anything!
A couple of minor hitches with things like a radius arm not detaching (due to the bracket being welded to the shell) and a sticky steering shaft slowed the body lift but with a crane holding the front up whilst we maneuvered the rear meant a pretty easy lift.
Next jobs are to clean and paint the chassis. (No rust seen here and we've a steam cleaner around the corner to take the worst of the muck and grime off) then start stripping the good bits off the shell. The loom had many additions (I mean, who fits electric locks to a spitfire  ) so I'll be taking that back to basics and by then the kit should be at the workshop.
Great fun up to now and still on track.


|
20th August 2012, 11:06
|
|
Senior Member
|
|
Join Date: Dec 2011
Posts: 656
|
|
Some time has passed since the last post and it's time I updated this thread. Since the kit arrived,

the frame fitted without much tweaking and has been coated with black Hammerite to keep the tinworm at bay


then the body fitted (Minor cutting away at the bulkhead but otherwise pretty good fit).

I've started work on rubbing the seams down which left the Gel thin in some places but have found a good colour match for RAL5002 in a Peugeot 'Bleu' to touch up with a rattle can


Now on to the floors which I'll cover immediately in a post of their own. |
20th August 2012, 11:13
|
|
Senior Member
|
|
Join Date: Dec 2011
Posts: 656
|
|
Floors
There has been some discussion via phone calls about how the front floors fit on the Cordite so I thought it a good idea to give them a post of their own.
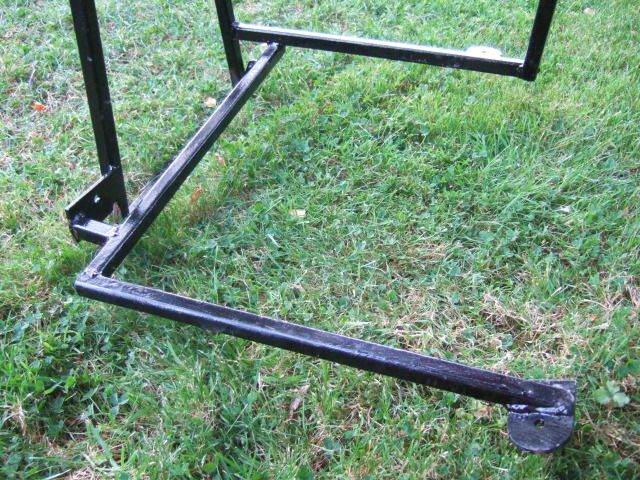
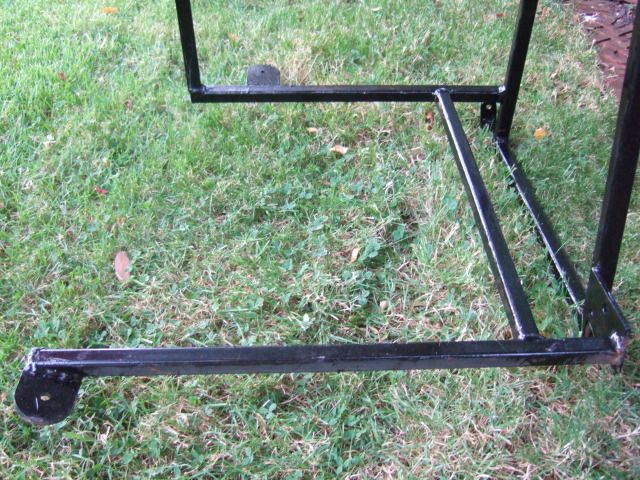
You may have noticed that the lowered front pans don't reach the body on any side but leave a good few inch gap around them:

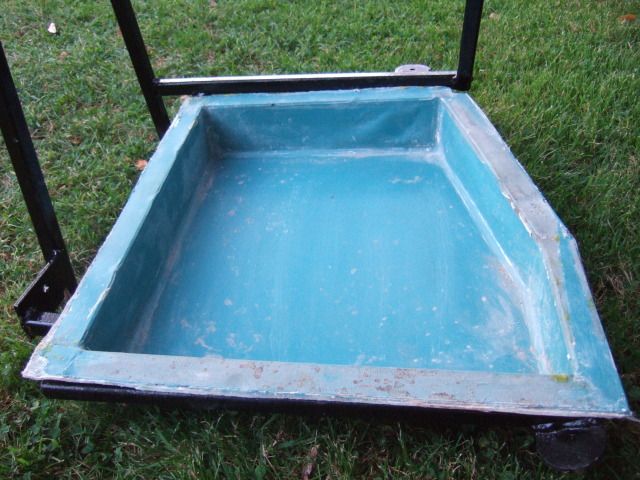
They are supported on Two steel members and can be bonded to those first then a treated Ply 'Frame' cut to sit on top of them. Some careful measuring makes sure the frame reaches all sides and a void is cut to reveal the well underneath:

When bonded on top of the Fibreglass well, the picture is complete and will be fully sealed and bonded to both the Shell and footwells by the usual glass method:

Of course, this is just my take on it but it works for me and gives the necessary strength. YOEMV  |
20th August 2012, 19:24
|
|
Senior Member
|
|
Join Date: Feb 2012
Location: Wembley, London
Posts: 5,056
|
|
Thanks for recording your build in detail Andy, it is a big help. 
I like your idea of re-using the original hand brake support panel.
A couple of quick questions if I may...
Have you fitted a lowering block to the rear spring?
If so, any chance of a photo of it in place?
I just pulled my frame and front floor pans out & just want to confirm the following:
The passenger side well sits flush on two sides of the frame.
But it stays in front of the third frame rail, which is in a higher position.
But the driver's side well can rest on all three sides of the frame.
It will just need a little notch cut out of the corner to fit.
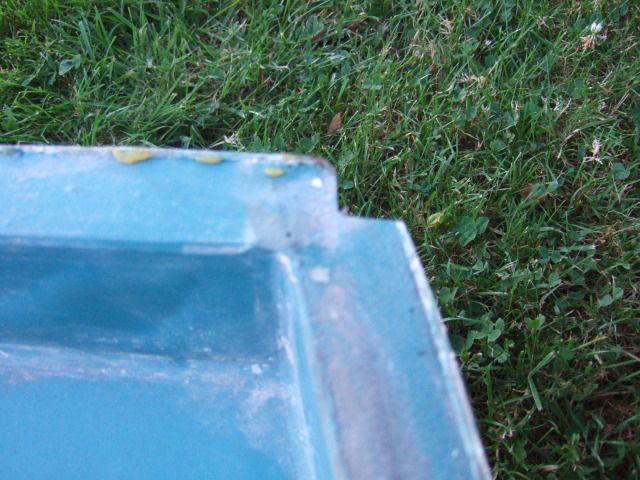
There was a notch cut out of the passenger side well which was confusing me a little. 
Good luck with the rest of the build.
You have a scary deadline, but do tend to work very fast! 
Cheers, Paul. |
21st August 2012, 08:30
|
|
Senior Member
|
|
Join Date: Dec 2011
Posts: 656
|
|
Hi Paul,
Looks like you've got it right there. They do look odd when viewed in situ alone but with covering floors, they come together ok. I've not put any lowering blocks in mine (And may not do yet) as I want to experiment with wheel sizes to fill the arch, leaving the geometry of the swing spring as it was designed.
|
28th August 2012, 06:12
|
|
Senior Member
|
|
Join Date: Feb 2012
Location: Wembley, London
Posts: 5,056
|
|
Hi Andy,
When I was painting my frame the other day I was also thinking about the petrol tank.
Any chance you can take a photo (or two) of your tank in place (& fuel line route) without the body on?
Cheers, Paul. |
28th August 2012, 08:24
|
|
Senior Member
|
|
Join Date: Dec 2011
Posts: 656
|
|
Hi Paul,
I'm afraid the body is bonded on now and I didn't get a photo of the tank specifically. My tank is from a Mk 3 Spit so you can see the outlet at the bottom on the photo below. The Spyder has a 1500 tank with the outlet at the top which, with the tank fitted backwards (To give access to the float switch) it lies along the tank and follows its side down toward the chassis rail before heading forwards.
I hope that helps a little
|
28th August 2012, 16:42
|
|
Senior Member
|
|
Join Date: Dec 2011
Posts: 656
|
|
More progress on the Cordite this week. After sanding down the seams and giving her a single coat of 'Rattle Can' RAL5002, I'm happy with the finish I'm looking for (At an astronomical cost of around £20 for 4 cans!) so attention turned to the inside. After fixing the steering column using the original brackets on the first cross bar in the frame then making up a simple bracket to hold the 'anti turn bracket' fixed to the second cross bar (Note no welding required):

I started looking at the interior cockpit where I had some fixed ideas on what look I am after. so... Off to the metalworks and brushing up on my RAF Halton training, the bulkhead is starting to take shape:


Giving her a nicely aged look already. Hold on tight for the seats when they arrive. She'll look awesome |
28th August 2012, 17:51
|
|
Senior Member
|
|
Join Date: Feb 2012
Location: Wembley, London
Posts: 5,056
|
|
Great progress Andy.
Thanks for the update on the petrol tank, I'm sure this will all make sense when I start putting mine together.
Daft question of the day - Have you put anything else behind the metal rear bulkhead?
Or is the rest of the body left 'open' around the rear wheels?
As I've said before it is a great help having your build to guide me.
Cheers, Paul. |
29th August 2012, 15:29
|
 |
Senior Member
|
|
Join Date: Jul 2011
Location: Marmande 47200
Posts: 501
|
|
I like that gearbox tunnel, is that a Spitfire one or modded from elsewhere.?
Pops
|
29th August 2012, 15:36
|
|
Senior Member
|
|
Join Date: Dec 2011
Posts: 656
|
|
I rescued it from the spitfire body shell before it went to the great recycler in the skip... It has a great datum point in the seat belt mounting points and holds the handbrake in the right place without any messing. Looks even better with a coat of aluminium paint.
|
29th August 2012, 16:36
|
|
Senior Member
|
|
Join Date: Dec 2011
Posts: 656
|
|
Some more progress on the Ally cockpit:

 |
29th August 2012, 23:04
|
|
Senior Member
|
|
Join Date: Jul 2011
Posts: 5,328
|
|
Looking very slick Andy. Love the ally panelling - how're you planning to infill the gaps around the doors and the curved sections at the back of the cockpit?
Oh, and here's a pretty good basis for a six cylinder Cordite if anyone's lurking and looking for a donor -
http://www.ebay.co.uk/itm/TRIUMPH-GT...item2a2222d460 |
30th August 2012, 08:24
|
|
Senior Member
|
|
Join Date: Nov 2011
Posts: 3,558
|
|
Apart from the tunnel , is the rest just aluminium paint?
Any particular paint you use?
How durable is it?
|
30th August 2012, 08:41
|
|
Senior Member
|
|
Join Date: Dec 2011
Posts: 656
|
|
As you noticed, the tunnel is painted as are the floor pans, though this is just for a background as they will be covered with 'Tread Plate' flooring. the walls are fabricated in 1.2mm aluminium riveted together (Over 300 rivets so far and a lot more to come).
Mr T, this is being designed 'on the fly' from a mental image so up to now, I've essentially 'blocked in' the square areas and the curvy bits will be filleted in, catching on to adjacent rivet lines. The corner at the rear will be coned in with rolled aluminium (Wide at the top to reflect the cockpit surround then tapered down to a point near the floor), though there is a small corner at the top where I'm not 100% sure how I'll blend in towards the door.
|
6th September 2012, 21:11
|
|
Senior Member
|
|
Join Date: Feb 2012
Location: Wembley, London
Posts: 5,056
|
|
Hi Andy,
I've just having another look at your build as this just arrived in the post...

Excuse the poor photo quality, I should have used the flash.
It looks like I need to trim the edges off a bit, but that will be easy to do.
How is Cordelia coming along?
Didn't you mention something about a 11th Sept. inspection date?
Good luck, Paul.
PS
I can't re-use this part from my own donor as I finally sold the body shell on Monday.
With a bit of luck the buyer will collect it early next week. |
|
Currently Active Users Viewing This Thread: 1 (0 members and 1 guests)
|
|
|
 Posting Rules
|
You may not post new threads
You may not post replies
You may not post attachments
You may not edit your posts
HTML code is Off
|
|
|
All times are GMT +0. The time now is 09:16.
|


 Linear Mode

