|
|
| Sammio Builds and discussions Sammio bodied car builds and specials |

12th July 2016, 18:14
|
 |
Senior Member
|
|
Join Date: Feb 2012
Location: Wembley, London
Posts: 5,056
|
|

Roadster - Cheers. 
And it would be nice if Summer actually made a prolonged appearance sometime this year. 
- - - - - - - - - - - - - - - - - - - - - - - - - - - - - - -
Tuesday Trim:
Didn't feel too bad sitting in an office today when it was absolutely lashing down outside. 
But managed to find a short dry period when I got home…
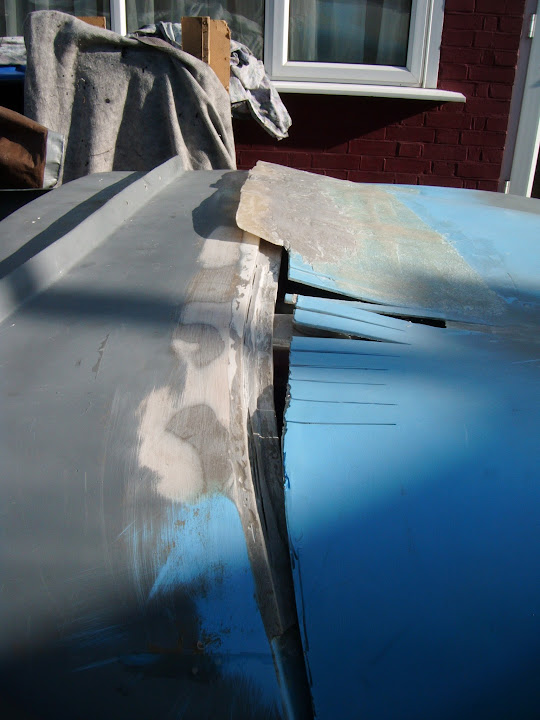
So I ground/sanded the excess fibreglass matting from back edge of the bonnet.
Although, as I've also rounded off the rear edge, the shut line is actually better than it looks in the photos.


It will be easier to see when I have re-sprayed it with some etch primer, but there are a couple of other jobs to do before then…
I need to smooth out the sunny side of the bonnet extension, which has a rough finish.
( Due to my use of parcel tape when making the mould. )

On the underside, I also want to extend the smooth(ish) edge in the bottom corner…

All the way across the under side of the rear edge, just for a few inches.

As given the amount of fibreglass splinters I've pulled out of my hands, I want the MOT tester to be safe!
Unfortunately, at this point the rain re-started so that was it for today.
Until next time, take care, Paul. 

|
14th July 2016, 18:34
|
|
Senior Member
|
|
Join Date: Feb 2012
Location: Wembley, London
Posts: 5,056
|
|
Wednesday - Nothing to report. 
- - - - - - - - - - - - - - - - - - - - - - - - - - - - - - -
Thursday - Part 1:
Well, I've been put back into another holding pattern for real work after just two days back.
So car building it is…
Started by sanding down and cleaning up the rear edge of the bonnet.


Before applying a layer of normal body filler across the top.


Rather than start on the underside of the bonnet next, I waited for that to set first.
Which allowed me to sand it all down with the bonnet lowered.


Note:
This is not the final body work preparation before paint, I just want/need a presentable finish for the MOT.
Next, I raised the bonnet and, after a quick sand & clean, applied fibreglass filler to the underside.


At which point it suddenly went dark and I thought my luck was out.

But I held my nerve and got some etch primer on the sunny side of the bonnet.

I also gave a quick spray along the scuttle edge while I was at it.

Shortly after that, I had to put the covers back on "just in case" while I went off to Sainsburys.
End of Part 1…
|
14th July 2016, 18:34
|
|
Senior Member
|
|
Join Date: Feb 2012
Location: Wembley, London
Posts: 5,056
|
|
Thursday - Part 2:
But when I got back, it was straight into sanding down the underside of the bonnet.
Again, this just needs to be smooth enough to protect the MOT tester from any fibreglass splinters.


This then got a coat of etch primer too.


Although, once again, the storm clouds appeared to be gathering.

Thankfully, the rain never came and this is what the bonnet looks like now.


Which is certainly good enough for an MOT.
Then I cleaned up the area where the bonnet straps will be bolted into position on the driver's side body shell extension.
( Although I don't know why I even bother trying to take photos in here. )

The good news is that this meant the whole of this underside area was now ready for some etch primer.


Again, this whole area will have Tetroseal slapped all over it, so it doesn't matter if it is a bit rough in places.


End of Part 2…
|
14th July 2016, 18:36
|
|
Senior Member
|
|
Join Date: Feb 2012
Location: Wembley, London
Posts: 5,056
|
|
Thursday - Part 3:
Made a template for the bottom corner of the passenger side to show where the bonnet straps were located.

Which allowed me to mark up the holes on the driver's side & drill them.


Unfortunately, the two corners are not a perfect match.
So I decided to match the distance from the rear corner, not the front arch edge.
( Although this decision came back to bite me later on. )
Then I made another template for the distance between the two sets of holes on the passenger side.

And then marked up the bottom holes.

I am very pleased to say that this time I got it right first time.


I then trimmed the "washer" for the driver's side bonnet, as the small bracing section is in the way.


At which point, I realised that one of the holes on the passenger side was practically on top of this brace section. 

Still, nothing a short session with the dremmel look-a-like couldn't sort out & after a quick dusting of etch primer it was as good as new.


But that was it for today, so I'll leave you with this photo taken as I stood on top of the garden wall.

Until next time, take care, Paul.
|
15th July 2016, 06:20
|
|
Senior Member
|
|
Join Date: Feb 2012
Location: Wembley, London
Posts: 5,056
|
|
Quick Comparisons:
I just been trawling this build thread to find some photos of the problems I had with my old brake light switch.
( As fixing this problem might be on today's "To Do" list. )
Anyway, while I was doing that, I came across some old bonnet photos too.
So this is what the bonnet looked like yesterday.
Yet this was what it looked like when I first fitted the bonnet hinges and the rear edge came up short.
Eventually, a whole section of the rear bonnet edge was cut out and replaced.
So if "Lingchi" is roughly translated as "Death by a thousand cuts", could "Cordite" mean "Built by a thousand small jobs" ?

- - - - - - - - - - - - - - - - - - - - - - - - - - - - - - -
Liberté, égalité, fraternité:
Hard to believe the carnage caused in Nice last night.
This was Wembley's tribute to the last terrorist attack in Paris, so it seems the least I can do is re-post the photo.

And whilst I am not always a great fan of Andrew Neil, his RANT at the time was simply outstanding.
https://www.youtube.com/watch?v=WIKg3Qexn7U
- - - - - - - - - - - - - - - - - - - - - - - - - - - - - - -
Take care, Paul.
|
15th July 2016, 10:11
|
|
Senior Member
|
|
Join Date: Feb 2012
Location: Wembley, London
Posts: 5,056
|
|
Friday Morning - Part 1:
The other bit of research I was doing this morning was looking into where the body shell paint should end and the bulkhead paint begin.
Mac had the same colour for both.
 Swifty
 mixed red & black, but his extension has a obviously separate edge to it.

So I looked at a few Jaguar pictures for inspiration while I was at it.
C Type

D Type

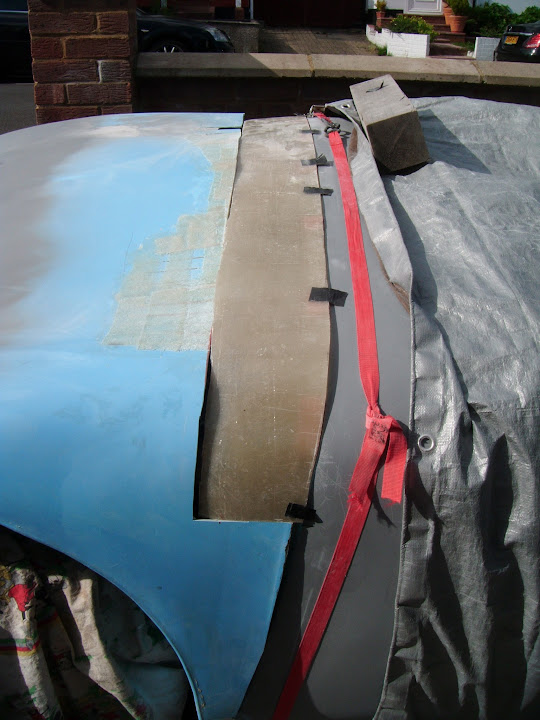
Before deciding that I would have a thin edge of BRG on the body shell extension, whilst the rest of it would be painted black.
So the BRG will be where the masking tape is on the horizontal panel.

I then masked off the rest of the area.

At some point I need to come back and repair gaps in the scuttle bonnet "lips" on both the driver's side…

And the passenger side.

The return lip of the body shell extension will be BRG up to the join with the closing panel to the bulkhead.

And the BRG will extend around to the back of the "blob" at the bottom of the extension.

Put some masking tape along the bottom edge of the body shell on the driver's side.

I only masked off the top section of the passenger side.

As I still need to tidy up the area underneath the passenger side.
( Which means jacking the car up differently and removing the wheel for better access. )
End of Part 1…
|
15th July 2016, 10:12
|
|
Senior Member
|
|
Join Date: Feb 2012
Location: Wembley, London
Posts: 5,056
|
|
Friday Morning - Part 2:
Then it was time for some Tetroseal, which, as always, is a seriously messy job.
This was a new brush a few minutes earlier.

Still, it was worth it, as the black makes a HUGE difference.
( I've found it easier to remove the masking tape now and re-apply it before adding a second coat. )
Passenger Side:


Driver's side:


It seems like ages ago that I was mocking up panels in cardboard…

But the underside of the driver's side panel are now finally painted (well the first coat anyway).


I've currently left a gap, which is near where the Spitfire's bulkhead front foot wells meet the Cordite lowered floor pans.

There are two reasons for this:
- I need to jack the car up higher to get better access.
- I want to check the join between these two sections that runs perpendicular to the side of the body shell.
Then there was a short break while I went back inside to scrub Tetroseal off my arms.

So while I was waiting for the Tetroseal to dry (& the pain in my arms from scrubbing them to die down ), I've finished this update.
Right, now I am back off outside to do some more and there will be another update later.
Cheers, Paul.
|
15th July 2016, 12:49
|
|
Senior Member
|
|
Join Date: Mar 2012
Posts: 1,152
|
|
Top work, Paul. I mean this as a compliment when I say that the black areas look instantly old.
I really feel that you should have started a YouTube channel at the start of this build and provided your updates as short videos. You'd have a good following by now and Quest and Dave would be in a bidding war.
Keep going, you are getting so close.
|
15th July 2016, 16:55
|
|
Senior Member
|
|
Join Date: Feb 2012
Location: Wembley, London
Posts: 5,056
|
|
Oxford - Cheers.
I also like the fact the textured look helps distract from the rough & ready finish underneath.
Although, I will be very glad when all the jobs that involve crawling around under the car are finished.
Don't know about a YouTube channel, but Mark Evans on Quest is one of the reasons I started this madness in the first place!
- - - - - - - - - - - - - - - - - - - - - - - - - - - - - - -
Friday Continued - Part 1:
I put some tape around the locating cones to stop the rubber sticking to the Tetroseal when the bonnet was closed.

My plans for the rest of the day changed when the postman delivered the longer bolts for the bonnet straps.

Well, it would be rude not to, wouldn't it?
Especially as I got to play with my new 8mm spanner too.

Sunny side of top bracket.

Other side & note I trimmed down the "washer" too.

Bottom bracket.


One down & one to go.

Even though I will have to remove the bottom bracket on the passenger side when I start tidying up, it was still great to see the brackets on.
But I am going to be a bit of a tease and leave those photos for later.
Instead you get to see yet another 'Before' & 'After' of my driveway.


End of Part 1…
|
15th July 2016, 16:55
|
|
Senior Member
|
|
Join Date: Feb 2012
Location: Wembley, London
Posts: 5,056
|
|
Friday Continued - Part 2:
Even before my last Mr Clumsy episode, I wanted to bridge the gap between the petrol tank and the rear cockpit wall.
So I removed the access panel cover.

Then used some expanding foam, which should stop me dropping anything else down there. 

Obviously, I will trim that back into shape when it has set.
Now this foam seemed to work pretty well in the small space available here…
However, I may have made a bit of a dog's dinner with it in the gap along the bottom of the boot.
( The wiring loom is wrapped in the newspaper. )

So I may have made some extra work for myself to sort out that mess.
The only other job I managed to do today was to get some etch primer on both sides on my rear seat spacers.
Underside.

Sunny Side.

At this point I had some domestic chores to do and the weather didn't look promising, so the covers went back on.
Thankfully, I managed to get the grass cut and all the laundry back in off the washing line before the rain started.
It is still "misting" on and off as I type this, so I think I'll call it a day.
But I'd like to end on a high note, so here are the photos I mentioned earlier of the car with its bonnet brackets in place.
( And the sunny actually shining. )


I also came across this "Before" photo this morning.
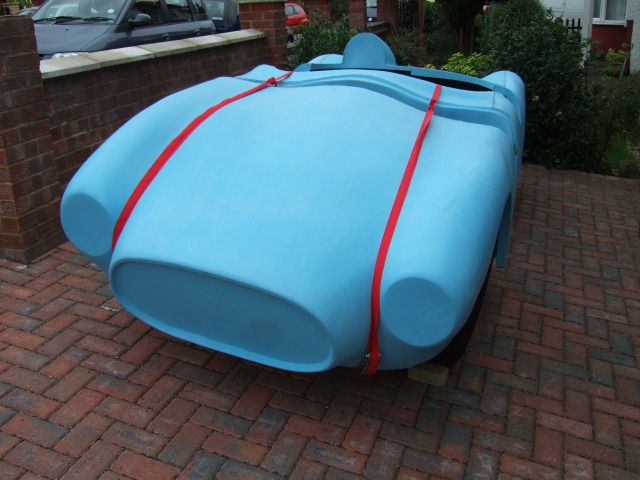
So here is the current "After" for comparison.
( Complete with hazard lights flashing. )

At some point, I need to make a final decision on how the grille is going to be fitted, as that will really set off the front end.
Until next time, take care, Paul.
|
16th July 2016, 14:37
|
|
Senior Member
|
|
Join Date: Feb 2012
Location: Wembley, London
Posts: 5,056
|
|
Small Saturday:
A lot of family stuff going on today, so not much car time available.
Started of with some small (& quiet) jobs to avoid disturbing the peace.
In no particular order, the foam in the rear access panel was trimmed.

Then covered in fibreglass matting.

The seat spacers were given a coat of black paint on both sides.


A skim of normal body filler was applied to the driver's side of the cockpit walls.


Note:
I am definitely leaning towards an alloy panelled interior at some point in the future.
So for now, I just need to improve the "first impression" that the MOT tester will get.
End of Part 1…
|
16th July 2016, 14:38
|
|
Senior Member
|
|
Join Date: Feb 2012
Location: Wembley, London
Posts: 5,056
|
|
Brake Light Switch:
This is such a small part, but it really punches above its weight when it comes to being a complete pain in the ****!
When the original switch that came with my donor broke, I thought I must have accidentally knocked it against something.
Then I watched as the brand new replacement switch spilled its guts out within minutes of being fitted. 

I then bought an alternative metal brake light switch.

But this didn't work either.
As the plastic Spitfire switch works when the "button" is released, but the metal one works when the button is pressed.
( Which meant the brake lights were permanently on when I connected the switch. )
So I ordered two more plastic ones and a bit of reading on a Triumph forum suggested "re-enforcing" the switch.
( As apparently the plastic "walls" are too thin to resist the pressure of the internal springs under load! )
One tip was to simply use some lock wire around the outside to prevent flex, so I went with a variation of that.
I cut out and shaped two small sections of aluminium.

Note: This would have been a single section if I hadn't accidentally cut too far.
I had to put little cut outs in them to avoid these parts of the switch.

I also filed some groves in all for corners.

Before wiring the aluminium to the outside of the switch body.

Finally, I added a strip of tape around the outside to tidy it all up a bit.

So far, so good…
Now, I am going to blame what happened next on a rush of blood to the head.
( Caused by crawling head first into the foot well to fit the switch. )
I initially tightened up the nut by hand, then used an adjustable spanner to get it tight.
A bit more effort got it "good & tight".
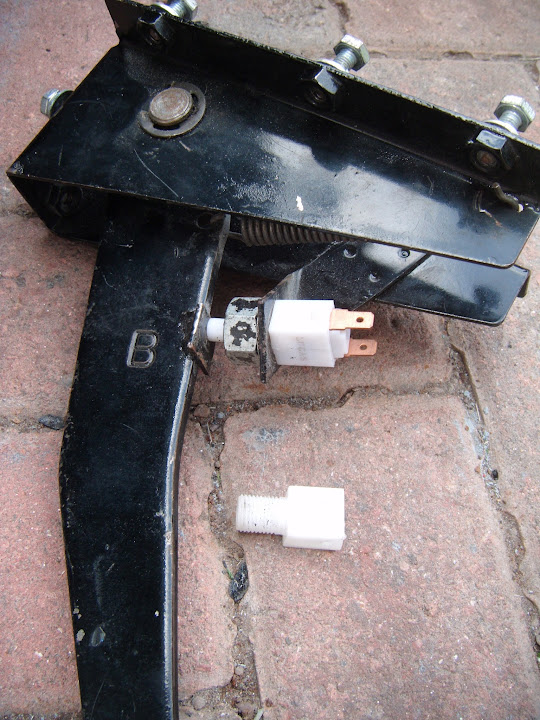
At which point I appeared to channel my Inner Gorilla and this was the end result.

Again, it may have been all the blood rushing to my head, but I could barely summon a swear word.
I just couldn't face doing all that work again, so I was within seconds of packing up for the day.
Then it dawned on me, that all the hard work was already done and the spare switch was just waiting for me.
So I just had to cut the wires around the old switch and swop the "jacket" over to the spare.

To say I exercised a degree of caution fitting the spare would be an under statement.

Couldn't get a decent photo, but you can just about make out the nut to the left and the "jacket" to the right of the bracket.

I connected up the wires and tried to work out the easiest way of testing if it actually worked.
In the end I went for a technical solution and set my camera up on some blocks of wood to video the rear of the car.
So without further ado, here is a short clip that shows me climbing in and testing the lights.
https://youtu.be/o2puSt1WM_Q
In no particular order, the following all passed.
- Brake
- Rear
- Fog
- Rear & Brake
- Left Indicator
- Right Indicator
- Hazard Lights
Unfortunately, I can't tell if number plate light came on, so I will have to check that again another day.
But apart from that, the back of the car appears to be ready for an MOT.
Anyway, that was all the car time I had today & I'm actually supposed to be doing something else right now.
So I'd better go, take care, Paul.
Last edited by Paul L; 16th July 2016 at 15:10..
Reason: Fixing YouTube Link
|
16th July 2016, 16:15
|
 |
Senior Member
|
|
Join Date: Dec 2011
Location: Devon
Posts: 550
|
|
The simplest jobs always take the longest!
You could have asked the guy that walked past to tell you if the brake lights were working.
Did you forget to blurr your no. plate this time?
What else now for the Mot, other than seats and belts?
With some good weather forecast so hopefully you can get some time in.
Cheers
|
16th July 2016, 21:19
|
|
Senior Member
|
|
Join Date: Mar 2012
Posts: 1,152
|
|
Nice work, Paul.
I'd recommend a hydraulic brake light switch plumbed into the rear brake line.
|
17th July 2016, 07:19
|
|
Junior Member
|
|
Join Date: Mar 2016
Posts: 10
|
|
Still loving this build thread.
Just a little thought on the switch. Wouldn't a washer on the jacket side of the bracket reduce the pressure on the switch slightly to stop them from exploding.
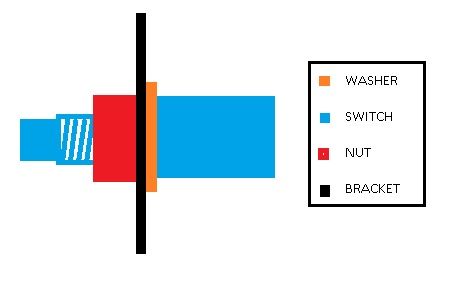
Edit:
Sorry just reread your thread and you've already done a similar job with a nut. Didn't want to delete this post and waste my artistic ability lol. Carry on with your great work Sir
Last edited by WelshOne; 17th July 2016 at 07:28..
|
17th July 2016, 11:51
|
|
Senior Member
|
|
Join Date: Feb 2012
Location: Wembley, London
Posts: 5,056
|
|
Froggyman - I know, "fit brake light switch" looks like a simple job on paper, but it took me ages to do in practise.
My current MOT "To Do" list includes the following:
- Tidy up and paint the cockpit interior.
- Add drain holes in the floor, in case I ever get caught in the rain.
- Fit the seats & seat belts.
- Connect the oil pressure gauge.
- Connect the new replacement heater fan switch.
- De-bug the problem with the front lights / wiring loom (hopefully a simple earthing issue).
- Clean up and paint the underside of the panel work on the passenger side.
- Access the underside of the join between the front foot wells & the lowered floor pans.
- Workout where the gearbox is weeping oil (as it currently lands on the exhaust & smokes when the engine runs).
- Fit the gearbox cover.
- Make a new, or modify the existing, "join" between the gearbox cover and the handbrake panel.
- Fit the two bullet side mirrors.
- Fit the two Brooklands aero screens.
- Fit the rear view mirror and the perspex deflector screen.
Unfortunately, I will be back in the office on Monday, just as a mini heat wave is due to start.
But, I will keep chipping away at the MOT list every chance I get.
- - - - - - - - - - - - - - - - - - - - - - - - - - - - - - -
Oxford - Cheers, I am sure that would be a better way than using the cheap plastic switch.
However, as long as the switch is still in one piece when I get a chance to check it later on I will be very happy indeed.
- - - - - - - - - - - - - - - - - - - - - - - - - - - - - - -
WelshOne - Thanks for taking the time to draw up a diagram.
It never actually occurred to me to put the washer on the other side of the bracket.
Although I've just checked the first photo I have of when the pedal was removed from my donor…

And that seems to have the washer on the "nut side" of the bracket.
Either way, I really hope my "jacket" approach will make the problem go away.
- - - - - - - - - - - - - - - - - - - - - - - - - - - - - - -
Well, the dirty black clouds and light drizzle seems to have lifted, so I'm heading outside…
Take care, Paul.
|
17th July 2016, 18:22
|
|
Senior Member
|
|
Join Date: Feb 2012
Location: Wembley, London
Posts: 5,056
|
|
Smaller Sunday - Part 1:
By the time I got outside, the storm clouds had returned.
So I opted to watch a DVD with my youngest daughter instead & had no regrets when the sun then promptly came out.
It was late afternoon by the time I finally got to do some car work…
First job was to get a second coat of paint on the sunny side of the seat spacers.

Then I wanted to see if the number plate light came on with the rear lights.
Rear Lights On - Check.

Number Plate Light On - Fail.

While I was at it, I double checked the side lights at the front (inside the headlight) - Still a fail.

But at least the main headlights (on both dip & high beam) work.

I'd already seen the front hazard lights on, so I knew the indicators were OK too.
Used my new multi meter to check there was power at the rear loom - Check.
( After unwrapping the wires in the boot. )
So I then removed the number plate cover to find the wires were not actually connected for some unknown reason. 

Unfortunately, connecting the wires back up did not solve the problem.
( And I checked there was definitely power at the these terminals. )

So I tested the bulb on my old Mondeo battery and that was working fine.

I then went back and sanded down the terminals, plus the ends of the bulbs, added a small blob of vaseline and…
Success!

So that is all the rear lighting ready for the MOT.
End of Part 1…
|
17th July 2016, 18:23
|
|
Senior Member
|
|
Join Date: Feb 2012
Location: Wembley, London
Posts: 5,056
|
|
Smaller Sunday - Part 2:
I made a start on sanding down the filler on the cockpit sides.

I also tidied up the inside edge of the bonnet opening, which was quite messy in places.


Until I was left with this.

So I quickly taped the grille into position.

I am still not sure if I could prep & paint the inside lip of the bonnet opening with the grille bonded into position.

Either way, the grille still makes a big difference to how the front looks.

Overall, not a big step forward, but at least these are all small steps in the right direction.
So until next time, take care, Paul.
|
17th July 2016, 20:09
|
 |
Senior Member
|
|
Join Date: Sep 2011
Posts: 1,446
|
|
Can you glass in some mounts and have the grille on some tabs bolted in to hold the grille so it can be easily removed ??
Sorry another job to add to your list.....
|
18th July 2016, 19:34
|
|
Senior Member
|
|
Join Date: Feb 2012
Location: Wembley, London
Posts: 5,056
|
|
RedRatBike - Don't worry, I should have included fixing the grille in place to my MOT "To Do" list.
Hopefully, I might have come up with a KISS solution for the grille (see below).
- - - - - - - - - - - - - - - - - - - - - - - - - - - - - - -
Monday Evening - Part 1:
Stepped off an air-conditioned train after the journey home from work to be met with a wall of heat.
So it was hotter this evening than it has been for most days during this "Summer" & I got a bit more done...
Bonnet Grille:
I actually have two problems to deal with here:
- Fixing the grille in place.
- Dealing with the outside edges, where the grille had to be trimmed very tight to get past the bonnet hinges.

For the grille fixing, I spent ages staring at this photo hoping for some inspiration…

When I finally remembered that the area above the grille/hoop is very deep, so you could fix a screw into it.
( Without it poking out through the front of the bonnet. )

So my current plan is to use some small sections of builder's band to form a fixing bracket something like this.

With the top section screwed into the bonding paste & the bottom section pressing against the grille, something like this.

Hopefully, if I use enough brackets, the grille will be solidly held in place, yet removable for painting.
My solution for the thin sections of grille at the outside edges was is to increase the depth of the opening.
From this.

Via a few drilled holes to help the filler stick.

To this extra layer of fibreglass filler.

After the first round of sanding, it looked like this.

Then came the second round of filler.

Which has built out the area for the grille to rest on like this.

But I had to leave the second round of sanding for another day...
End of Part 1…
|
|
Currently Active Users Viewing This Thread: 4 (0 members and 4 guests)
|
|
|
 Posting Rules
|
You may not post new threads
You may not post replies
You may not post attachments
You may not edit your posts
HTML code is Off
|
|
|
All times are GMT +0. The time now is 12:21.
|


 Linear Mode

