Are you madabout kit cars      
 "We've Got Kit Cars Covered" Information about Madabout-Kitcars.com Contact Madabout-Kitcars.com         Home of UK kit cars - madabout-kitcars.com Various kit car write ups All the latest kit car news Kit car related and general discussion

Search
Manufacturers
Kit Cars
Kit Car Data sheets
Picture Gallery
SVA Knowledgebase
Clubs & Communities
Build cost estimator
Kit cars for sale
Knowledge Base 
KitcarUSA.com
Classic-Kitcars.com
 

Go Back   Madabout Kitcars Forum > Mad Build Area > Sammio Builds and discussions

Sammio Builds and discussions Sammio bodied car builds and specials

Reply
 
Thread Tools Display Modes
  #1761  
Old 29th March 2015, 09:58
Paul L's Avatar
Paul L Paul L is offline
Senior Member
 
Join Date: Feb 2012
Location: Wembley, London
Posts: 5,056
Paul L is on a distinguished road
Default

Rene - Thanks for your kind words, they do mean a lot.

I am actually really proud of what I have achieved so far.
( Especially as a few Cordite projects seem to have simply been abandoned. )

It is just the slow pace of progress that frustrates me at times.

However, I am still looking forward to that first day of driving a car I've build myself.

- - - - - - - - - - - - - - - - - - - - - - - - - - - - - - -

British Summer Time:
Although the clocks went forward, the weather seems to have gone backwards.


So rather than get fed up trying to do battle with the weather I plan to spend today on other things.

I also spotted a potential car related purchase last night, but I need to check something else first.

I'll be happy if I could just finish off the sanding of the boot lid and get that in primer tomorrow.
( As seeing the final look would be a big step forward. )

I know I took a break from it in the middle, but I made the first cuts into the body shell back in October.
( Having started the process of cross bracing the under side of the shell the month before. )


So until next time, take care, Paul.
Reply With Quote
  #1762  
Old 29th March 2015, 14:42
a big scary monster a big scary monster is offline
Senior Member
 
Join Date: Apr 2014
Posts: 198
a big scary monster is on a distinguished road
Default

Hi Paul excellent work on the boot lid, if the locks are the same ones as the links I sent you when you first started the journey of lid fitting and I threw a few late night musings at you? Then I can confirm there rust proofness as I have had 2 fitted outside for nearly a year on my camper and they are untarnished. (I have not commented on your build for a while as my spaniel managed to launch both my phone and my tablet onto the aga hearth and both where very broken indeed, annoying when all info on one is backed up on the other, my point is can you not get 4 locks keyed alike with a spare in the car for that inevitable day you loose or break a key) my other thought from a week or 2 ago was re the lifting eye, I thought a fibre glass moulding possibly with a 3rd brake light on the rear face with a finger slot on the front face may look good, although the wire for light would be a pain, but now I am actually really liking the stainless eye, don't forget to get in touch before stoneleigh if you want anything for the interior sewing and I will take my machine. Looking good keep it up Ed.
Reply With Quote
  #1763  
Old 29th March 2015, 15:37
Scottie22 Scottie22 is offline
Senior Member
 
Join Date: May 2013
Posts: 2,161
Scottie22 is on a distinguished road
Default

So you should be proud Paul! You have achieved an enormous amount, and we have all watched your skills and confidence increase, over the last year or so, well done.
Reply With Quote
  #1764  
Old 29th March 2015, 15:53
reneanglia reneanglia is offline
Senior Member
 
Join Date: Jan 2015
Posts: 168
reneanglia is on a distinguished road
Default

Paul did you seen these locks?
https://www.google.nl/search?q=unive...ml%3B700%3B438
Reply With Quote
  #1765  
Old 29th March 2015, 17:54
Paul L's Avatar
Paul L Paul L is offline
Senior Member
 
Join Date: Feb 2012
Location: Wembley, London
Posts: 5,056
Paul L is on a distinguished road
Default

Ed - I already had one pair of those locks, so just needed to get a second pair.
One day I might replace all four with new "key alike" versions, but not until I'm on the road.

Scottie - Cheers mate.

Rene - I did see that style of lock, but I already had two locks with traditional keys.
But see my reply to Ed above, as I might get 4 of those at some point in the future.

- - - - - - - - - - - - - - - - - - - - - - - - - - - - - - -

The Calm After The Storm:
After the wind & rain had lashed the house all day, suddenly the rain stopped & the sun came out.

Admittedly the wind was still blowing as I discovered when I peeled off one the car covers and nearly took off down the street!

I used this bonus car time to continue sanding down of the bottom edges of the boot lid.

You many recall that I added some fibreglass matting to the underside of this corner.


So now I could sand down the sunny side and still maintain the lid thickness.

It is clear that I will need to come back and add some filler in places, but for now I wanted to get some etch primer on to see how it all looked.

This is the traditional "Before" shot.


Before I took the "After" shot I went back out the front to touch up the edges of the boot opening.

While doing this I thought I noticed the wind was blowing water from the covers on to the body shell.

Then to my horror I realised it was actually starting to rain again.

I quickly pulled the cover back over the body shell and thought that was a close call.

Until I realised the boot lid was still sitting outside on the patio at the back of the house.

One mad dash, and some perfuse swearing, later the lid was safely in the kitchen.


When that was dry enough, I loosely refitted all the shiny bits.
( They will all be removed again so I can start the next round of filler work. )


And here, at last, is the view I wanted to see.


I know this lid has been a complete nightmare to do, but I must confess I do love how it looks.

After taking this photo I realised that I needed to do one more thing to improve the view.


So it was another trip back down to the bottom of the garden to get the petrol cap.


I hope when this is all painted British Racing Green it will really look the part.

A bit like Scottie fitting his steering wheel, it was worth painting the lid just to lift my spirits.

So until next time, take care, Paul.
Reply With Quote
  #1766  
Old 29th March 2015, 18:26
Scottie22 Scottie22 is offline
Senior Member
 
Join Date: May 2013
Posts: 2,161
Scottie22 is on a distinguished road
Default

It looks the part now Paul, never mind the BRG!
Reply With Quote
  #1767  
Old 29th March 2015, 18:27
Scottie22 Scottie22 is offline
Senior Member
 
Join Date: May 2013
Posts: 2,161
Scottie22 is on a distinguished road
Default

P.S. You've got to fit a Monza style fuel cap!!
Straight swap.
Reply With Quote
  #1768  
Old 29th March 2015, 19:09
garyh garyh is offline
Senior Member
 
Join Date: Jun 2011
Location: birchington, kent
Posts: 1,769
garyh is on a distinguished road
Default

Looks really good, worth the effort.
Reply With Quote
  #1769  
Old 29th March 2015, 19:21
jones jones is offline
Senior Member
 
Join Date: Apr 2014
Location: Midlands
Posts: 405
jones is on a distinguished road
Default

So I have been smug that my wedding anniversary weekend happened to tie in with the shocking weather so I wouldn't miss playing with the car. However yet again your perseverance has shone through and you have an awesome boot lid and really does look great - a headache it may have been but very well thought out it certainly is worth the work. I feel your car will be just reward when complete for all the determination you have shown. Mine is now behind schedule and likely to miss Stoneleigh.

Last edited by jones; 29th March 2015 at 19:35..
Reply With Quote
  #1770  
Old 29th March 2015, 20:56
a big scary monster a big scary monster is offline
Senior Member
 
Join Date: Apr 2014
Posts: 198
a big scary monster is on a distinguished road
Default

I really like all the shiny bits and the number plate plinth, in my opinion it was all worth the effort as it makes it look like a real period car that's been raced and modified. I can't wait to see the proud smile on your face the day it is finished. Ed.
Reply With Quote
  #1771  
Old 30th March 2015, 07:15
Paul L's Avatar
Paul L Paul L is offline
Senior Member
 
Join Date: Feb 2012
Location: Wembley, London
Posts: 5,056
Paul L is on a distinguished road
Default

Scottie, GaryH, Jones & Ed - Thanks for all the positive feeback.

It is easy to get overwhelmed by all the work that lies ahead when I see my "Moon Rover" littered all over my drive.

However, those last two photos I posted are actually a text book example of what can be achieved by "chipping away".

When I bought my Cordite, I really thought the only work required at the back would fitting the rear lights, number plate & petrol cap.

As you all know, the reality has been very different, so this seems like a good time to reflect on the work required to get this far.

Therefore last night I looked back through my photos and pulled a few together to highlight just what I have managed to achieve...

- - - - - - - - - - - - - - - - - - - - - - - - - - - - - - -

There was the wholesale butchery of both sides of the rear body shell.


Which in turn lead to extra work to get a straight(ish) line along the bottom edge of the body shell.


The photo above also shows the tail pipe exits that I made using old beer cans.


Fitting the extra hump AndyP57 sent me was not straight forward either, as it was for the driver's side.


I even had to lower a small section of the body shell next to the hump.


Plus I had to build a new rear cockpit edge & straighten out the faces of the two humps before I reached this stage.


Finally there was the ton of extra work I made myself when I decided to cut out a boot lid in the first place.


Whilst the above is not even a full list of all the work required, it is a pretty good example of why I love those last two photos.


- - - - - - - - - - - - - - - - - - - - - - - - - - - - - - -

I know the current spell of wet & windy weather will eventually pass and some sunshine will help me get more done.

It is also clear that if I keep "chipping away" the rest of the build will fall into place eventually.

Cheers, Paul.
Reply With Quote
  #1772  
Old 30th March 2015, 08:07
8 Valve Ed 8 Valve Ed is offline
Senior Member
 
Join Date: Dec 2013
Location: Sunny Cumbria
Posts: 470
8 Valve Ed is on a distinguished road
Default

I take my hat off to you Paul. I couldn't do the 'chipping away', I have to attack the build at 110% time and effort. I would have lost interest after the first month doing it your way! Most days I am spending at least 12 hours in the garage and three or four here in front of the computer researching or keeping abreast of things on here.

You have ended up with a LOT of work which is very time consuming and fiddly. I cringed when I saw your first welds but you have shaped up well if you don't mind me saying so. The only way to learn is to get stuck in and get your hands dirty! You are packing a lifetime of learning skills and techniques into a relatively short time.

I am sure, having got this far you will complete a creditworthy car which you can be proud of. The big thing is to keep up the momentum. If you find a sticking point, go do another aspect of the car then come back to the sticking point with a fresh mind and it will resolve.

Good luck and keep at it!
Reply With Quote
  #1773  
Old 30th March 2015, 08:27
redratbike's Avatar
redratbike redratbike is offline
Senior Member
 
Join Date: Sep 2011
Posts: 1,446
redratbike is on a distinguished road
Default

"I hope when this is all painted British Racing Green it will really look the part. " .............................well all the bits looked good with just grey primer so with the BRG they will really set the rear off ...
keep at it you are really making progress .. ... think you need to get some seam sealer and have a play ... there is brush on and in a tube buy both and see what suits you'll use it up either way
Reply With Quote
  #1774  
Old 30th March 2015, 15:58
ufo17's Avatar
ufo17 ufo17 is offline
Member
 
Join Date: Dec 2013
Posts: 37
ufo17 is on a distinguished road
Default Wow

I was going to say give yourself a break and look at what you've achieved but I think maybe you being so harsh on yourself is partly why your getting results like the boot opening. If you keep the quality going and don't worry about the time this is going to (does) look amazing. Really well done, first class effort.
P.s I'm gutted I can't make it over to blighty for stoneleigh I really want to see these cars in the flesh, anybody want to buy a house in France http://www.frenchestateagents.com/fr...arentes-france. I can't start a build until my house sells so some one help me out please
Reply With Quote
  #1775  
Old 30th March 2015, 16:40
Paul L's Avatar
Paul L Paul L is offline
Senior Member
 
Join Date: Feb 2012
Location: Wembley, London
Posts: 5,056
Paul L is on a distinguished road
Default

8 Valve Ed - Cheers, I've certainly learned a lot of new skills working on this project.
So hopefully I should be able to complete the remaining jobs a bit quicker now compared to when I first started.

RedRatBike - I am still amazed at the difference seeing things in one colour (even if it is grey) makes.
I already have a tub of brush on seam sealer that I first used during the bulkhead repair work.

ufo17 - Thanks, seeing the overall shape finally coming together is a great boost.
I am pleased with what I have managed to achieve so far, especially given the circumstances.
My really frustration come from how much work I still have left to do, as it often seems relentless.

The house in France looks great and I would love a big garage / workshop like that to play in.
Good luck with the sale.

- - - - - - - - - - - - - - - - - - - - - - - - - - - - - - -

Little & Often - Part 1:
Although there are a few small jobs left to do on the boot lid, I've started on the 101 little jobs the framework needs.

In no particular order...

Gear Box Cover:
I drilled the 6 horizontal holes required in the bulkhead.


Doing this work reminded me that I hadn't order a new rubber seal for the, so that now on its way from Rimmer Bros.

While looking on line for this seal, I also noticed this parts guide from Canley Classics.


And it would seem that my donor car was missing Part #608563.

Which is why there is currently a gap here:


Unfortunately, this part is no longer available & it seems you now use a section of the other seal I've just ordered.

Anyway, back to the gearbox cover and I can't drill the 5 vertical holes needed until the seal arrives,

Even then I might have a bit of extra work to do, as whilst the cover fits needed along the top edge,


There is no way of getting the bottom corners any closer than this due to the shape of the cover.


But I will worry about that another day when I can see how thick the rubber seal is.

I also tidied up the underside of the holes I drilled in the bulkhead and got some Kurust on them.


I then covered some scrapes on the bottom of the bulkhead with Kurust while I was at it.

I also put some on the fixing brackets for those holes.
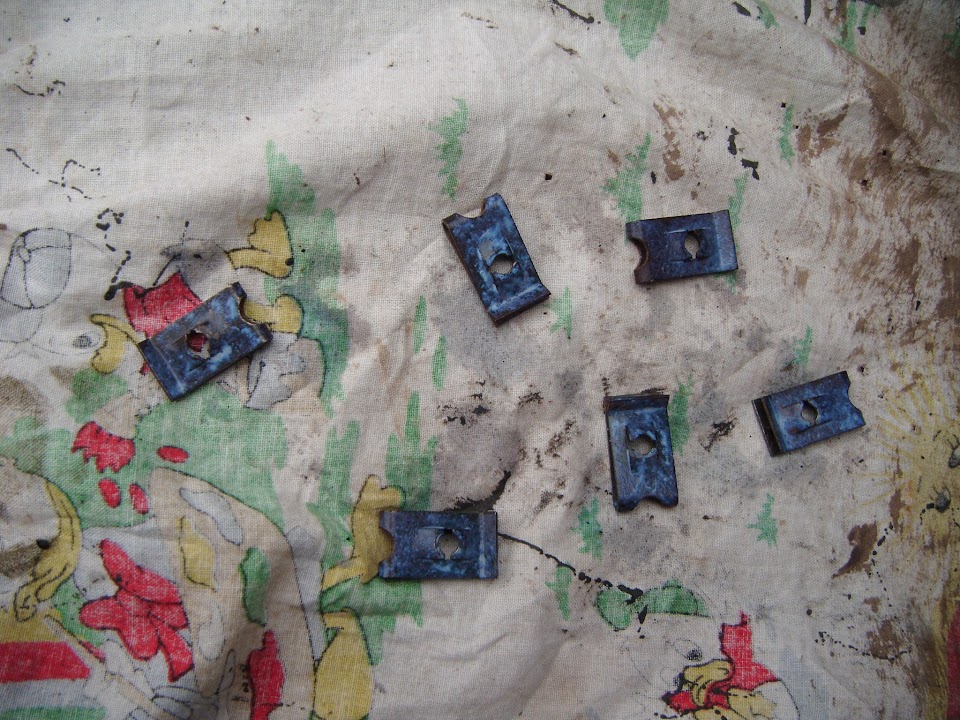


Top Tip:
Don't keep small parts like this on a small corner of a sheet you are mainly using for something else.

I had forgotten all about them until I heard "pinging" sounds when I shook the sheet to start folding it.

Thankfully I was able to find all 6 brackets scattered around the driveway.

- - - - - - - - - - - - - - - - - - - - - - - - - - - - - - -

Hand Brake Panel:
I spent a while staring at this gap trying to work out the best thing to do.


I appreciate 8 Value Ed's point about welding it up the first time, but these parts were never designed to be joined.

I was able to weld the Spitfire hand brake panel from above and keep the original shape.

But I knew this was not going to sit flush on the other side, hence removing this to seal it in the first place.

In the end, I decided to use the seam sealer than I already have, so I masked the area off first.
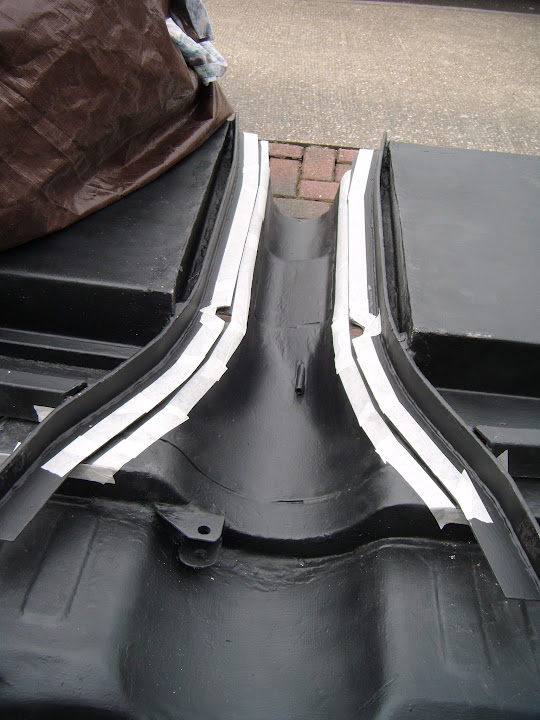


Then used a spatula to really push the sealer into the gap as best I could.


I'll now leave that to dry before trimming the edges and removing the masking tape.

- - - - - - - - - - - - - - - - - - - - - - - - - - - - - - -

Hard Fuel Line:
I found a new grommet that will fit snugly around the fuel line.
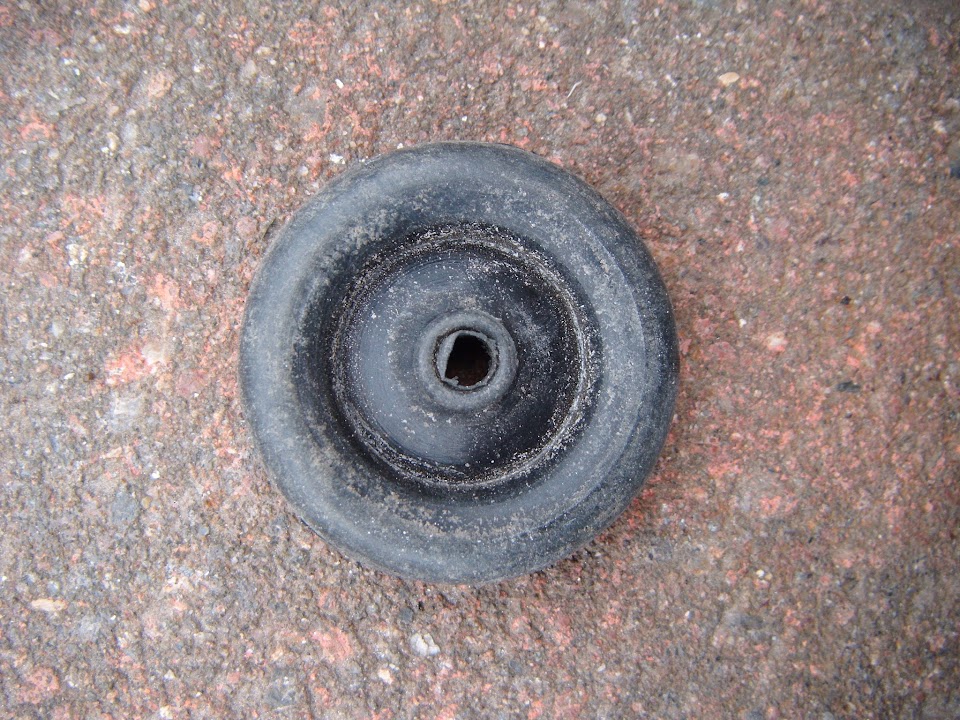


There is one drain hole left in the boot floor.


Which was just the right size for this grommet.


So now I know what size hole I need to drill here at some point.


- - - - - - - - - - - - - - - - - - - - - - - - - - - - - - -

End of Part 1...

Last edited by Paul L; 4th April 2015 at 06:22.. Reason: Typo
Reply With Quote
  #1776  
Old 30th March 2015, 16:41
Paul L's Avatar
Paul L Paul L is offline
Senior Member
 
Join Date: Feb 2012
Location: Wembley, London
Posts: 5,056
Paul L is on a distinguished road
Default

Little & Often - Part 2:

Rear Wheel Arches:
There were three "standard" seat belt mounting holes in the rear arches.

I've already utilised one of these holes to mount the bracket I make to support the exhaust pipes.


But I'd left the others in place in case I needed them to join the rear arches to the internal frame work.
( As it was, I simply welded some box section directly to the arches. )

So now I needed to seal the holes and tidy up where the welding had melted the paint.

Thankfully, a selection of new seat belt bolts & bits came with my donor.


This was the passenger side:


By using the original seat belt "spacers", the bolt does poke out of the nut too far.


The other hole simply had a bolt fixed through it.


Although there was nothing simple about getting to the nut in here (middle of photo).


Especially as I had to squeeze my head & arms into this gap in the frame.


With the other side of the welding area cleaned up, I put some Kurust on it.


The driver's side just needed two bolts with spacers.


These were also a bit easier to reach when I crawled underneath from the front, rather than the side.


- - - - - - - - - - - - - - - - - - - - - - - - - - - - - - -

Weather Watch:
I knew it wouldn't stay dry long enough for me to start any painting today.

I didn't push my luck, so I stopped work at this point and got the covers back on everything.

So I was actually feeling quite smug when I felt the first drops of rain just as I was heading indoors.

Unfortunately the smug feeling didn't last long when I remembered I still had washing on the line!

Given the forecast I don't think I will get a chance to do any painting tomorrow either.

So until next time, take care, Paul.
Reply With Quote
  #1777  
Old 31st March 2015, 06:36
Paul L's Avatar
Paul L Paul L is offline
Senior Member
 
Join Date: Feb 2012
Location: Wembley, London
Posts: 5,056
Paul L is on a distinguished road
Default

Rough Night: - Was woken up around 2.30am when it sounded like the wind was going to lift the roof off.

There was so much noise outside, I had to go downstairs and check all the car covers were still there/secure.

This seemed to be repeated every hour, so I haven't had much sleep, but at least everything is still on the driveway.

Have I mentioned I wish I had a garage?
Reply With Quote
  #1778  
Old 31st March 2015, 07:15
8 Valve Ed 8 Valve Ed is offline
Senior Member
 
Join Date: Dec 2013
Location: Sunny Cumbria
Posts: 470
8 Valve Ed is on a distinguished road
Default

If this wind keeps up you might have mine soon! LOL

BTW, I keep meaning to mention this but do you have weather radar? Seriously, I use it all the time.

http://www.netweather.tv/index.cgi?action=radar;sess=

Extremely useful and might be a godsend to you.

Last edited by 8 Valve Ed; 31st March 2015 at 07:18.. Reason: Added link.
Reply With Quote
  #1779  
Old 31st March 2015, 13:34
reneanglia reneanglia is offline
Senior Member
 
Join Date: Jan 2015
Posts: 168
reneanglia is on a distinguished road
Default

Quote:
Originally Posted by Paul L View Post
Rough Night: - Was woken up around 2.30am when it sounded like the wind was going to lift the roof off.

There was so much noise outside, I had to go downstairs and check all the car covers were still there/secure.

This seemed to be repeated every hour, so I haven't had much sleep, but at least everything is still on the driveway.

Have I mentioned I wish I had a garage?
Garage,Garage?..........who needs a F*Garage!
Garage's are for wimps,Real Man build their car outside on the drive.....
Reply With Quote
  #1780  
Old 31st March 2015, 13:41
jones jones is offline
Senior Member
 
Join Date: Apr 2014
Location: Midlands
Posts: 405
jones is on a distinguished road
Default

haha

Quote:
Paul L

Rough Night: - Was woken up around 2.30am when it sounded like the wind was going to lift the roof off.

There was so much noise outside, I had to go downstairs and check all the car covers were still there/secure.

This seemed to be repeated every hour, so I haven't had much sleep, but at least everything is still on the driveway.

Have I mentioned I wish I had a garage?
I have to admit I did awaken from my slumber in the middle of the night to what was quite a storm, I thought about the car under cover and came to the realisation if it were uncovered I had no means to recover the car so best stay in the warm and went back to sleep.

(I have a garage - it just isn't big enough for even an MX-5 what is the point of these modern garages that don't fit even the smallest of cars?!?!?)
Reply With Quote
Reply


Currently Active Users Viewing This Thread: 16 (0 members and 16 guests)
 

Posting Rules
You may not post new threads
You may not post replies
You may not post attachments
You may not edit your posts

BB code is On
Smilies are On
[IMG] code is On
HTML code is Off

Forum Jump


All times are GMT +0. The time now is 05:02.

copyright © madabout-kitcars.com 2000-2024
terms and conditions | privacy policy