|
|
| Sammio Builds and discussions Sammio bodied car builds and specials |

20th April 2013, 22:47
|
 |
Senior Member
|
|
Join Date: Feb 2012
Location: Wembley, London
Posts: 5,058
|
|

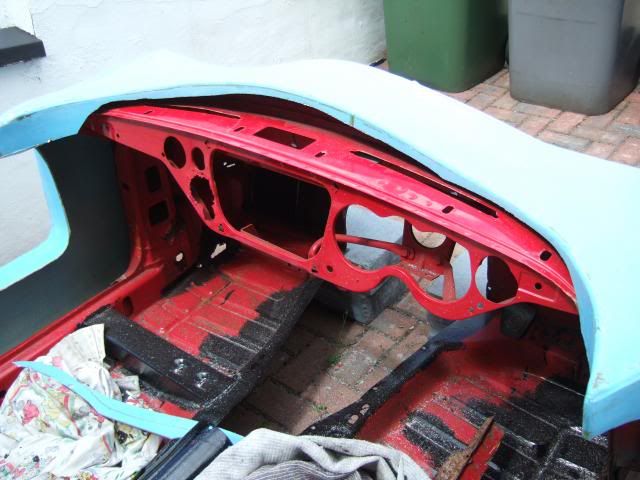
Saturday - Part 2:
As the fit at the front got better, I needed to keep working away at the back end to match.
It quickly became clear that the panel with the petrol tank filler hole was fouling...

So the middle section had to go.
Before:

After:

Further trimming lead to the point where the boot floor started to get it the way...

By the end of the day this petrol tank mounting area was still causing me a fouling problem...
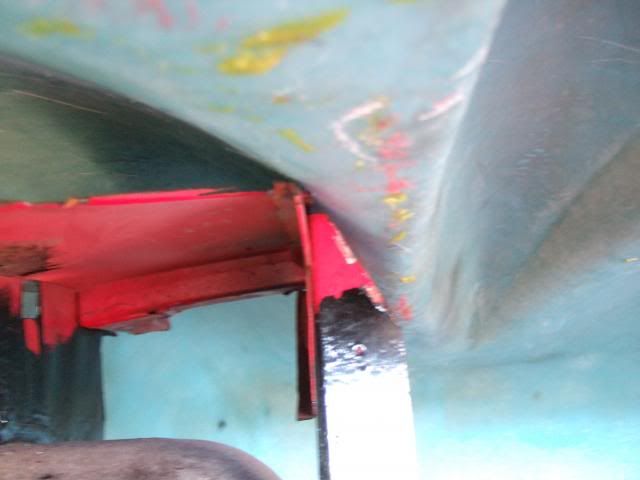
But it was too late to do anything about it as I had to call it a night.
After a long day on the car I had a few things to show for it.
The first was the piles of metal & fibre glass I had cut away...

And this is where I have got to in terms of Cordite body on top of Spitfire shell.
Bulk Head:
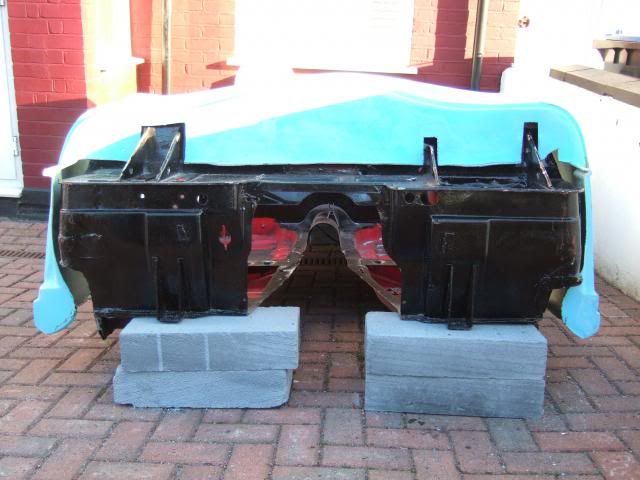
Note the use of breeze blocks to replace the axle stands that kept collapsing.
( There are lots of slopes on my drive which didn't help with my use of force.  )
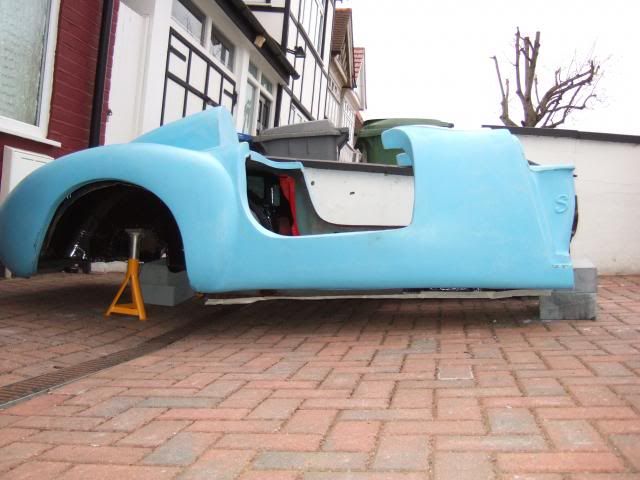
The dash could still go lower with further fibre glass trimming:

The good news is on the passenger side, where Spitfire & Cordite wheel arches line up:

The bad news is on the driver's side where the wheel arches don't line up:

The Cordite body currently doesn't come close to covering the lower sills.
But this will get lower when I sort out the remaining "fouling" issues.
I am not sure how the petrol tank could be fitted if I need to remove more of the mounting brackets?
( DonnySoutherner used the Spitfire rear wheel arches with the Cordite internal frame. )
But all that beard scratching can wait as I need to be in bed.
Lots of family stuff to do tomorrow & I need to do some gardening too!
So until next time, take care, Paul. 

|
21st April 2013, 07:46
|
 |
Senior Member
|
|
Join Date: Jul 2011
Posts: 5,328
|
|
Gardening schmardening, get on with the cordite Paul
You can always tell your family that you're turning the garden into a safe haven for endangered species, like bees, so you can offset the carbon emissions from driving the Cordite and save the planet.
Just say you heard about it on gardeners question time, no woman ever listens to that so you'll be on safe ground (pun intended).
Interesting developments with the Spitfire shell, it's likely that neither the Cordite body nor the Spitfire shell are symetrical, so I hope it all comes together for you.
I take it you're keeping the bits of fibreglass bulkhead handy in case you need a backup plan...
Best of luck and I look forward to seeing it develop. |
22nd April 2013, 17:07
|
|
Senior Member
|
|
Join Date: Feb 2012
Location: Wembley, London
Posts: 5,058
|
|
Well Sunday didn't quite go as planned as my wife was ill in the morning.
So it was just me & my girls who went to the West End to see a show called "Potted Potter".
( Just two men with silly hats & props covering all 7 Harry Potter books in 70 mins - Very funny. )
But then it was my turn to get ill & spend the rest of the day lying down.
Mister Towed - Unfortunately, I still have to catch up on the gardening this week.
But it is only fair I do my "chores" if I am getting a chance to spend a bit longer on the car.
As for the issues with fitting the Cordite body to the Spitfire shell, it was always a long shot.
Ribble are still experimenting with this, whereas Tribute build the A352 around this approach.
As for symmetry, I knew the Cordite doors are not the same size and don't line up.
But it hadn't occurred to be to check the rear wheel arches are in the same place on each size.
As I would really hope that my Spitfire donor's rear axle isn't asymmetrical!
However, it is still worth me spending a bit longer assessing what the issues & my options are.
A quick summary of my current choices are:
- "Traditional Build" - Cordite Body + Cordite Frame Work + Spitfire shell's rear wheel arches.
- "Fast Build" - Cordite Body + Cut down Spitfire shell
- "Frankenstein build" - Cordite Body + Spitfire bulk head + Rear Cordite Frame + Spitfire rear arches.
I have resigned myself to the fact that which ever option I choose there is a lot of extra work to do.
I've also had another look at DonnySoutherner's use of the Spitfire's rear arches.
He has effectively removed the whole of the petrol filler hole panel & most of its support.
The reason this works is that the Cordite framework holds the petrol tank in a different position.
AndyP57 has promised to take some more photos of their Green "fast build" Navigator.
If they need to relocate the petrol tank, then it is clear what needs to be removed & why.
So it looks like further trimming will allow the rear to sit a lot lower than it is doing at the moment.
But with the back end nice & low, I think the bulk head will then be too high by comparison. 
The reason I want to use the Spitfire bulkhead is for better mounting of both the pedals & steering column.
So the key will be finding out what part of the Cordite bodywork fouls which part of the Spitfire bulk head.
In fact, it might be worth removing the Cordite frame work to test fit the Spitfire shell over the chassis.
Only then will I be able to clearly see what I am up against in terms of fitting the Cordite body on top.
I know the above is a lot of words, but I do find writing things down helps me think.
But I'll end with a few more photos from Saturday.
This highlight's Mr T's earlier comment about things not being symmetrical.
The "lip" on the bulk head for the bonnet to rest on becomes very thin on the driver's side:

These are not great photos to see the impact on the underside of this lip area.
But the edge of the fibre glass at the back becomes the point of contact with the Spitfire bulk head.
This is the driver's side:

And this is equivalent area on the passenger side:

Finally a few more photos from the trimming of the rear boot section...
The first bits to go were what was left of the edge of the boot lid opening:

Then the sides of the boot / rear wing area needed to go:

Finally the corners of the boot floor were the last things getting in the way:

The rear edge of the boot floor may need a further trim when the body goes lower.
Until next time, take care, Paul.
PS
Quote:
Originally Posted by Mister Towed

... I take it you're keeping the bits of fibreglass bulkhead handy in case you need a backup plan...
|
[Churchill Dog] Oh yes. [/Churchill Dog]
|
23rd April 2013, 18:40
|
|
Senior Member
|
|
Join Date: Feb 2012
Location: Wembley, London
Posts: 5,058
|
|
Just put the first coat of oil on the garden furniture this evening, so I've got time for a very quick update…
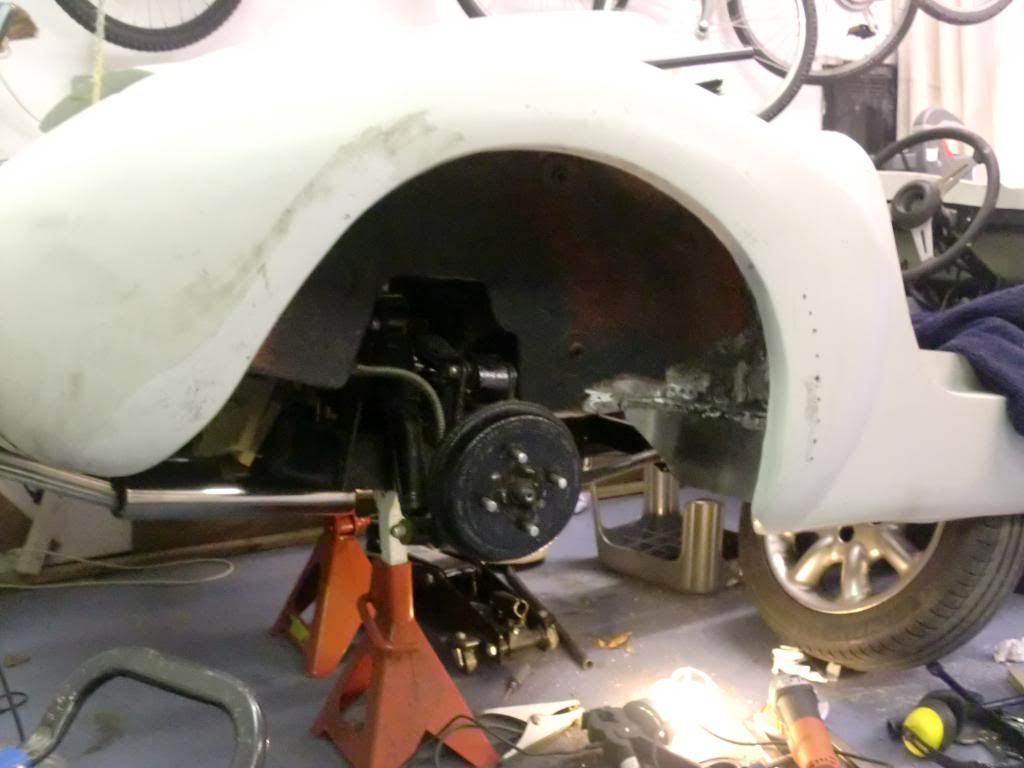
Steering Column Support:
This is the view of the steering column support brackets on my Spitfire shell:

This is one of the reasons I started looking at the use of the Spitfire bulkhead / complete shell. *
As my Cordite frame needs to be modified to allow the steering column to fit & it has no support brackets.
This was the type of "box" I had plannned to insert into a frame rail when I was practising my welding...


As the Cordite body needs to sit lower on the Spitfire bulk head I checked how the support brackets worked.
In the photo below, my fingers mark the spot when the brackets are welded to the top of the dash.
Also, if you look closely, you can just see the width of the support bracket below the Spitfire dash vent.

So I think it will be possible to lower the body work over the bulk head a bit more with fouling this. 
Obviously I would still need to extend the fibre glass to cover the last bits of Spitfire dash.
But I don't need to worry about that until I have a better idea of what I am doing.
* Note:
Although the steering column was an issue, mounting the pedals was my biggest problem with the Cordite.
To resolve this, mods were needed to both the metal frame work for the floor & the fibre glass bulk head.
( As always, these issues be will not be present in the internal frame work for the new Ribble Navigator. )
Ribble Navigator - "Fast Build":
AndyP57 has confirmed that the petrol tank would need to be relocated on their "Green" demonstrator.
So the next time I have my angle grinder out, I will remove what remains of the original petrol tank mounts.
Then I can see how everything sits/looks and find out what it the next point of contact "in the way".
Until then, take care, Paul.
|
24th April 2013, 19:57
|
|
Senior Member
|
|
Join Date: Feb 2012
Location: Wembley, London
Posts: 5,058
|
|
Gardening Update - After getting home from work I put the second coat of oil on the garden furniture.
Cordite Update - So with that chore out of the way, I had just enough time to get my angle grinder out.
In order to lower the back of the Cordite body shell still further the petrol tank mounting brackets have to go.
I now know this is required for the "Fast Build" option as well as if I just use the rear arches & floor section.
This is where the Spitfire brackets are currently fouling against the insides of the Cordite wheel arches…

Ideally, at this point, I'd like to keep as much metalwork over the top of the Spitfire arches as possible.
But without these supporting brackets in place, more of the petrol filler panel would have to go too.
Before:

After:

And after repeating the cuts on the other side:

I put the body shell back on, but was still having problems with the driver's side wheel arch alignment:

However, when I tried to push the shell forward a bit, the rear boot/valance "lip" was in the way:

Nothing a quick whirl of the angle grinder couldn't sort out.
Not easy to see in the photo, but now the rear edge of the Cordite body is lower than the Spitfire boot floor:

This allowed me to get both the driver & passenger arches to align at the same time:

 Note:
Note:
I didn't get a chance to check which direction the rest of the body was pointing when this happened.
I then put some masking tape along the bottom edge of the Spitfire shell to make it easier to see in the photos.
And this is where I got to when I had to call it a day (it started raining a few minutes later! ):
Removing the petrol tank mounting brackets has given lots of clearance:

But it does look like the metal panel above the wheel arch is the next fouling point.

Well, that and the wheel arches themselves which I have kept as wide as possible up until now.
They will be the next area to cut away when I get the chance (probably at the weekend).
I'm also grateful to AndyP85 for sending me a photo of the "Fast Build" Green Navigator:

So as always, lots to think about, cheers, Paul.
|
24th April 2013, 20:08
|
 |
Senior Member
|
|
Join Date: May 2012
Location: Preston
Posts: 139
|
|
Quote:
Originally Posted by Paul L
Gardening Update - After getting home from work I put the second coat of oil on the garden furniture.
Cordite Update - So with that chore out of the way, I had just enough time to get my angle grinder out.
In order to lower the back of the Cordite body shell still further the petrol tank mounting brackets have to go.
I now know this is required for the "Fast Build" option as well as if I just use the rear arches & floor section.
This is where the Spitfire brackets are currently fouling against the insides of the Cordite wheel arches…
Ideally, at this point, I'd like to keep as much metalwork over the top of the Spitfire arches as possible.
But without these supporting brackets in place, more of the petrol filler panel would have to go too.
Before:
After:
And after repeating the cuts on the other side:
I put the body shell back on, but was still having problems with the driver's side wheel arch alignment:
However, when I tried to push the shell forward a bit, the rear boot/valance "lip" was in the way:
Nothing a quick whirl of the angle grinder couldn't sort out.
Not easy to see in the photo, but now the rear edge of the Cordite body is lower than the Spitfire boot floor:
This allowed me to get both the driver & passenger arches to align at the same time:
Note:
I didn't get a chance to check which direction the rest of the body was pointing when this happened.
I then put some masking tape along the bottom edge of the Spitfire shell to make it easier to see in the photos.
And this is where I got to when I had to call it a day (it started raining a few minutes later! ):
Removing the petrol tank mounting brackets has given lots of clearance:
But it does look like the metal panel above the wheel arch is the next fouling point.
Well, that and the wheel arches themselves which I have kept as wide as possible up until now.
They will be the next area to cut away when I get the chance (probably at the weekend).
I'm also grateful to AndyP85 for sending me a photo of the "Fast Build" Green Navigator:
So as always, lots to think about, cheers, Paul.
|
No worries mate,
anymore let me know
|
25th April 2013, 07:49
|
|
Senior Member
|
|
Join Date: Jul 2011
Posts: 5,328
|
|
Looking like it's slowly but surely coming together Paul. Keep up the good work.  |
25th April 2013, 21:02
|
|
Senior Member
|
|
Join Date: Feb 2012
Location: Wembley, London
Posts: 5,058
|
|
Gardening Update - I managed to get another big chunk of my "To Do" list ticked off this evening.
So with a bit of luck I will get the chance to do a bit more on the car at the weekend (weather permitting).
Rear Wheel Arches - More Thoughts
I've decided not to trim the Spitfire wheel arches until I have temporarily put the whole shell onto the chassis.
As it occurred to me that lining up the arches independantly of the wheels was bound to end in tears.
Clearly the Cordite body work is slightly narrower than the Spitfire original (otherwise it wouldn't foul at all).
But if I allow the Cordite body to drop too far, then the tyres will foul the body work & that wouldn't be good.
So I will leave this work until after I have been to Stoneleigh & had a good look at the Silver Navigator.
Which leads me nicely into the next round of jobs I need to tackle…
Planned Engine Re-Start:
I want to re-start the engine before I remove the Cordite framework, as the petrol tank is currently bolted to it.
There are also a number of smaller jobs that I really should sort out while the body shell is out of the way.
These include tightening all the engine & gearbox nuts/bolts, as oil has slowly weeped on to my drive. 
Now would also be a good time to put the heat wrap bandage around the main sections of the exhaust pipes.
That way, when I do finally work out what build route I will be taking, I can actually start doing it for real.
Until next time, take care, Paul.
Replies:
AndyP85 - Thanks for the photos of the Green Navigator demonstrator, they were a big help.
It looks like you have taken another chunk off the wheel arches since the initial photos were posted.
So it would be great to see where the Navigator body lines up now & how much clearance to the tyres you have.
Which reminds me to ask what size wheels and tyres are fitted so I can compare to my own?
Misted Towed - Cheers, I'll be much happier when I know what way this build is heading.
There are pros & cons with all my options, but I just want to choose the best path and get on with it now.
If I can make use of the brighter evenings to keep chipping away at it, that will be a big help too.
|
29th April 2013, 16:52
|
|
Senior Member
|
|
Join Date: Feb 2012
Location: Wembley, London
Posts: 5,058
|
|
Didn't get a chance to do anything at the weekend, but knew I was at home today so I had high hopes.
I had to wait for our new washing machine to be delivered, but once I'd plumbed that in, I could play outside.
First job was to try and re-start the engine, so I dug out the wiring loom & all the other bits I needed.
Without the Cordite body in place, it looks like I've made no real progress at all...
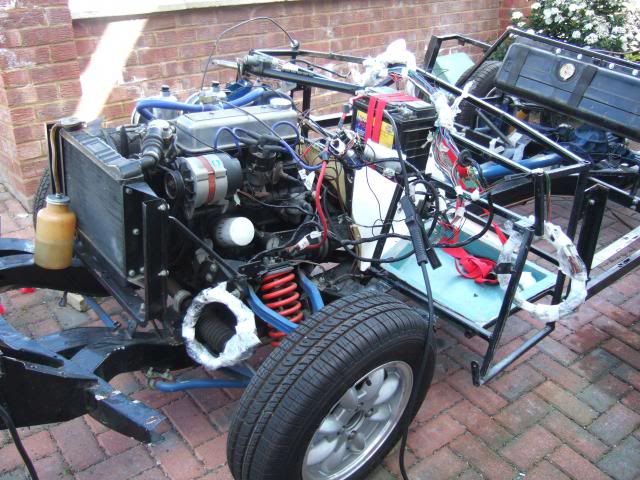
Normally the engine has always burst into fire once I've connected everything up, but not today.
Eventually the battery went flat as I continued to check all the wires had been connected properly.
So I stuck the battery on charge and turned my attention to the Cordite dash area.
The front of the Cordite body should be able to get a bit lower over the bulk head so I trimmed a bit off.
Before:

After:
In order for the Cordite body to drop any further I might need to "reshape" the top of the Spitfire bulkhead.
This may involve the use of a big hammer to add some dents to accommodate the Cordite's curves.
I then had another quick look at the rear wheel arches & this confirmed that I need the wheels in place.
The good news is that if the Cordite body is "centred" on the Spitfire arches it doesn't foul the shell below.
( Clearly the body had shifted a bit when I took the "fouling" photo in an earlier post. )
The bad news is that if I trim the Spitfire wheel arches, the body shell will be lower than the existing "clearance".
Which is why I will be bringing a tape measure to Stoneleigh to check the the arc of the tyre movement.
I also found this photo of DonnySoutherner's set up which was a big help.
( He just using the rear section of Spitfire body work & I might end up doing the same. )
Then I went back to trying to start the engine and still no joy so I started checking the fuel line.
The good news is I think I found the problem...
The grommet holding this section of fuel pipe had split...

So instead of a nice rubber hose connection from the fuel pump...

I found this...

I can only guess that the damage was done when I removed the body shell the other day.
But no sooner had I straightened the kink out when the battery went flat again.
At which point, I must confess, I had a major sense of humour failure & lost all motivation.
I know the only way to complete this build is one step at a time.
But this relatively small set back seemed to knock me for six for some reason.
So I decided to down tools & catch up on some of my domestic chores instead.
Hopefully my visit to Stoneleigh on Sunday will re-motivate me a bit.
Cheers, Paul.
|
29th April 2013, 20:04
|
|
Senior Member
|
|
Join Date: Jul 2011
Posts: 490
|
|
Stoneleigh will help motivate a few others out there too (inc. me!)
I'm sure everyone who had a go at building their own car had (or thought they had) insurmountable problems and false starts...
There are so many different problems with a build and many ways of tackling them... as evidenced on this site.
|
30th April 2013, 06:26
|
|
Senior Member
|
|
Join Date: Feb 2012
Location: Wembley, London
Posts: 5,058
|
|
Thanks Nigel.
I think yesterday was just one of those days where the "drip, drip, drip" of issues finally caught up with me.
As long as I don't think about the all the jobs ahead and stick to the ones at hand I should be able to keep going.
I feel more positive this morning and you are a great example of someone taking on bigger challenges than you expected.
Cheers, Paul. |
30th April 2013, 07:46
|
 |
Senior Member
|
|
Join Date: Jan 2012
Location: Poole, Dorset
Posts: 615
|
|
Don't lose heart Paul, there is always light at the end of the tunnel.
Best to find out these little issues now, rather than when the body is bonded on and you are trying to scrabble around underneath and inside to find the faults! So well done, and keep at it!
With the lighter evenings and sunny May predicted, we should all feel a little more motivated this month!
|
1st May 2013, 19:03
|
|
Senior Member
|
|
Join Date: Feb 2012
Location: Wembley, London
Posts: 5,058
|
|
Engine Re-Start - Take 2:
Before I ordered some replacement parts, I realised I had a possible temporary fix sitting in a box somewhere.
( As I had already bought a length of braided rubber fuel line for the petrol tank end of the fuel system. )
The only problem is that my stash of car parts & tools has become a "hoarder next door" type pile.

Jokes aside, my lack of storage has become more of a problem than working outside (which is still a pain).
Thankfully I managed to find the box with the fuel line in it so I removed all the existing hard & soft lines…

Then I just attached the new line which is clearly too long, but I hoped it would still work…

Then it was back to the old routine of reconnecting the wiring loom to the (hopefully) fully charged battery.
Finally, it was time to turn the key & see if the kink in the old fuel line was preventing the engine from starting.
Despite giving it a bit of time to get petrol back through the pipe, it still wouldn't burst back into life.
I put a spare spark plug in each of the HT leads in turn to test for a spark which I had.
At some point in the attempts at starting, a wire had worked loose from the coil.
So I tightened that up and re-fitted it, just in time for the battery to give up the ghost again.
Oh well, I'll have another go, another day.
On the plus side, it is great to be able to work outside in the sunshine after work.
Until next time, take care, Paul.
Replies:
TlrTone - Cheers, I plan to make sure the car drives at the "moon rover" stage before bonding the body.
The engine was working fine a few months ago, so I really hope it will be something simple. 
|
1st May 2013, 19:09
|
|
Senior Member
|
|
Join Date: Apr 2012
Posts: 1,163
|
|
Im jealous, i have woken up every morning this week dreaming of mechanical work and not bodywork, i have white dust exiting every orrifice in my body :-(
|
1st May 2013, 19:17
|
|
Senior Member
|
|
Join Date: Sep 2012
Posts: 424
|
|
Paul , stop worrying mate, the car will burst into life. They are so basic it s fuel has probly drained back . But all of this can be done at the end of the build.
You will get there in the end mate, get stuck in and cut the old metal away and sit the new one on, whats the worst that could happen , you might need to weld in a little metal to make contact with the fibreglass.
Its not easy doing what your doing, as realy , the body wasnt ment to fit this way , but cut away , and sit the body on , and if it was me , make some nice templates , so you can get a close touching point ready to glass together.
By the way dont think i was telling you off  , i was realy kicking your butt
 , only jocking mate. It will be great when done , do a bit , and enjoy it. |
4th May 2013, 05:37
|
|
Senior Member
|
|
Join Date: Feb 2012
Location: Wembley, London
Posts: 5,058
|
|
Viatron - I assume the bodywork is for your other car project, or have you started on your Navigator?
It also sounds like you might become a bit more involved with the Ribble project, so good luck with that too Mac.
Mikmiglia - Don't worry Mike, a kick up the ar$e is probably needed to help me finalise my build plan.
I know the Cordite body work wasn't really designed to fit over the Spitfire shell in the way I am testing it.
So there would still be extra work required to reinforce it & get a good join between the fibreglass & metal.
But in my defence, parts of the framework don't appear to have been designed to fit anything at all!! 
I don't trust my own mechanical skills to leave the engine not running until the end of the build.
Plus it would be a great for me to hear it running again before I remove the frame & petrol tank.
- - - - - - - - - - - - - - - - - - - -
Gardening Update
We have a family Bar-B-Q planned for this afternoon & I managed to finish all my gardening chores last night.
What also occurred to me was my garden took a number of years of hard work to get into the shape it is now.
This was achieved by tackling one job at a time & accepting that lots of jobs take longer than you expect.


Similarly, the Summer House* took a lot of effort & pushed my building skills, but was worth it in the end.
( Although when I think back, rain was also a major pain when I was trying to sort out the concrete foundations.  )

* Originally promised to my daughters as a play area, but now a car parts & tool storage facility.
So ironically, spending time in the garden away from the car has encouraged me to continue chipping away at it.
But the main reason for covering my gardening chores is that it means I now have full permission to head off to...
Stoneleigh Kit Car Show:
I will travel up to the show on Sunday morning & am looking to forward to both the Ribble & Tribute stands.
I'll bring my camera, tape measure & note book to have a good look around the Navigator demonstrator.
I really hope this will fill in some of the gaps in my understanding of how everything goes together in the build.
It will also be good to finally meet AndyP57 in person & hopefully a few other forum members too.
Have a good Bank Holiday Weekend, Paul.
|
4th May 2013, 05:55
|
 |
Senior Member
|
|
Join Date: Dec 2011
Posts: 656
|
|
We're looking forward to meeting you at last too! Logistics have become a little more complex than originally planned (I've already been to Stoneleigh last night to drop off our accommodation and have Two more trips with cars to go today!) But both Andyp87 and I will be there at the stand, looking bright eyed and bushy tailed ready to enjoy the company.
|
6th May 2013, 08:18
|
|
Senior Member
|
|
Join Date: Feb 2012
Location: Wembley, London
Posts: 5,058
|
|
After a long day with our family Bar-B-Q on Saturday, it was hard getting up & out yesterday.
But by 9.10am I'd driven the 80+ miles & was waiting for the gates to open...
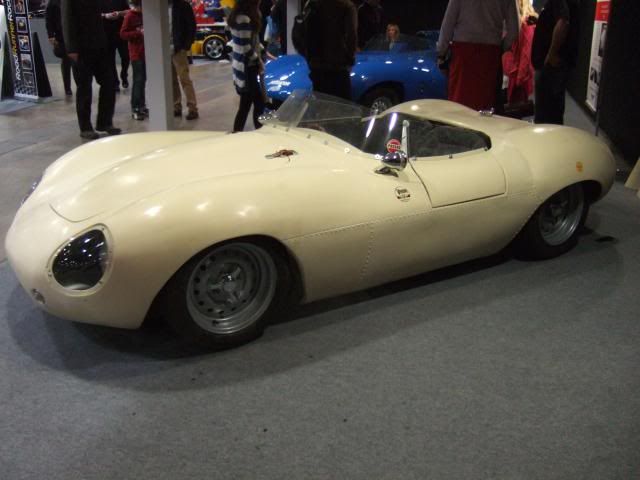
Stoneleigh Kit Car Show:
I knew I couldn't stay all day, so I stuck to my priorities of seeing a real Cordite/Navigator.
I'd forgotten to write down where the Ribble stand was, but that's when AndyP85 came in handy.
He is a "Big Lad" and I could spot him from a long way off & AndyP57 was there too.
It was great to finally meet in person after such a long time & we had a great chat.
I also crawled around the car with my camera, tape measure & note book & asked lots of questions.
It really was a big help and it was worth the trip for my time here alone.
Here are some of the areas I wanted to cover...
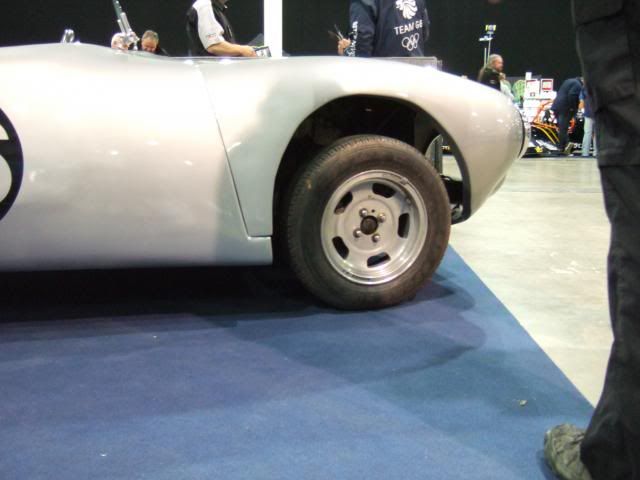
Stance:
The first thing I wasn't to check was the overall height of the car.
This demonstrator does not have a lowering block fitted at the rear & has standard springs at the front.
It also has 13" wheels, which are the same size as the ones on my donor.
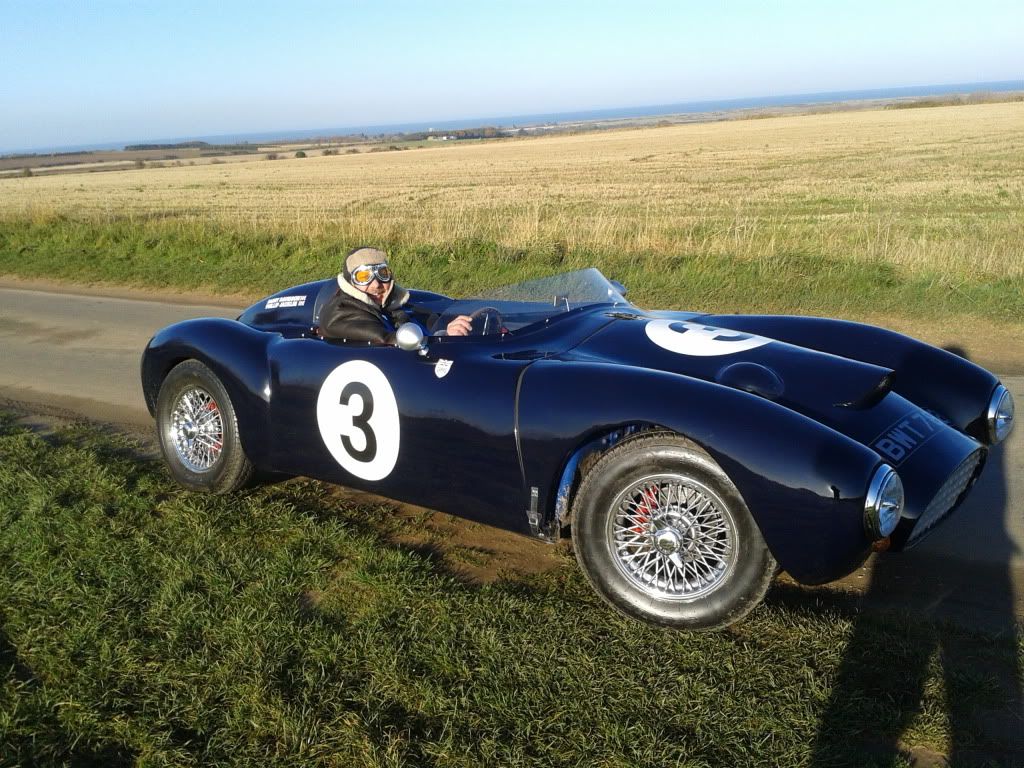
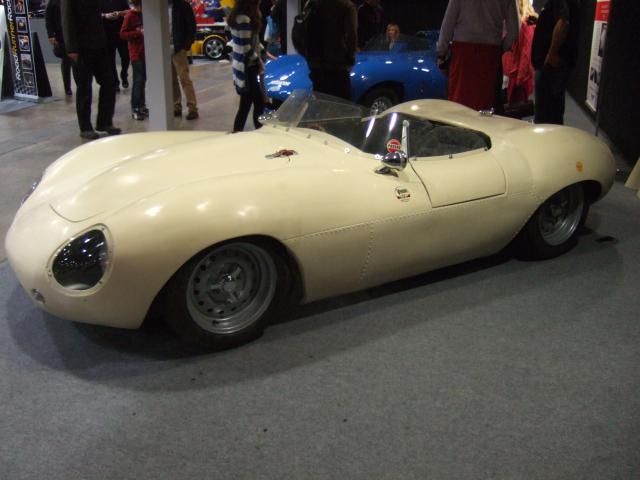
Clearly, this is not as near to the ground as lowered cars like Mister Towed's...
Or Barry's (which just happened to be on the same page of Mr T's build thread as the photo above)...
But in reality it is still low enough to get into without any problems despite the lack of doors.
( More on doors later on.)
[i]Rear Wheel Arches:[i]
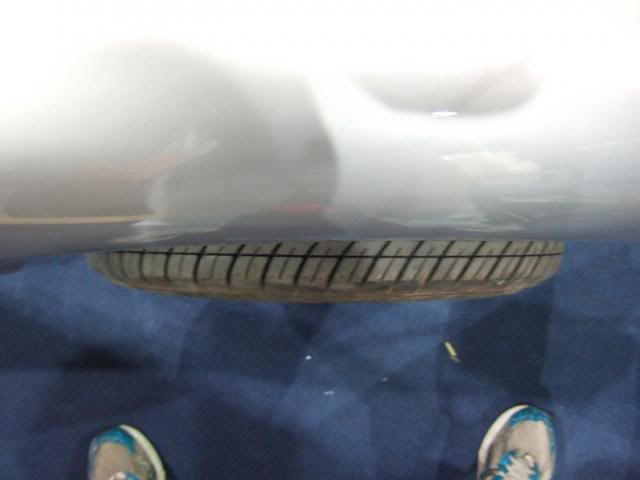
The Demonstrator has around 11cms of clearance from the top of the tyre to bottom of the wheel arch.
I will bear this in mind when I finally test my Spitfire shell & Cordite body combo over my chassis & wheels.
I was also able to confirm that the body shell does not cover the whole tyre.
 Dash Board to Steering Wheel Gap:
My plan to use the Spitfire bulkhead will leave metal "poking out" beyond the Cordite dash area...
However, a standard Spitfire column sits quite a way back from the body work anyway...
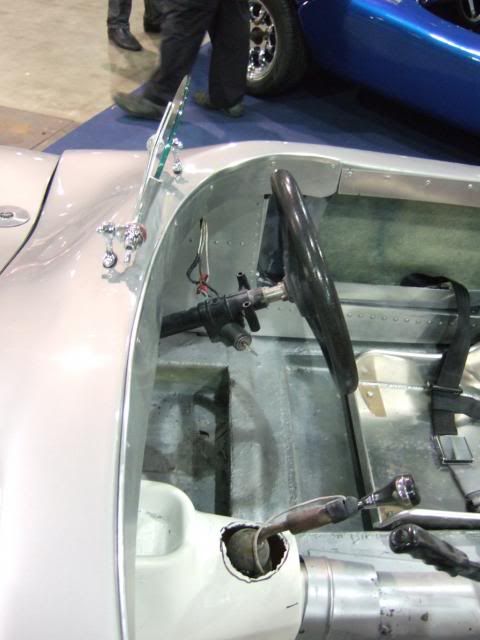
So extending the Cordite dash back over the Spitfire bulkhead should be OK.
Pedals:
I forgot to ask if the brakes were connected, but the brake pedal did hit the floor when pushed...

This was one of the main reasons for wanting to use the Spitfire bulkhead.
As there was significant re-working of the frame needed with lots of knock on impacts.
( More of the new Navigator developments later. )
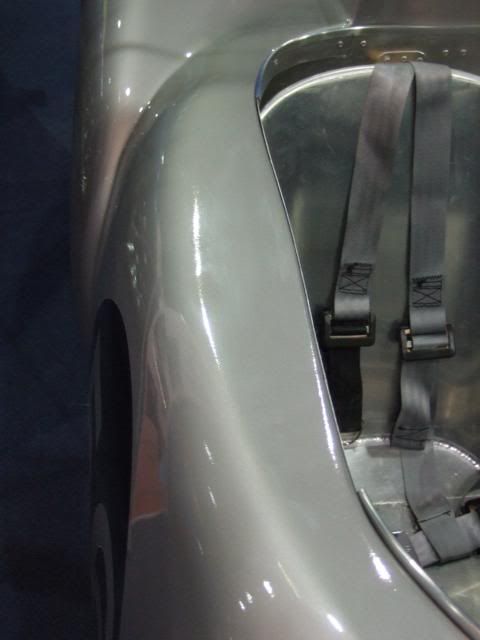
Seat Belts:
I have got a set of these belts myself after Viatron posted the link the other day...

It was also good to see where the mounting points were, this was behind the seat...
 Doors:
AndyP57
Doors:
AndyP57 simply sealed his doors closed which you can see from the inside.
( Although the plan is to extend the internal panelling to cover this. )

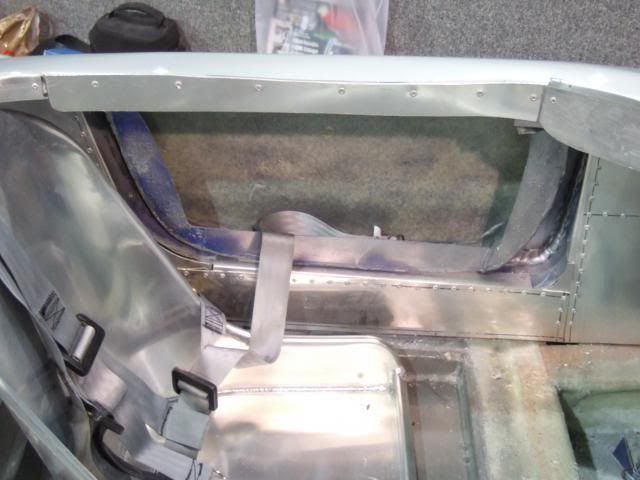
But the amazing thing for me is that if you were looking from the outside you'd never know...
Which is the comment I made on Mr T's build thread the other day.
Just a single coat of primer leaves no traces of how you achieved the final body shape.
Sealing the doors is still my last resort solution if working doors can't be made.
Front Wheel Arch & Bonnet:
There clearly plenty of clearance to play with in the front wheel arch...
Although the fact that the bonnet can not be fitted before the re-body inspection is a real pain.
( You need to remove part of the chassis in order for the bonnet & its hinges to fit. )
Also the Demonstrator has opted for a fixed bonnet (4 bolts) and an access panel instead.
So technically, I have still not seen even a photo of a working Cordite bonnet yet!
However, if you look closely at this previous photo you will see the front corner of the access panel isn't flush.
That is because the top of the radiator cap just fouls the bonnet & needs to be lowered a fraction.
So I'll worry about the bonnet another day & Mr T has shown it can always be adjusted to fit.
Rear Lighting:
Even simple things like seeing the rear lights I also have in place was a help.
The rubber edge seems to take up any slight curve in the body shell with no extra work...
 Navigator - MkII
AndyP57
Navigator - MkII
AndyP57 showed me some photos on his mobile of the work being done on the new mould.
These will be published on here shortly and it will be good to see what they are doing "full size".
By the looks of it, some of the Spyder's alignment issues have remained with the Cordite/Navigator.
The only good news is that I can take comfort from the fact it isn't just me who can't square things.
Tribute:
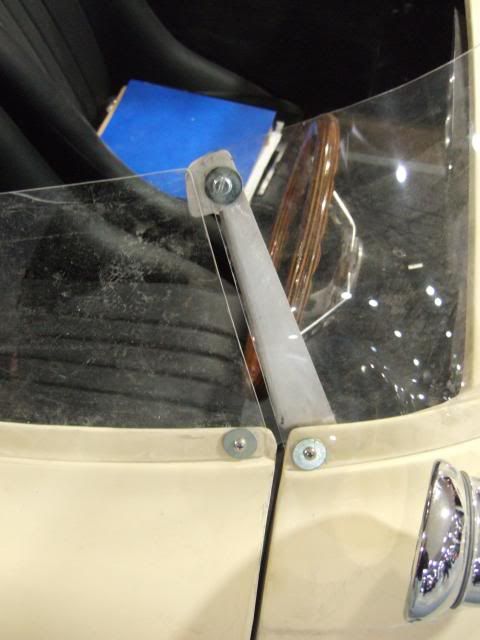
Finally I also wanted to say hello at the Tribute stand as I love the work Chris & Dan are doing.
I had a brief chat with Chris and had a look at the way the A352's boot lid worked.
I might also steal their idea for supporting the side screens...

Note:
There are some extra brackets & screws in the photo as this was "thrown together" for the show.
It took me a while to realise that the "slammed" low rider effect was due to the missing chassis!
 Shopping:
I did pick up a few things at the show, but I'll cover them another day.
With a bit of luck, I might even get a chance to work on the car later on.
I've just got to take my daughters on a quick shopping kit and then take it from there.
Cheers, Paul.
|
6th May 2013, 09:06
|
|
Senior Member
|
|
Join Date: Jul 2011
Posts: 5,328
|
|
Now that's what I call a stance! I 'king love it!
Now then Paul. Don't get yourself in too much of a tizzy wondering about how other people have done things. The first rule of Sammio building is 'do it your way'.
By all means borrow ideas from other builders but these aren't production cars or even production kits. Every chassis and body is different and what works for one might fail on another.
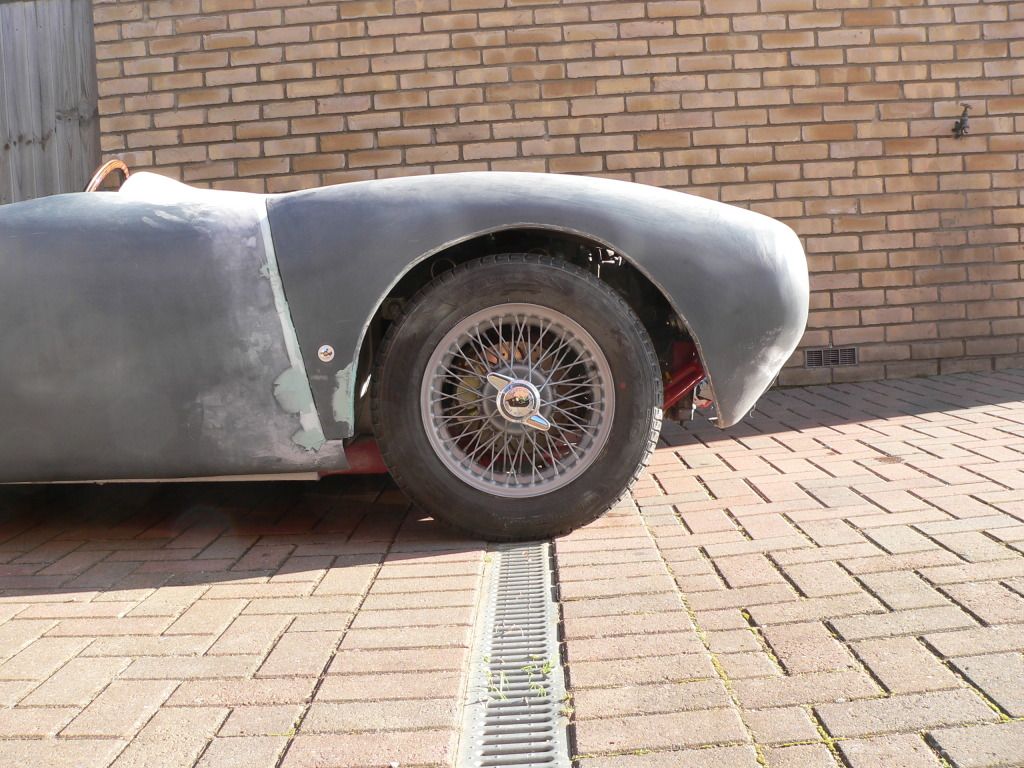
For example, the silver Cordite really needs lowering and some decent wheels fitting before you'll be able to see how the front arches are going to look. Those seventies slot mags are too small and too wide to give any clue and they need to go on ebay. I've gone with a 3" lowering block at the back, 95mm cut out of the front springs and standard MGB 14x4.5 wires with 175/70/14 tyres to get the stance I wanted.
I then found that there was an ugly, unequal gap between the arches and tyres with the bonnet resting on top of the engine. Even cutting clearance holes all over the place didn't eliminate the horribleness of the uneven wheelarch gap, which is why I had to add all my scoops and bulges, drop the radiator another inch and move the dynamo to get the front arches to look right over the tyres.
By contrast, Phil J has lowered the two cars he's built roughly the same amount as mine, but only needed a small bulge to clear the front carb, a modest scoop to clear the thermostat housing and a lowered alternator and radiator to get the bonnet low enough to look right. Both his engines were mounted lower than mine to start with (different mountings?) and he's been able to fit 175/80/14's which would foul on the front bulkhead of mine, even though I moved the bulkhead back 20mm and bashed in the front faces with a lump hammer. The result is that his cars look great without needing as much modification as mine did to acheive the same effect. 
So, abandon convention, go out there and, as a famous manufacturer of trendy trainers would say, just do it!
|
6th May 2013, 12:46
|
|
Senior Member
|
|
Join Date: Jul 2011
Posts: 5,328
|
|
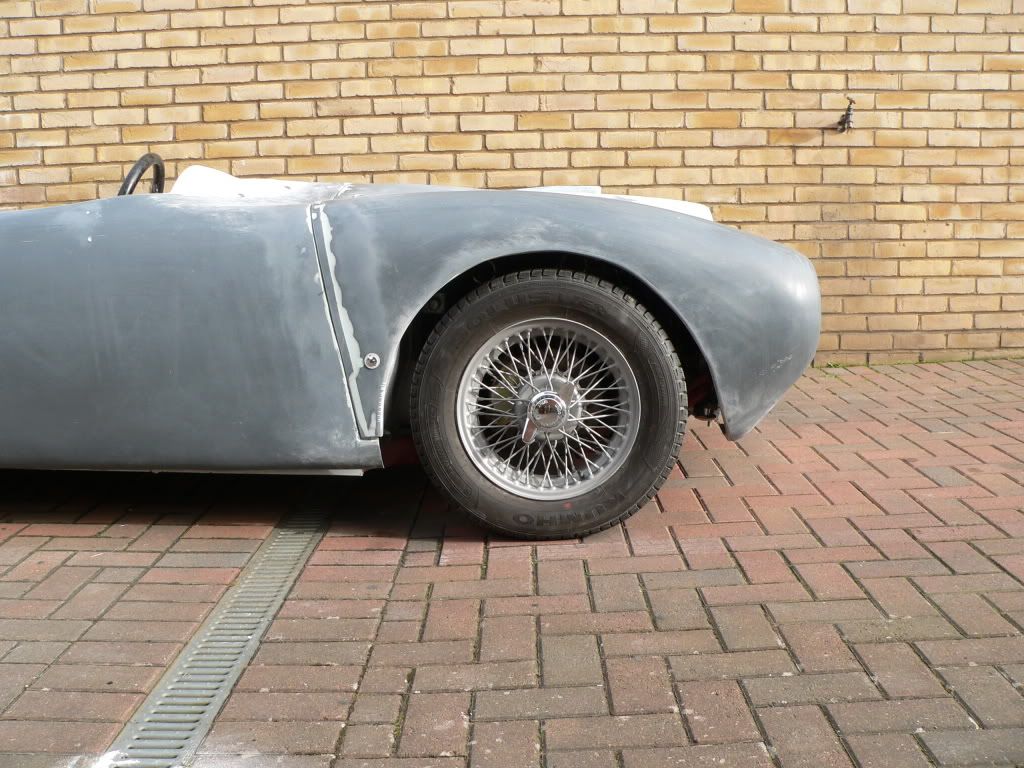
Here we go, this is what I mean about the front arches. First picture is after cutting a single scoop into the bonnet, second is after a lot more clearancing, including moving the dynamo and radiator again and adding both a second scoop and a bulge -
 |
|
Currently Active Users Viewing This Thread: 12 (0 members and 12 guests)
|
|
|
 Posting Rules
|
You may not post new threads
You may not post replies
You may not post attachments
You may not edit your posts
HTML code is Off
|
|
|
All times are GMT +0. The time now is 16:34.
|


 Linear Mode

