|
|
| Sammio Builds and discussions Sammio bodied car builds and specials |

13th September 2011, 20:09
|
 |
Senior Member
|
|
Join Date: May 2009
Location: POOLE , DORSET
Posts: 2,200
|
|
 Jennette's Sammio 550 Build
Not a lot to add at present .
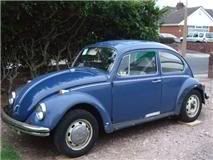
Basically Jennette has opted for a 550 to replace the old 66 car she recently sold.
I part exchanged a 67 Beetle against a Sammio Spyder kit from a chap in Blackpool...we allowed £400 for a running , driving but tired Beetle , £180 fo get her home and £230 recovered by selling off the parts we could offer out ...
SO THIS .....
 HAS BECOME THIS....
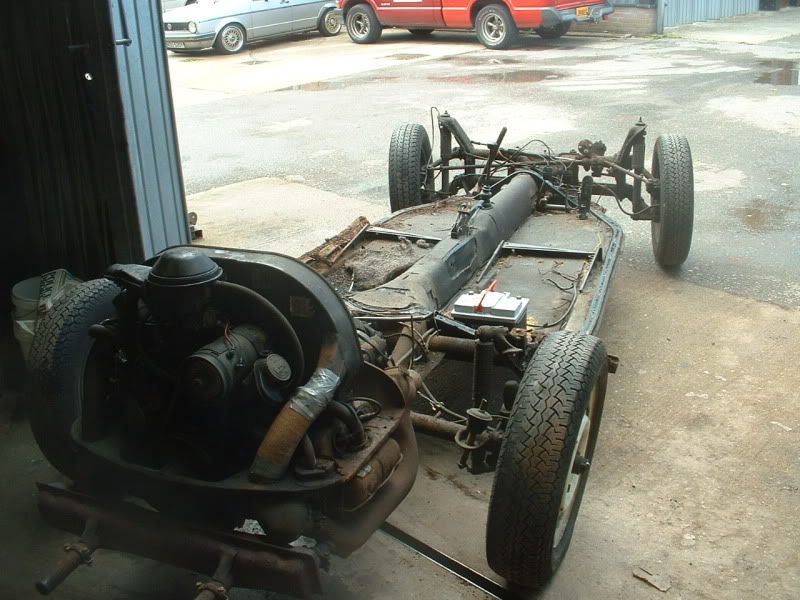
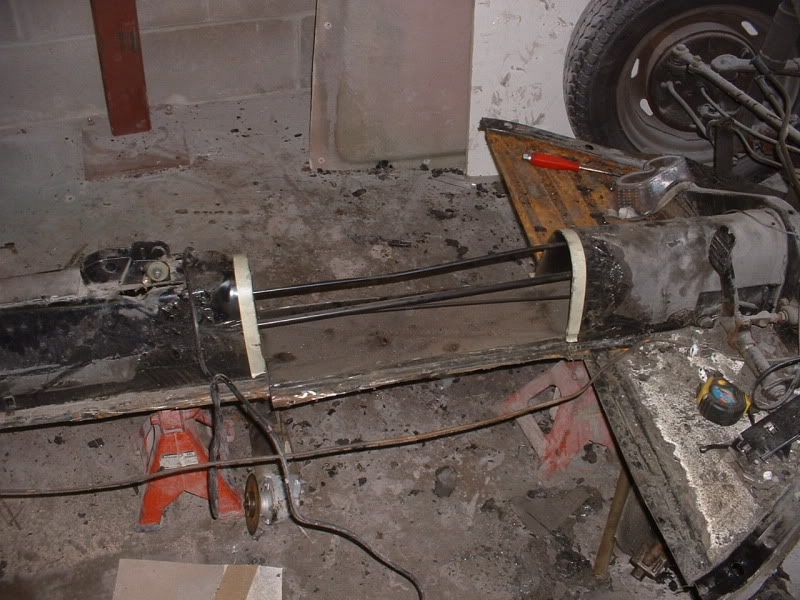
Front frame section is made , waiting for rear at present - hopefully in next few days get the chassis shortened .....Revival this weekend , so not going to have much time at weekend , so probably update next week... |
31st October 2011, 19:19
|
|
Senior Member
|
|
Join Date: May 2009
Location: POOLE , DORSET
Posts: 2,200
|
|
Well it took more than a week to update !!
Fitted in getting a bit done on this today ....
I have removed the engine / box , driveshafts etc as one unit ( will split them off the car to flip the diff/shafts )
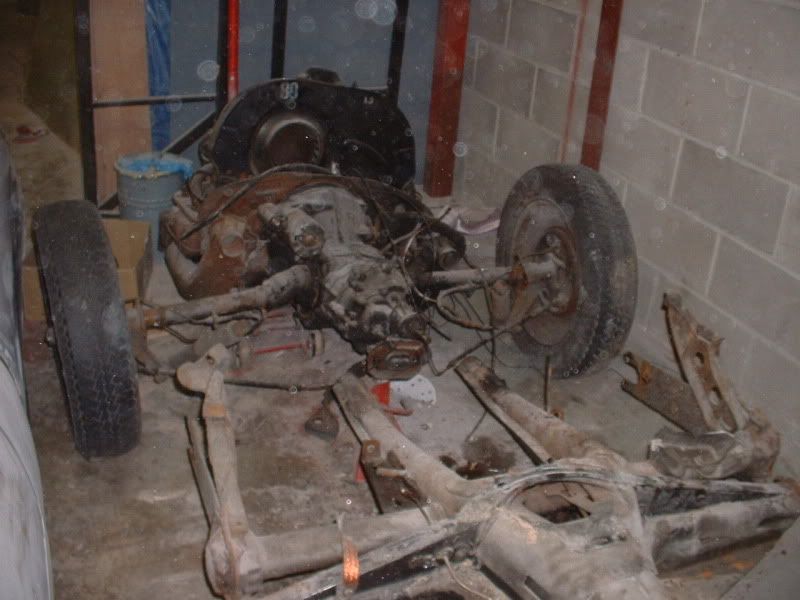
Those rear horns that normally support the gearbox will be coming off....
Now the floorpans , excess cables , gearshift etc are removed....I have cut out the gearstick hole to access the throttle cable tube...the gearshift will not be used and I am hoping to save the throttle tube when I shorten the car to re-use it. The first one I just hacked away and replaced with a camper cable and new tube - giving this one a bit more thought !!
tomorrow I shall remove the rear horns and trial fit the front frame section to help me get the shortening right - its 16.5'' from memory. If I get a chance the tunnel will get shortened as well.....
Last edited by lancelot link; 31st October 2011 at 19:23..
|
1st November 2011, 18:13
|
|
Senior Member
|
|
Join Date: May 2009
Location: POOLE , DORSET
Posts: 2,200
|
|
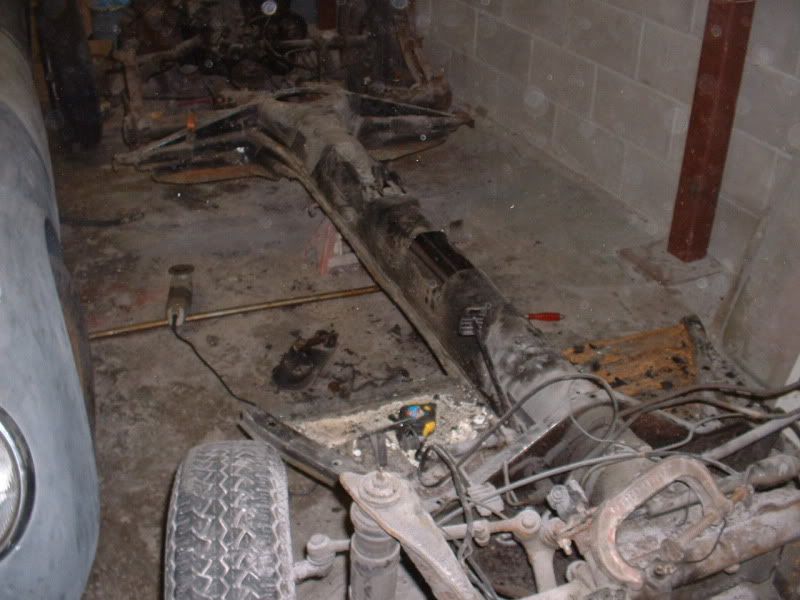
Didn't remove the horns but did get the tunnel shortened....
First I cut the top curved section off leaving the base for stability and to have a look...
Then the botom was removed as well as the two redundant tubes....one is fuel and I am re routing that and the other is clutch cable - we are going hydraulic due to the mid mount....The one tube left is the throttle cable....I cut around its spot weld on the tunnel allowing it to flop around...when the tunnel is shortened the throttle tube is free to poke out the hole I made an extra 16-17''
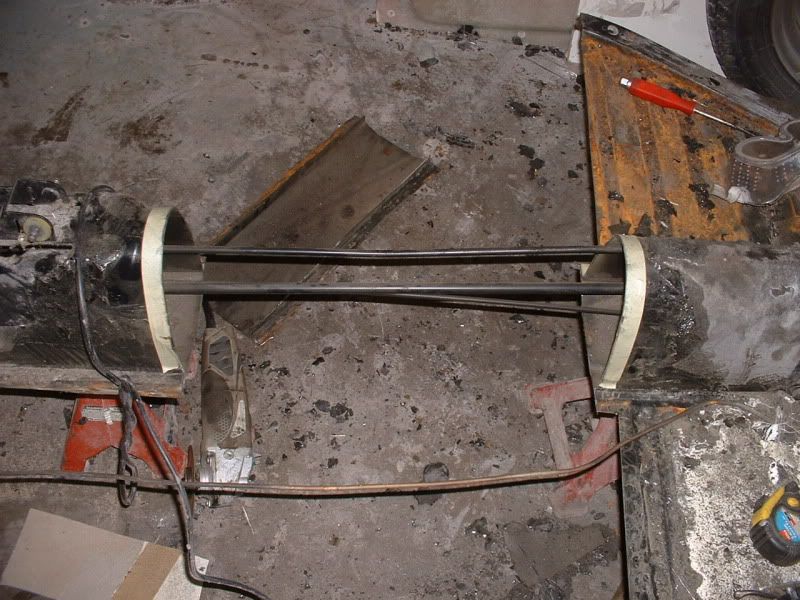
Using the frame as a jig , I pulled the tunnel back together , checked wheelbase twice ,it was spot on and then measured my diagonals...did this 3 times from 3 different points as even production cars have variables , we got down to a bit less than 2mm out on the diagonals - that is very acceptible...welded the tunnel back together , pushed the throttle tube back against the tunnel , chopped about 17'' off the end and tacked it in place with a little bit of extra steel to close the hole down I had cut....so now I can use the stock accelerator and cable - making things easier / cheaper...
Managed to seperate the engine and gearbox so my buddy can turn the diff and swap the shafts round for me ....I have a mate who works on Beetles all day , every day , so it would be rude not to use him !!
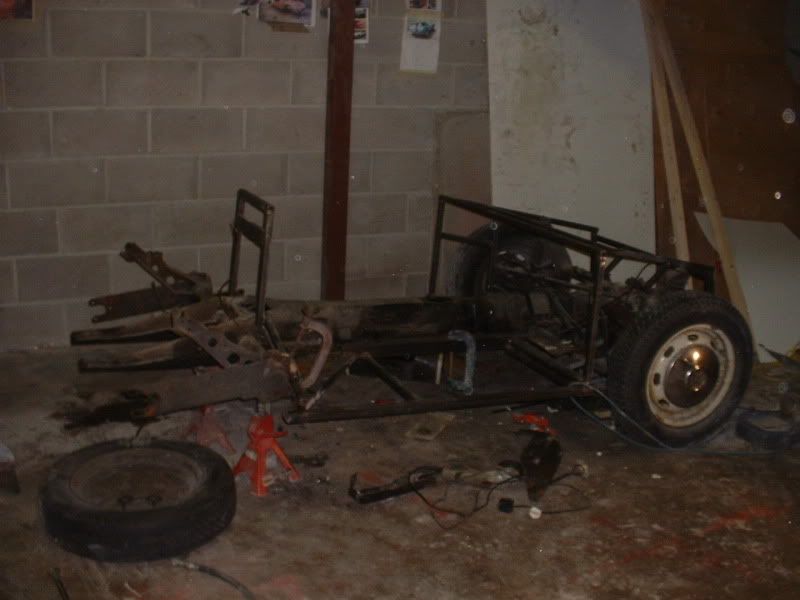
Tomorrow , inbetween G46-ing I will remove those rear horns and the rear shock mounts and get the adaptor plate for the rear subframe fitted....then its wait for the rear frame and gearbox to come back....
Last edited by lancelot link; 1st November 2011 at 18:16..
|
27th November 2011, 07:52
|
 |
Senior Member
|
|
Join Date: Jun 2011
Posts: 935
|
|
Any update on Jeanettes car Garry
|
27th November 2011, 13:32
|
|
Senior Member
|
|
Join Date: May 2009
Location: POOLE , DORSET
Posts: 2,200
|
|
not really , mate ....gearbox has gone over to my mates to have the gearing reversed and I have ordered a tube rear frame section for the rear....
probably get a bit done next week...
|
1st December 2011, 20:40
|
|
Senior Member
|
|
Join Date: May 2009
Location: POOLE , DORSET
Posts: 2,200
|
|
managed to get the pedals sorted ....did this a few weeks back but realised I hadn't mentioned it...
By welding part of the brake pedal to the clutch pedal and cutting through the pivot tubes , I have managed to create a clutch pedal that activates a master cylinder in the brake cylinders location. I have welded an extra plate to the Napoleons hat section to take another cylinder that will now operate as the brake master.
This gives me the oppurtunity to run dual brake cylinders , not all Beetles have them and a single cylinder to actuate a hydraulic clutch to replace the old cable one....routing a cable to the new position would have been a nightmare. A simple slave cylinder will now operate the clutch - simples !
Accelerator is unaffected as this car will remain RHD.
Handbrake will operate using the stock but shortened cables and a Morris Minor handbrake that I have also fitted since last time...
Oh....have created front floor sections and welded to the frame as well....
steering column and body fitting next....

|
1st December 2011, 20:50
|
 |
Senior Member
|
|
Join Date: Jan 2011
Location: Cullompton, Devon
Posts: 328
|
|
Gary sounds really good and interesting brain work to be done, have spoken to Lizzie will phone you tomorrow, regards J. Dean.
|
23rd February 2012, 21:34
|
|
Senior Member
|
|
Join Date: May 2009
Location: POOLE , DORSET
Posts: 2,200
|
|
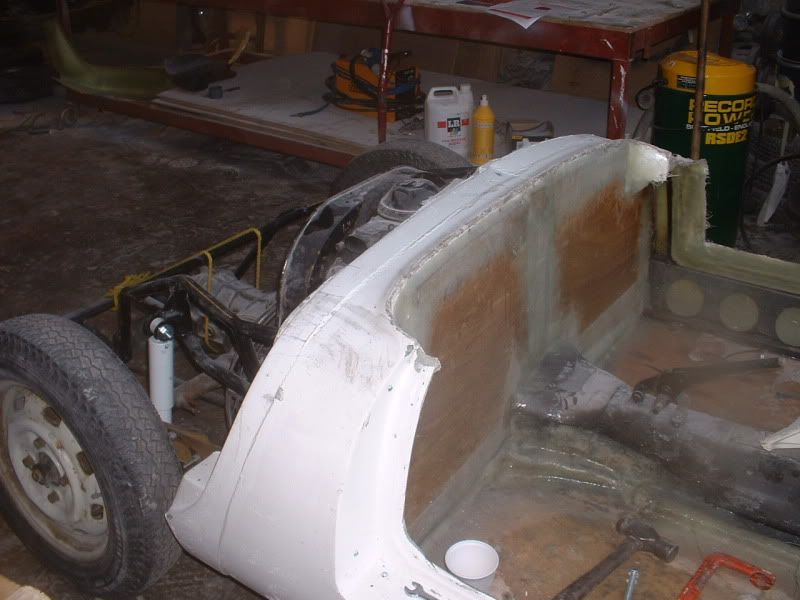
UPDATES....
Jennettes car is now back on its wheels , rear framework nearly finished - just gearbox mount to sort out.
New EMPI Gas shocks fitted and extended spring plates on.
The rear bulkhead is in and glassed , the floors are fully bonded in and the drilled cill sections are in the car. Door plates are fitted to the A and B pillars and welded to the cill sections.
Doors and steering column next.....
 |
25th February 2012, 04:39
|
|
Senior Member
|
|
Join Date: Jun 2011
Posts: 935
|
|
Looking good Garry, has Jennette chosen her cplor scheme for it yet. How about white with red interior.
|
25th February 2012, 14:48
|
|
Senior Member
|
|
Join Date: May 2009
Location: POOLE , DORSET
Posts: 2,200
|
|
white with red interior is a good combo....I have talked her out of silver as its the obvious choice - good sales colour but obvious none the less....
I quite like the pale/mid blue colours ....Jerry Seinfields example is a really good combo ...blue with tan interior.
http://www.youtube.com/watch?v=l_svWpTXXAo
I know Jennette likes red , but although it looks fantastic on the prettier Sammio's (  ) having seen a red 550 at the shows last year , it didn't work for me.......
Jennette is thinking maybe a slightly different colour interior with the pale blue - a shade of grey perhaps ? |
5th March 2012, 15:44
|
|
Senior Member
|
|
Join Date: May 2009
Location: POOLE , DORSET
Posts: 2,200
|
|
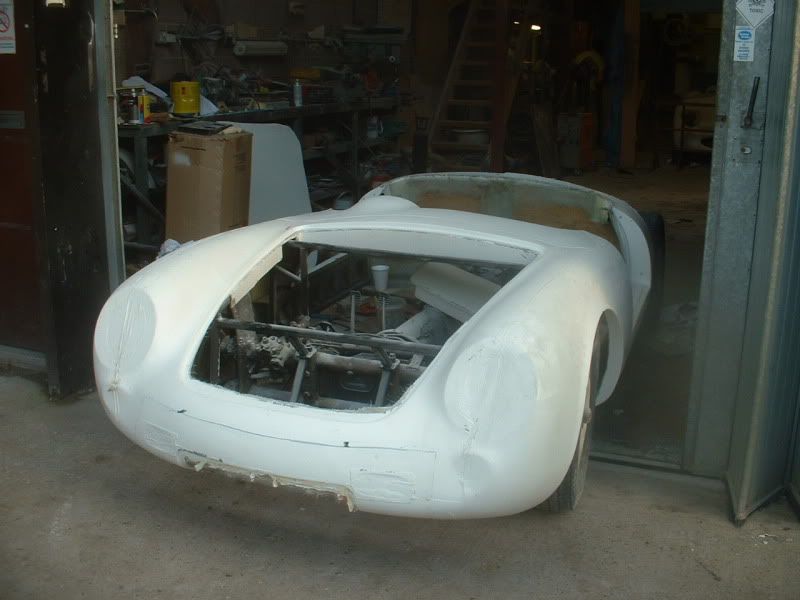
All inner arches and under bonnet glassed in place ....
steering column being collected tomorrow and hopefully fitted after work.
fuel tank space measured and the tank drawn.....6.58 gallon capacity , not massive but enough on a car thats going to do about 40 to the gallon.
bonnet trimmed and modified slightly .....my inner arch / fuel tank hole design fouled slightly !!
headlights fitted....
screen laid up but not fitted....
pics to follow later this week.....
|
5th March 2012, 17:47
|
 |
Senior Member
|
|
Join Date: Dec 2011
Location: Devon
Posts: 550
|
|
Looking good, certainly coming together now.
What thickness ply did you use for the bulkhead & floors?
The updates on this project are very interesting. Keep em coming.
|
27th July 2012, 20:02
|
|
Senior Member
|
|
Join Date: May 2009
Location: POOLE , DORSET
Posts: 2,200
|
|
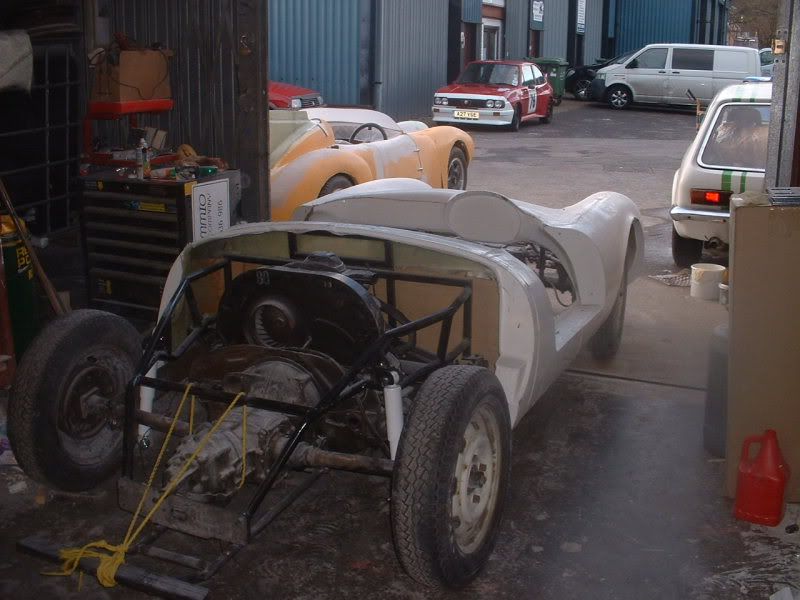
Time for an update.......
Jennettes 550 has been moved on ...someone expressed an interest in the car and Jennette decided to let it go......She wasn't keen initially but I offered to replace it with something more befitting the mum of the original Sammio.......
Heres a little teaser of what I am doing to replace it......13/60 based
 |
27th July 2012, 20:27
|
|
Senior Member
|
|
Join Date: Jan 2012
Location: Warrington
Posts: 383
|
|
That rivet detail looks great and the single screen should look fantastic also. I will look forward to seeing how this progresses!
|
27th July 2012, 20:40
|
|
Senior Member
|
|
Join Date: May 2009
Location: POOLE , DORSET
Posts: 2,200
|
|
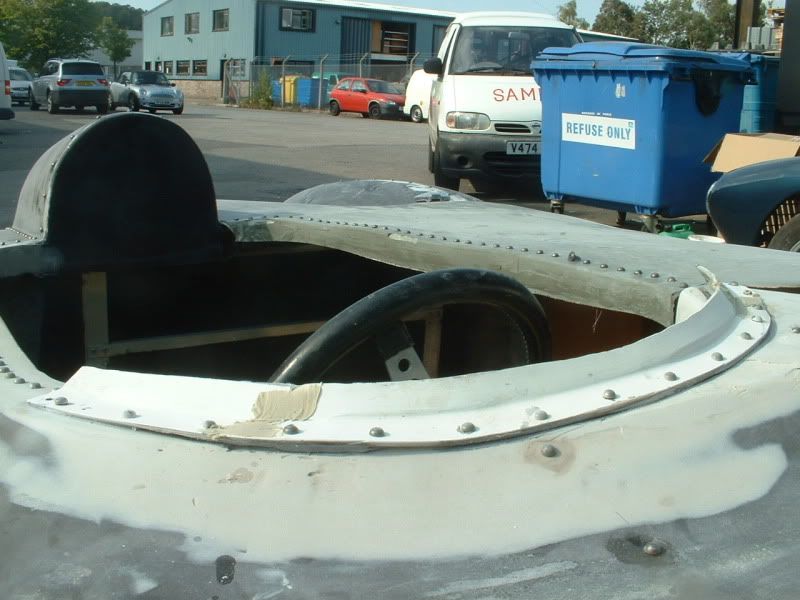
VERY MUCH A WORK IN PROGRESS.....Rivet detail needs a bit more work and will look more convincing when painted , but we are pleased so far.....
Theres about 500 rivets on the car !!
We have extended the dash back in the centre to give more of a double cockpit feel as well...I didn't want a split cockpit and its a handy perch for the mirror !
The car will have 2 seats and 2 sets of belts but has the option of 'going solo' as well....
Last edited by lancelot link; 27th July 2012 at 20:43..
|
27th July 2012, 21:33
|
|
Senior Member
|
|
Join Date: Nov 2011
Posts: 3,558
|
|
Too much time on your hands since the company changes??
:-)
|
27th July 2012, 21:47
|
 |
Senior Member
|
|
Join Date: Jul 2011
Posts: 5,328
|
|
That's looking great Gary. Are they metal rivets or the 'mastermind' plastic alternative?
|
28th July 2012, 01:54
|
|
Senior Member
|
|
Join Date: Jul 2011
Posts: 490
|
|
Quote:
Originally Posted by Mister Towed

That's looking great Gary. Are they metal rivets or the 'mastermind' plastic alternative?
|
..or split peas? (as per the High Speed Flight Research Dept of of Vickers Supermarine..?) |
28th July 2012, 05:31
|
|
Senior Member
|
|
Join Date: Jan 2011
Location: Cullompton, Devon
Posts: 328
|
|
Looking good Gary !
|
28th July 2012, 08:02
|
|
Senior Member
|
|
Join Date: Jun 2011
Location: birchington, kent
Posts: 1,769
|
|
How do you hold the rivets in?
|
|
Currently Active Users Viewing This Thread: 1 (0 members and 1 guests)
|
|
|
 Posting Rules
|
You may not post new threads
You may not post replies
You may not post attachments
You may not edit your posts
HTML code is Off
|
|
|
All times are GMT +0. The time now is 05:08.
|


 Linear Mode

