|
|
| Vintage and Classic Roadster Kit Car Builds For Vintage and Classic era kit cars. Post your build reports, problems and progress here |

9th October 2023, 21:42
|
|
Senior Member
|
|
Join Date: Apr 2011
Posts: 282
|
|
That is beautiful. I'm very envious that I am not young enough to do it and still be able to drive it. It feels very weird being the same age as old people!
|
10th October 2023, 11:04
|
 |
Senior Member
Enthusiast
|
|
Join Date: Sep 2004
Posts: 1,892
|
|
Quote:
Originally Posted by Dpaz

It feels very weird being the same age as old people!
|
I don't think any of us that visit here could be called young! I keep telling myself this will be my last build but you never know.... |
30th October 2023, 10:54
|
|
Senior Member
Enthusiast
|
|
Join Date: Sep 2004
Posts: 1,892
|
|

I have mocked up the dashboard. I am going for the minamilist look - large Jaguar rev-counter in the centre, standard Smiths fuel and combined oil pressure / temperature for the smaller gauges. Bicycle speedo and oddometer discreetly mounted. No glovebox as the suggested one is uselessly small.
 dash mockup dash mockup by Robin Martin, on Flickr
Lucas windcreen wiper motor and boxes trial fitted. These are a real b*gger to get right but essential to do so as they are fitted in the clamp which holds the screen in place. As this is sealed in with mastic once the screen is fitted so you don't want to be taking it out very often!
 wiper motor installed wiper motor installed by Robin Martin, on Flickr
Front brake pipes all run. I didn't follow the suggested route from the manual. I know that one of them bridges the point where the side mounted exhaust exits the bonnet side panel - but I am not going to be doing that with the exhaust anyway. I had to make the brackets for the front flexi pipes as my (very early) chassis was missing them. The flexis are a bit tight but I think they will be OK once the suspension is at its working height.
 front brake pipes front brake pipes by Robin Martin, on Flickr
 front brake pipe bracket front brake pipe bracket by Robin Martin, on Flickr

|
31st October 2023, 08:22
|
 |
Senior Member
Enthusiast
|
|
Join Date: Mar 2005
Posts: 3,077
|
|
Nice work Robin, looking really smart!  |
1st November 2023, 13:35
|
 |
Senior Member
Enthusiast
|
|
Join Date: Feb 2005
Location: Hampshire
Posts: 2,497
|
|
Looks great  |
19th November 2023, 10:11
|
|
Senior Member
Enthusiast
|
|
Join Date: Sep 2004
Posts: 1,892
|
|
A litle bit of progress, probably the last for a while as my wife has just this week had a hip replacement and apparently being nurse and chief cook and bottlewasher is now more important lol.
I made a backing plate for the dashboard to take the three instruments I am using. The centre place is a giant rev counter from a Jag. Left and right of it will be a fuel gauge and combined oil pressire / water temperature gauge. The plan is to make the actual dash from aluminium recycled from the old bonnet sides which I will be remaking.
 dashboard1 dashboard1 by Robin Martin, on Flickr
In the lower part of the picture you can see the start of my new gearbox support. Originally the gearbox was suspended from the transmission tunnel - an arrangement I didn't particulary like.
That's all for now... |
8th December 2023, 18:45
|
|
Senior Member
Enthusiast
|
|
Join Date: Sep 2004
Posts: 1,892
|
|
I managed to find a few odd half hours in between being Florence Nightingale and Jamie Oliver :-)
I have completed the new gearbox mount which will also support the transmission tunnel and hence floor. It also means I can make the transmission tunnel sides in two parts that will fit in my bender.
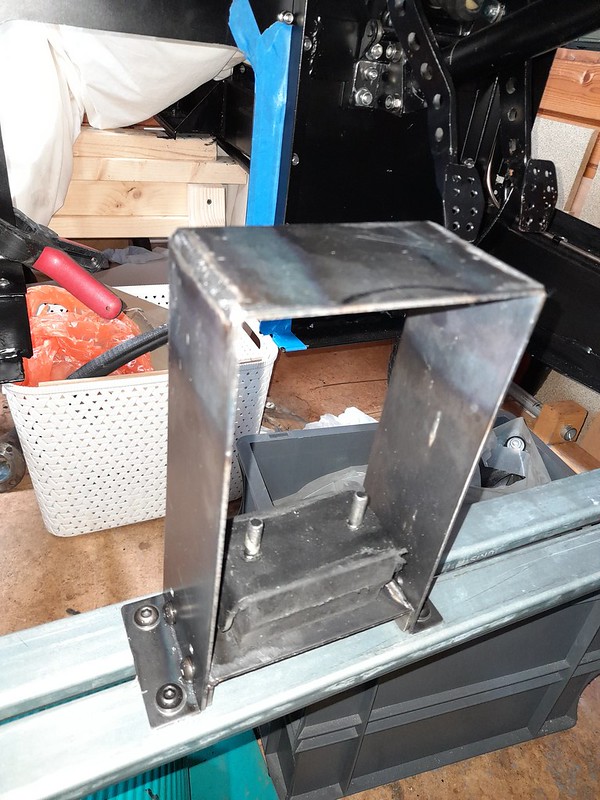 gearbox_mount gearbox_mount by Robin Martin, on Flickr
And I also made up and mounted the fuse/relay box which will also act as a distribution point for the electrics hopefully avoiding the spaghetti look. I used a similar arrangement in the Pembleton.
 fuse_box1 fuse_box1 by Robin Martin, on Flickr
And on the engine side two mate'n'lock connectors to avoid cables having to go through the bulkhead.
 fuse_box2 fuse_box2 by Robin Martin, on Flickr
The battery box may or may not be fitted below the fusebox. Undecided atm. |
8th January 2024, 12:36
|
|
Senior Member
Enthusiast
|
|
Join Date: Sep 2004
Posts: 1,892
|
|
I have completed the transmission tunnel. Pleased with the result but folding the long lengths of sheet steel almost destroyed my home made bender. Steel is so much tougher than ally. Hopefully I wont need to do it again.
Getting a good fit at the bulkhead end proved tricky as the tunnel is not square to the bulkhead and the chassis that supports the torsion bars is also at a slight angle. But got there is the end after a lot of bad words....
The observant may notice that I used a stretcher / shrinker to acheive the flare in the tunnel at the diff end, and again at the gearbox end. You can still see the grip marks on the flange.
 transmission tunnel 2 transmission tunnel 2 by Robin Martin, on Flickr
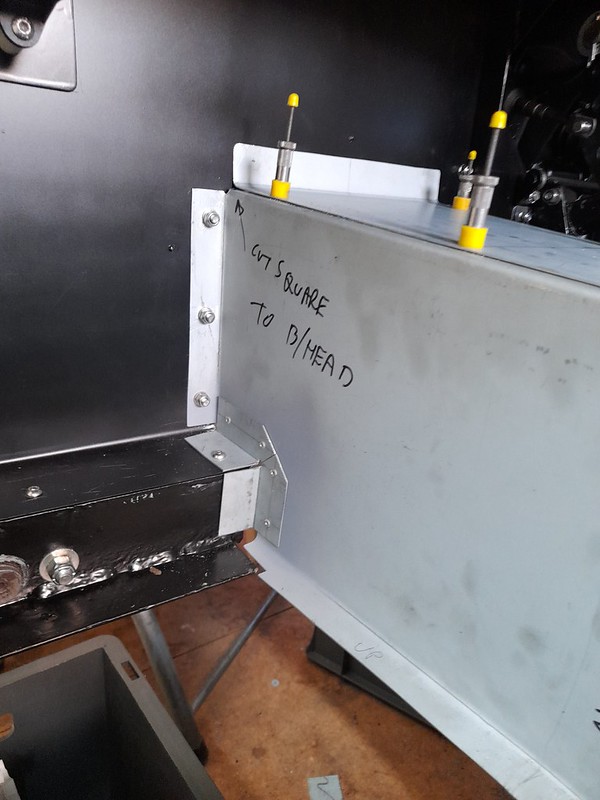 transmission tunnel 3 transmission tunnel 3 by Robin Martin, on Flickr
Next job - handbrake. I have purchased one of Richard Oakes trigger handbrakes and a lovely piece of kit it is too... |
8th January 2024, 16:03
|
|
Senior Member
|
|
Join Date: Nov 2012
Posts: 845
|
|
Beautiful Work Indeed!
Hi Martin
Kindly stop making me feel so amateurish!
Regards, Mick
|
13th January 2024, 16:19
|
|
Senior Member
Enthusiast
|
|
Join Date: Sep 2004
Posts: 1,892
|
|
I have a handbrake! And it works :-)
 handbrake 1 handbrake 1 by Robin Martin, on Flickr
I have to say that the trigger handbrakes are beautifully made and, as a bonus, you get to deal directly with the famous Richard Oakes.
The handbrake cable from the Marina is the first I have ever seen with a built in grease nipple. You can just about see it on the centre right of the picture.
 handbrake2 handbrake2 by Robin Martin, on Flickr |
14th January 2024, 09:33
|
|
Senior Member
Enthusiast
|
|
Join Date: Mar 2005
Posts: 3,077
|
|
Wow, that's the bees knees !
|
24th January 2024, 18:13
|
|
Senior Member
Enthusiast
|
|
Join Date: Feb 2005
Location: Hampshire
Posts: 2,497
|
|
Shiny! |
1st February 2024, 08:31
|
|
Senior Member
Enthusiast
|
|
Join Date: Sep 2004
Posts: 1,892
|
|
I have taken the opportunity of the last few mild days to complete the fusebox and battery box. The 3 connectors you can see are for the dashboard and rear loom. 2 other connectors appear the other side of the bulkhead, 1 for the engine and the other for the front lights etc. I have used industrial mate'n'lock connectors mainly as I had a load left over from the Pembleton build.
The ignition switch I have chosen is a fancy, key operated, industrial job but only has a low switching capability hence the large relay.
And of course the inevitable isolation switch.
For safety, as the battery in in the footwell rather than being under the bonnet, I have fitted two large fuses to the battery box, 1 for the starter (125 Amps) and the other for everything else (40 Amps).
Just need the actual battery now!
 fusebox fusebox by Robin Martin, on Flickr
 fusebox_mounted fusebox_mounted by Robin Martin, on Flickr
Next step will be the dashboard.... |
14th February 2024, 18:54
|
|
Senior Member
Enthusiast
|
|
Join Date: Sep 2004
Posts: 1,892
|
|
Today I completed construction of the dashboard blank. I made it from one of the bonnet side panels which I am replacing as they are full of holes in the wrong places. And I thought it would be cool to incorporate at least some of the old panelwork! As it is over 40 years old it comes with a pre-patinated finish which I think I might leave.
Difficult to see from the picture but I formed a radius on the lower edge using a mould and a small rubber hammer. And there is a 20x20mm re-inforcing angle running the entire width at the top.
The plan was to use some s/h Smiths gauges but as they are almost as expensive s/h as new nowadays so I think I will buy some new ones. Just water temp and fuel level are all I intend to use.
Now comes a question for anyone who still looks at this forum. I have several toggle switches to mount on the left in the blank area, and several indicator lights to mount on the right in front of the steering wheel. Should they be in a horizontal line, or should they follow the line of the scuttle top and slope upwards? Hmmm...
 dashboard2 dashboard2 by Robin Martin, on Flickr
|
14th February 2024, 21:35
|
|
Senior Member
|
|
Join Date: Apr 2011
Posts: 282
|
|
Very smart! IMHO Rocker Switches and warning lights following the top line with a big yellow oil light in the middle.
|
18th February 2024, 20:41
|
|
Senior Member
Enthusiast
|
|
Join Date: Jun 2015
Location: Reading, Berkshire
Posts: 688
|
|
I still lurk agree that the lights would look cool in a line following the line of the scuttle
Lovely work chap.
Dave |
19th February 2024, 10:41
|
|
Senior Member
Enthusiast
|
|
Join Date: Sep 2004
Posts: 1,892
|
|
As suggested I have made everything line up with the scuttle top. I am still not convinced though ;-)
 dashboard3 dashboard3 by Robin Martin, on Flickr
The little rectangle of masking tape immediately in front of the steering wheel represents the tiny digital (bicycle) speedo I am using. Not very "classic" but practical and cheap! And removable.
I have been trying not to buy any parts with the classic car label as it seems to add a premium to the cost. But the Lucas trafficator switch you can see is perfect for the job. I can operate it without removing my hands from the steering wheel as per the IVA rules and - well - it looks the part. I don't need an IVA as the car is already registered, but I consider the rules to be a good guidline where practical. |
1st March 2024, 17:13
|
|
Senior Member
Enthusiast
|
|
Join Date: Sep 2004
Posts: 1,892
|
|
I have been pondering the problem of my propshaft for some time now. For some reason the little screwed cap that holds the oil seal on the splined joint is way to big and hence impossible to screw up. I can only think that it has come loose at some point and years of rattling arround on the propshaft joint has stretched it. Its at least 3mm too big in diameter.
 propshaft_problem propshaft_problem by Robin Martin, on Flickr
Anyway I was doing some routine maintenance on the Pembleton. The driveshafts (2cv) have 3 joints the centre one of which is a sliding spline like on a propshaft. They are all protected by rubber gaitors. So I got out the callipers and, would you believe it, the size of the shafts making up the splined joint is almost the same as that on the Marlin propshaft. Getting excited now... So I ordered a gaitor from ECAS, the main source for 2CV spares and it fits perfectly!
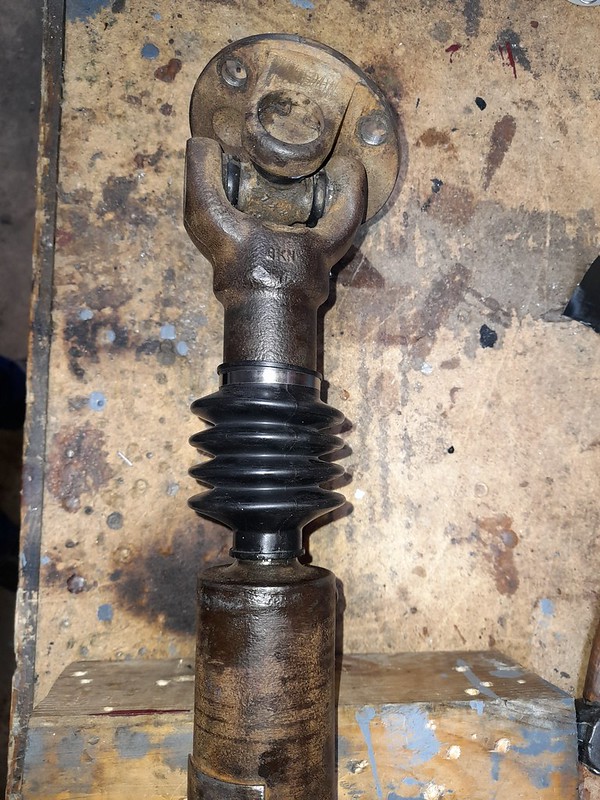 propshaft_solution propshaft_solution by Robin Martin, on Flickr
Not very often you get a piece of luck like that. |
2nd March 2024, 18:28
|
|
Senior Member
Enthusiast
|
|
Join Date: Mar 2005
Posts: 3,077
|
|
A brilliant bit of lateral thinking and repurposing!
|
|
Currently Active Users Viewing This Thread: 7 (0 members and 7 guests)
|
|
|
 Posting Rules
|
You may not post new threads
You may not post replies
You may not post attachments
You may not edit your posts
HTML code is Off
|
|
|
All times are GMT +0. The time now is 14:26.
|


 Linear Mode

