|
|
| Tribute Automotive Builds Discuss your Tribute kit build |

16th February 2013, 22:13
|
 |
Senior Member
|
|
Join Date: Nov 2011
Location: Emsworth
Posts: 810
|
|

One of those days when I planned to do so much but achieved so little!
The day was plagued by customers, so did one sand, fol and sand on the bonnet. The top is nearly there, but still needs more sculpting around the front vent.
Returned to it in the quiet of the evening and set about fitting the LHS bonnet catch. Then found the release cable pointed forward and touched the tyre as the catches are not handed. To change the cable mount to vertical I slotted the mount to let the wire cone up a bit then drilled and tapped the mount for an M8 bolt. On the bolt I put si cunifer pipe to act as a roller. Added another cable mount by welding on a small plate and then a nut for the cable outer. Slotted it for the wire, stripped the outer back a bit and hey presto, job done.
[IMG] 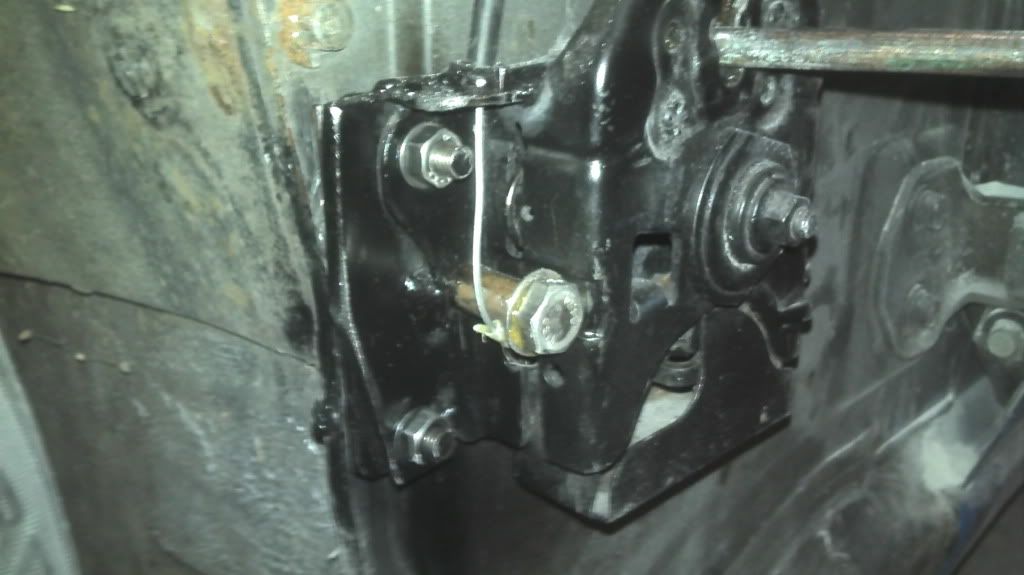 [/IMG]
Now I have two working bonnet catches. There is a grommet on the lhs for the bonnet catch on a LHD car so that bit was easy.
Very pleasing to see it pop open like a real one!!!
GreatOldOne and RedRatbike thank for your kind words. Your encouragement helps!!

|
17th February 2013, 15:26
|
|
Senior Member
|
|
Join Date: Nov 2011
Posts: 3,558
|
|
I hope Chris is taking notes, I might be asking for a flip front on my tribute to the A352 tribute.
Loving the details including the explanation of the problem you hit, some of your thoughts and then the solution. So much more useful than simply showing the end result
|
17th February 2013, 20:28
|
 |
Senior Member
|
|
Join Date: Oct 2010
Posts: 1,622
|
|
Quote:
Originally Posted by seanick

One of those days when I planned to do so much but achieved so little!
|
I know what you mean Nick, it happens to me on a regular basis!! Great engineering solutions. I hope your primer hasn't gone off in the tin  |
17th February 2013, 22:48
|
|
Senior Member
|
|
Join Date: Nov 2011
Location: Emsworth
Posts: 810
|
|
The bottom part of the wing bolts on the original mounting points. The section of aluminium took a ridiculously long time to do, but was a pleasant session of metal bending.
That will keep the dirt from the bonnet catch, now need to gutter the water away from the wiper 'bin'. That needs to miss the catches too.
[IMG] 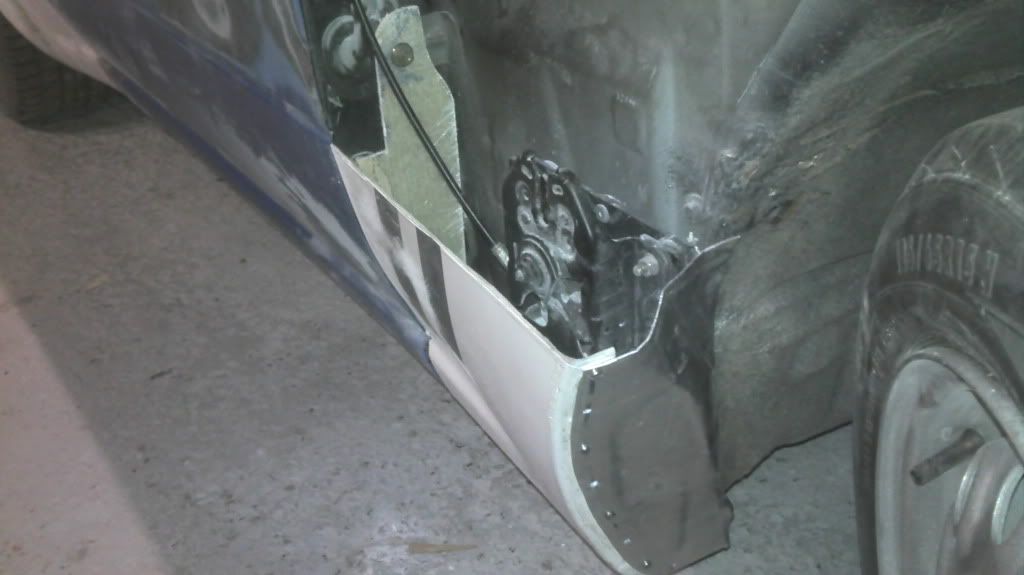 [/IMG]
The mounting flanges are cut from a panel of glassfibre 'I made earlier.
They are attached with a fillet of filler, and I will glass them in tomorrow, forming a return on the top at the same time, and addons a few mm to the edges to improve the door gaps.
[IMG] 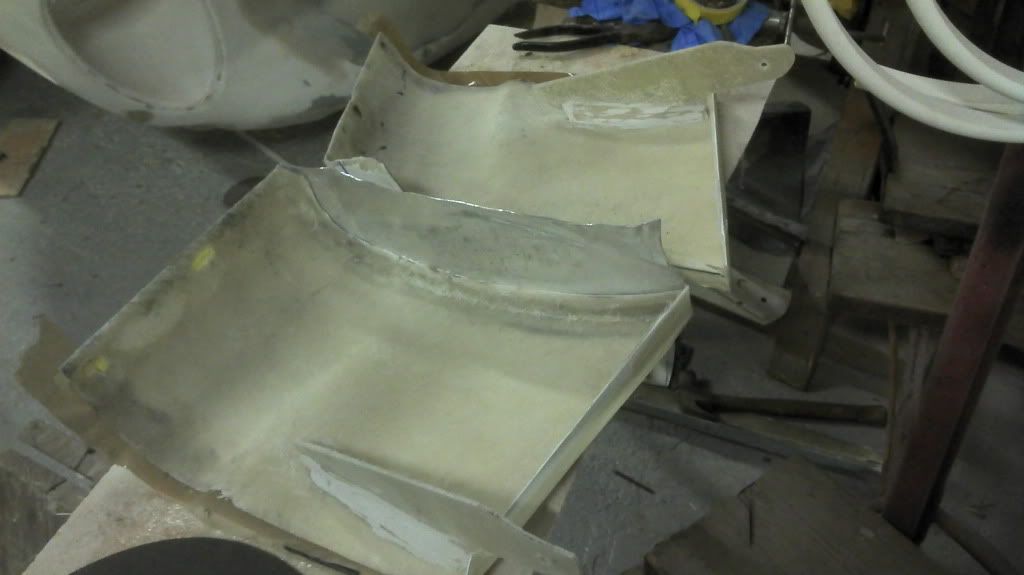 [/IMG]
Thanks WCA, I'm sure tribute will find a simpler way of doing this! !
Hope the foot is getting a little better every day.
Chris- my primer is like milk.....long life!! I feel a spray day coming along very soon.
Thats if I dont change my front vents a bit. Im thinking smaller, and oval? |
18th February 2013, 11:51
|
|
Senior Member
|
|
Join Date: Dec 2012
Location: Alton, Hampshire
Posts: 451
|
|
Looking good Nick, was great to see it in the flesh today. Thanks for the parts and the coffee mate
|
18th February 2013, 21:32
|
 |
Senior Member
|
|
Join Date: Sep 2011
Posts: 1,446
|
|
Quote:
Originally Posted by seanick
GreatOldOne and RedRatbike thank for your kind words. Your encouragement helps!!
|
I built a Robin Hood with my father approx 15 years ago so appreciate all the re-engineered bits you have come up with........the build video of the Robin Hood just used to say make a bracket for this etc,..dad's an ex welder fitter years back and I have a city+guilds in mechanical engineering so we were pleased when it passed the SVA with the comment best put together Robin Hood he had ever seen we were well chuffed.still going strong although dad's 73 this week so it may be time for me to get my legacy sooner than he thinks...not sure what the mrs will say ..ha ha.
Was hoping to be able to afford to build a car of my own but the house is swallowing cash so I have to live my dream through you guys doing such a great job building the cars out there....I appreciate them all |
20th February 2013, 06:48
|
|
Senior Member
|
|
Join Date: Jul 2012
Location: Near Penzance cnwll
Posts: 146
|
|
Hey Nick
Glad you you kept with the flip front, looking good. Theres a few hours of deep thought in getting that right. I dream of a spray day ! every time I think i Am getting to the point i can start the prep for primer i find another little job to do. Keep going, the sun is coming !
|
20th February 2013, 14:33
|
 |
Senior Member
|
|
Join Date: Dec 2011
Location: Devon
Posts: 550
|
|
Originally Posted by seanick
You may find you need 60 to 80 hrs on fairing before you hit the trigger on the spray gun. I reckoned my body was getting close, so asked a local car restorer around today for a price to finish mine. He said to take it as it is 4k, and to just top coat it if I sprayed on 6 coats of primer, flatting at coat 3 and six, then took it to him for the final gloss, then 2k !!
At £30 pounds/hr, fair enough. Just shows my standards are way too low, and thats bearing in mind I paint boats for a living!!! He gave me 5 out of ten. Back to the long boards.
He obviously saw what an incredible job you have made in constructing your car and thought it would be worth millions when sprayed. It definitely deserves a good paint job but agree one that suits the age of the car portrayed. A more realistic price should be possible but a 1950s price is too much to ask tho.
|
20th February 2013, 20:21
|
|
Senior Member
|
|
Join Date: Jul 2012
Location: Near Penzance cnwll
Posts: 146
|
|
Save your money and paint it yourself ! It will be look brilliant . Don't be tempted by the quick fix.
|
20th February 2013, 21:44
|
|
Senior Member
|
|
Join Date: Nov 2011
Location: Emsworth
Posts: 810
|
|
I have spoken to the same paintshop that Greyone used today. They said £450 to gloss or £850 ish to do the whole job. I will give the primer a go at least. Its the spray mist dropping onto horizontal surfaces that makes paying for a pro paint booth worth it imho. Maybe I will rig up an extractor........
|
20th February 2013, 22:25
|
|
Member
|
|
Join Date: Jan 2013
Posts: 37
|
|
Oh yes yes yes, we all want to see you setting up an attic paint booth!
EDIT: Typo
Last edited by Martini; 21st February 2013 at 22:40..
|
21st February 2013, 09:45
|
|
Senior Member
|
|
Join Date: Sep 2011
Posts: 1,446
|
|
wooden frame and some plastic sheeting i'd say for a temp spray booth ..damp floor to stop the dust.
without being rude if you are good enough to spray boats whats stopping you doing the car?
|
21st February 2013, 12:34
|
|
Senior Member
|
|
Join Date: Nov 2011
Location: Emsworth
Posts: 810
|
|
Yawn....just driven to Wales.
Boats are easy, big flat panels to spray, with vertical sides or overhangs. There fore you get no paint mist settling down from above onto areas you have. just sprayed. All that settling paint needs to be compounded ands polished off which can take ages. With a boat you just paint it and thats it. A paint booth supplies warm air and extracts all the air Bourne spray as you go.
back to the road!
|
21st February 2013, 12:48
|
|
Member
|
|
Join Date: Dec 2012
Posts: 75
|
|
Thats how I spent 10 days before giving up
|
25th February 2013, 12:56
|
|
Senior Member
|
|
Join Date: Dec 2012
Location: Alton, Hampshire
Posts: 451
|
|
Quote:
Originally Posted by seanick
I have spoken to the same paintshop that Greyone used today. They said £450 to gloss or £850 ish to do the whole job. I will give the primer a go at least. Its the spray mist dropping onto horizontal surfaces that makes paying for a pro paint booth worth it imho. Maybe I will rig up an extractor........
|
Which paint shop is this Nick? |
28th February 2013, 20:40
|
|
Senior Member
|
|
Join Date: Nov 2011
Location: Emsworth
Posts: 810
|
|
Week 19
Run out of filler.......
[IMG] 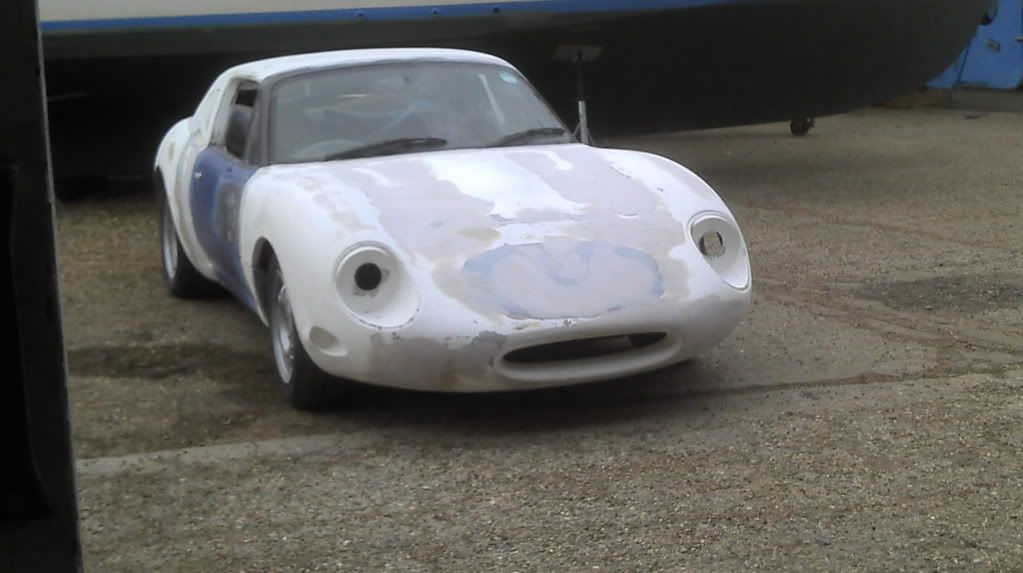 [/IMG]
Redrat..glad to be of service!
Hammy..SelectAutos Southampton or is it Woolston?
Peeps....the sun is coming....about time!
Martini.....a paint booth in my attic? Did that bit get lost in translation? How would I get he car up the stairs?
Frogman, it may look okay in the pictures........ |
28th February 2013, 23:24
|
|
Member
|
|
Join Date: Jan 2013
Posts: 37
|
|
Quote:
Originally Posted by seanick
Martini.....a paint booth in my attic? Did that bit get lost in translation? How would I get he car up the stairs?
|
Absolutely!
My smartphone dictionary told me it meant warehouse as well as...well, its actual meaning  |
1st March 2013, 22:46
|
|
Senior Member
|
|
Join Date: Nov 2011
Location: Emsworth
Posts: 810
|
|
Stripped the stone chip of the N/S door. Hot air gun and a tungsten scraper, then a whizz over with the random with 80.[IMG] 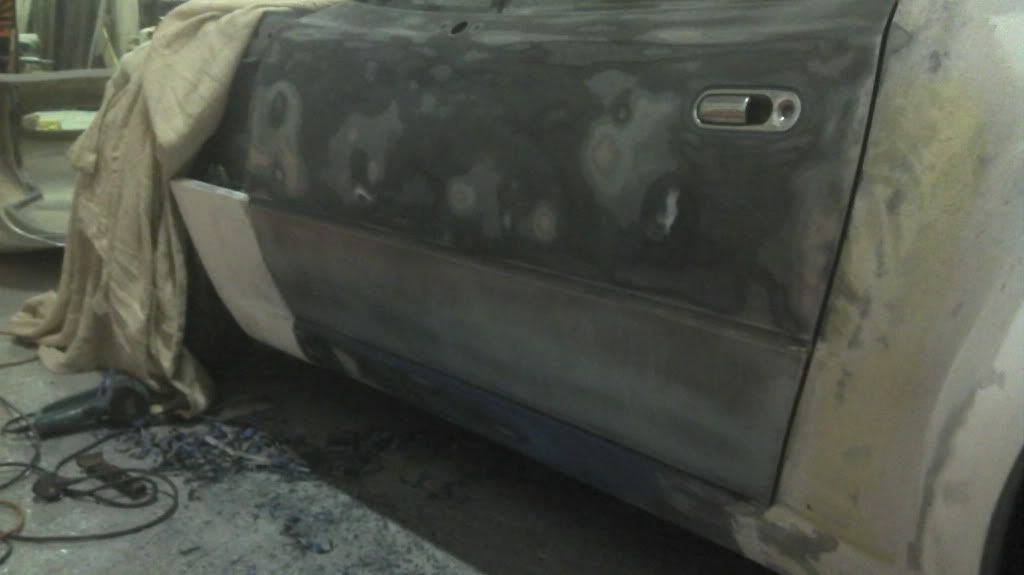 [/IMG]
After a bit of fairing applied a few coats of 2 pack hi-build primer to the bits that will be hard to get to. 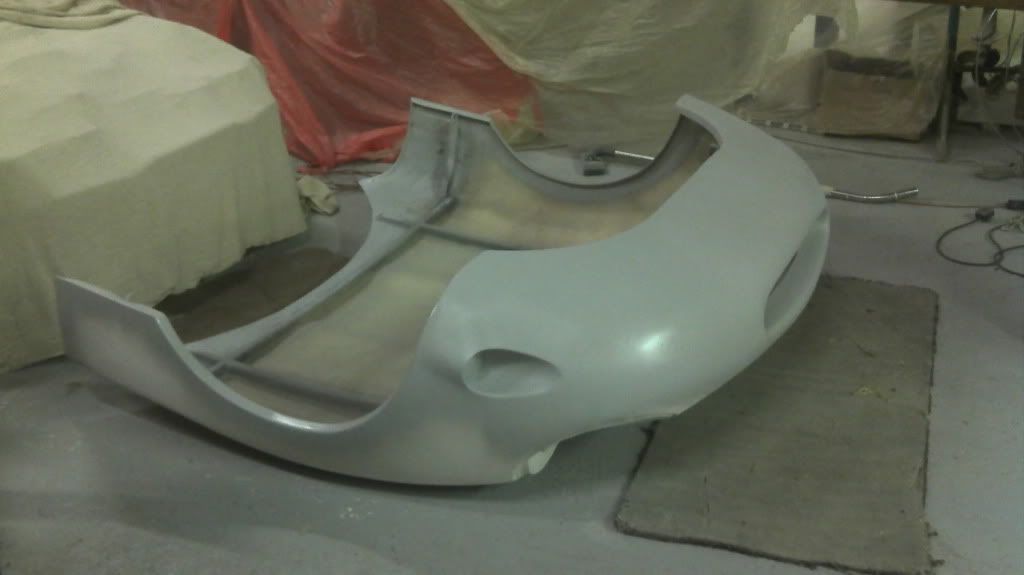
This grey primer looks great when its dry, but when wet I can still see more fairing is req'd..
Stinks too! |
2nd March 2013, 21:26
|
 |
Senior Member
|
|
Join Date: Jan 2013
Location: Germany
Posts: 188
|
|
Quote:
Originally Posted by seanick
Stripped the stone chip of the N/S door. Hot air gun and a tungsten scraper, then a whizz over with the random with 80
After a bit of fairing applied a few coats of 2 pack hi-build primer to the bits that will be hard to get to.
This grey primer looks great when its dry, but when wet I can still see more fairing is req'd..
Stinks too! |
That looks great, I like the deep lip on Grill |
3rd March 2013, 22:30
|
|
Senior Member
|
|
Join Date: Nov 2011
Location: Emsworth
Posts: 810
|
|
Nearly gift wrapped and ready for primer.
Its gonna be a long night.......  [IMG] 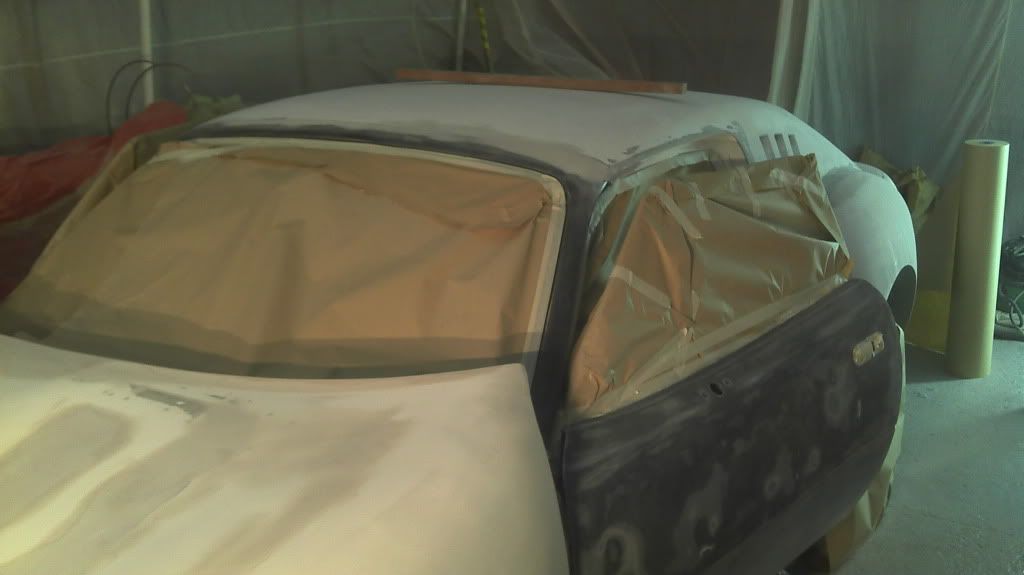 [/IMG] |
|
Currently Active Users Viewing This Thread: 1 (0 members and 1 guests)
|
|
|
 Posting Rules
|
You may not post new threads
You may not post replies
You may not post attachments
You may not edit your posts
HTML code is Off
|
|
|
All times are GMT +0. The time now is 07:01.
|


 Linear Mode

