|
|
| Tribute Automotive Builds Discuss your Tribute kit build |

6th August 2021, 20:09
|
 |
Senior Member
|
|
Join Date: Jan 2014
Location: Egham, Surrey
Posts: 1,780
|
|
 New Instruments from Grassbanks
That bugger Justin from Grassbanks has been tempting me with shiny bits, so nice do they look that I have had to pry my wallet open.
The beauty about these instruments is that they are plug and play, it all plugs into the back of your existing dash binnacle, not only the instruments but all the warning lights, these would take longer than instaling the instruments.
I have a car in the drive with an untrimmed interior almost ready, it has been sitting for a long time as I didn't want to do the wiring, it is a pig.
With the ETB instruments, you have to take an extra feed from the oil pressure sender for the oil pressure gauge. This is under the inlet manifold and even on a ramp is a pig to get to. Water temperature is taken from the block drain fitting which is much easier but still a faff. None of this is needed on the new Grassbanks setup.
When fitting the ETB instruments you need to take feed from the original binnacle to feed indicators, main beam, abs, oil pressure light etc etc, the easiest way to do this is to piggyback off the old bulb holders that fit in the back. The problem is the fittings use stainless steel so you can't solder to them. You have to solder directly to the thin flexible circuit board, this normally means burning through it and with all the connections is a labour of love.
Grassbanks has used the same idea but has 3d printed sockets that go directly into the existing bulb holder holes. Again so simple and so time saving.
Another great advantage is that the Grassbank speedo has an analogue odometer, the ETB version has an LCD digital display that gives the game away.
I am not going to get my hands on them until the end of the month but will give more feedback on them when I have them in my hands.
One thing people forget about is the time taken to swap all the BMW switches on the dash to more retro looking items, this is also being looked at with the idea of supplying a plug n play solution to all the switches.
He is also looking at doing the same set up for the Zagato and the Kobra although the Kobra will have to wait until a dash is available although I think the Zagato dash would work.
I will post some pictures of the prep done to install the new dash. I was going to use a Tribute dash which is much easier to fit but have opted for a heavily modified DNA dash, much harder to fit and more expensive but it's the way I'm going. If anyone wants a Tribute dash (or a highly modified DNA version) just let me know.
Last edited by Jaguartvr; 6th August 2021 at 20:26..
Reason: photo
|
7th August 2021, 08:13
|
|
Senior Member
|
|
Join Date: Aug 2012
Posts: 2,143
|
|
Mick I sent you a pm !!
|
7th August 2021, 09:20
|
|
Senior Member
|
|
Join Date: Dec 2012
Posts: 432
|
|
Quote:
Originally Posted by Jaguartvr

That bugger Justin from Grassbanks has been tempting me with shiny bits, so nice do they look that I have had to pry my wallet open.
The beauty about these instruments is that they are plug and play, it all plugs into the back of your existing dash binnacle, not only the instruments but all the warning lights, these would take longer than instaling the instruments.
I have a car in the drive with an untrimmed interior almost ready, it has been sitting for a long time as I didn't want to do the wiring, it is a pig.
With the ETB instruments, you have to take an extra feed from the oil pressure sender for the oil pressure gauge. This is under the inlet manifold and even on a ramp is a pig to get to. Water temperature is taken from the block drain fitting which is much easier but still a faff. None of this is needed on the new Grassbanks setup.
When fitting the ETB instruments you need to take feed from the original binnacle to feed indicators, main beam, abs, oil pressure light etc etc, the easiest way to do this is to piggyback off the old bulb holders that fit in the back. The problem is the fittings use stainless steel so you can't solder to them. You have to solder directly to the thin flexible circuit board, this normally means burning through it and with all the connections is a labour of love.
Grassbanks has used the same idea but has 3d printed sockets that go directly into the existing bulb holder holes. Again so simple and so time saving.
Another great advantage is that the Grassbank speedo has an analogue odometer, the ETB version has an LCD digital display that gives the game away.
I am not going to get my hands on them until the end of the month but will give more feedback on them when I have them in my hands.
One thing people forget about is the time taken to swap all the BMW switches on the dash to more retro looking items, this is also being looked at with the idea of supplying a plug n play solution to all the switches.
He is also looking at doing the same set up for the Zagato and the Kobra although the Kobra will have to wait until a dash is available although I think the Zagato dash would work.
I will post some pictures of the prep done to install the new dash. I was going to use a Tribute dash which is much easier to fit but have opted for a heavily modified DNA dash, much harder to fit and more expensive but it's the way I'm going. If anyone wants a Tribute dash (or a highly modified DNA version) just let me know. |
Morning Jag , Justin does come up with some cracking bits of kit , i understand how a new Oil Pressure warning light could be easily connected but wouldn`t an Oil Pressure gauge still require a new sender unit fitted into one of the existing oil galleries? Geoff .

|
7th August 2021, 10:34
|
|
Senior Member
|
|
Join Date: Jan 2014
Location: Egham, Surrey
Posts: 1,780
|
|
Justin says you don't need one, the new gauge reads something from the original sender, it's all black magic to me but fitting an extension pipe with an additional take off for the new gauge on the ETB setup was a pain.
I will confirm this when they have been fitted.
I notice from the picture that there are warning lights on the oil and water gauges, I presume that these light up at a certain temperature/pressure. Pretty sure these weren't standard on the Z3 cluster.
Another problem with the ETB gauges was the fuel sender, just wasn't accurate even with the supplied resistor.
Having now fitted the Grassbanls dials I can confirm that the oil pressure gauge works perfectly.
Last edited by Jaguartvr; 18th September 2021 at 13:35..
|
7th August 2021, 10:57
|
|
Senior Member
|
|
Join Date: Dec 2012
Posts: 432
|
|
Quote:
Originally Posted by Jaguartvr
Justin says you don't need one, the new gauge reads something from the original sender, it's all black magic to me but fitting an extension pipe with an additional take off for the new gauge on the ETB setup was a pain.
I will confirm this when they have been fitted.
I notice from the picture that there are warning lights on the oil and water gauges, I presume that these light up at a certain temperature/pressure. Pretty sure these weren't standard on the Z3 cluster.
Another problem with the ETB gauges was the fuel sender, just wasn't accurate even with the supplied resistor.
|
When i did the instruments on mine i had that extn piece fitted into the oil gallery and had oil pressure and oil temp senders fitted into it , Geoff . |
7th August 2021, 11:06
|
 |
Senior Member
|
|
Join Date: Sep 2011
Posts: 1,447
|
|
are they £1200?
sure i have read that somewhere
|
7th August 2021, 12:02
|
|
Senior Member
|
|
Join Date: Jan 2014
Location: Egham, Surrey
Posts: 1,780
|
|
price TBA, £1200 only for the first 2 sets, sorry, 1 set  |
20th August 2021, 08:18
|
|
Senior Member
|
|
Join Date: Jan 2014
Location: Egham, Surrey
Posts: 1,780
|
|
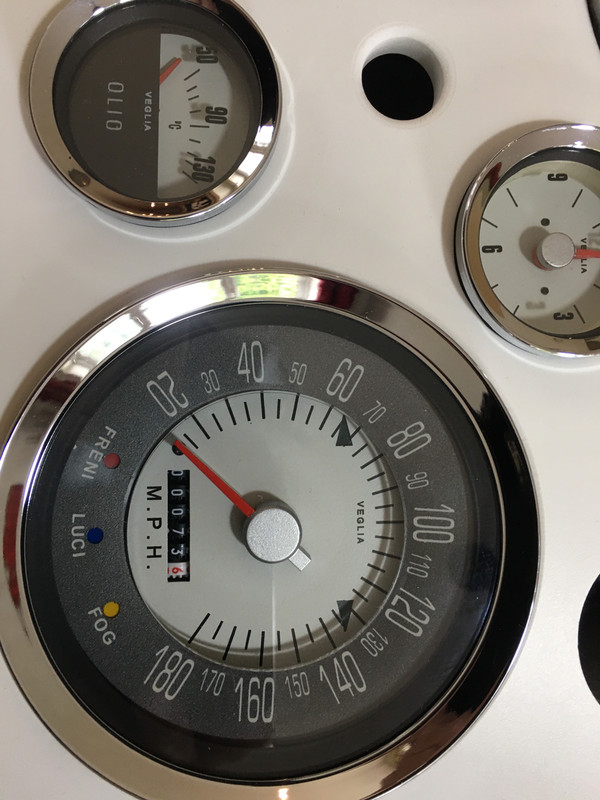
First picture of my instruments
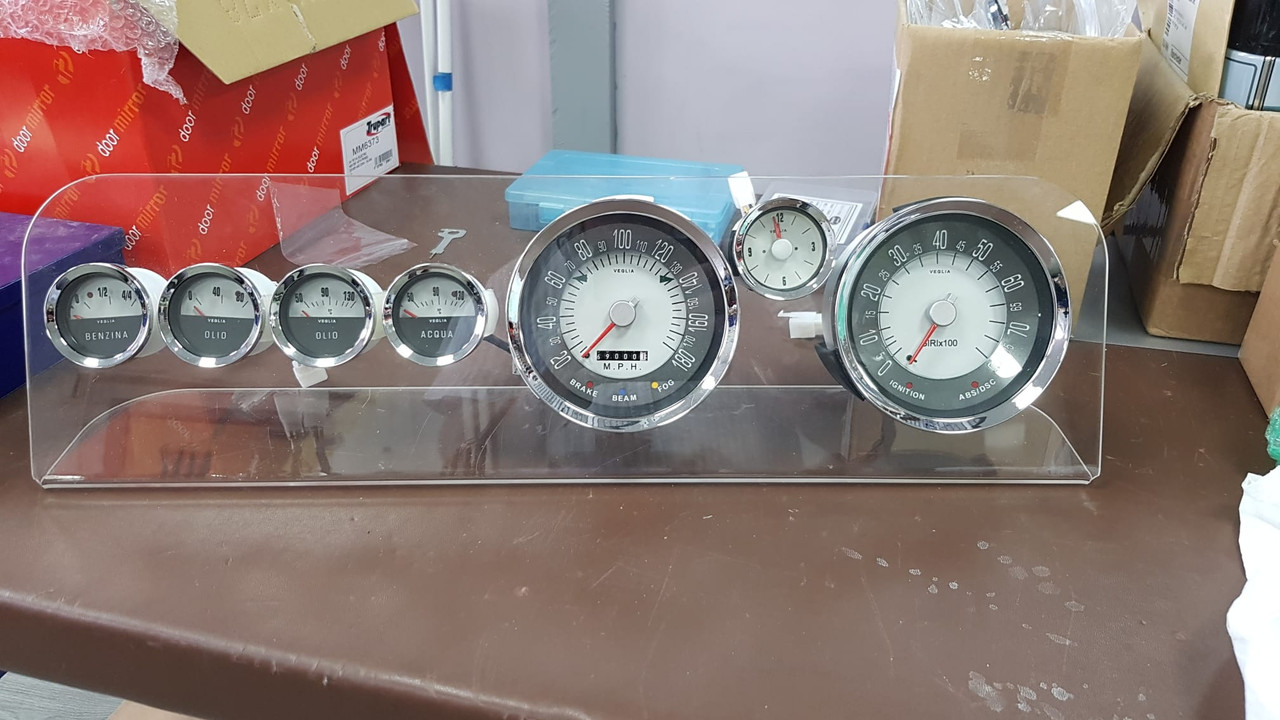
Very pleased they look great and can't wait to get my hands on them.
One of the things that I really like is the traditional odometer, the LCD screen on the ETB instruments was a big letdown, gave the game away instantly.
The odometer is actually an hours indicator rather than miles the same as used on a boat.
Now looking for problems, my car is on a limited mileage policy so if there was ever a claim I wouldn/t like to give them a reason not to payout.
I have asked Grassbanks to sent the new speedo at zero and will take a picture of the current mileage at this point. I will then be able to compare the "hours" to "miles". The original binnacle is hidden behind the new dash so you can always check the mileage but a bit of a faff.
Now you can get those Bluetooth OB2 readers that plugin under the dash and are read by your smart phone, they all have different features. Does anyone know of a version that shows the mileage? Would be a very good way of knowing the exact mileage for the insurance company without having to pull the dash. Take a screenshot every MOT and you are covered.
One thing I am not so keen on is the labelling on the idiot lights on the speedo and rev counter, ASC/DSC gives the game away and it looks a little odd that the small instruments are labelled in Italian but the idiot lights in English. I would like to see the idiot lights unlabeled. Also 3 lights on each dial so that front fogs could be included. The idiot lights are feed from the idiot light sockets on the back of the original cluster so you could simply plug one of Grassbanks adapters into the cluster and connect it to the idiot light of your choice, this way you could have one of the lights connected to the MIL warning or whatever warning you wanted.
Small point but doesn't detract from the overall effect.
|
20th August 2021, 11:06
|
|
Senior Member
|
|
Join Date: Jun 2015
Posts: 1,401
|
|
Very nice indeed!
|
20th August 2021, 12:03
|
|
Senior Member
|
|
Join Date: Jan 2014
Location: Egham, Surrey
Posts: 1,780
|
|
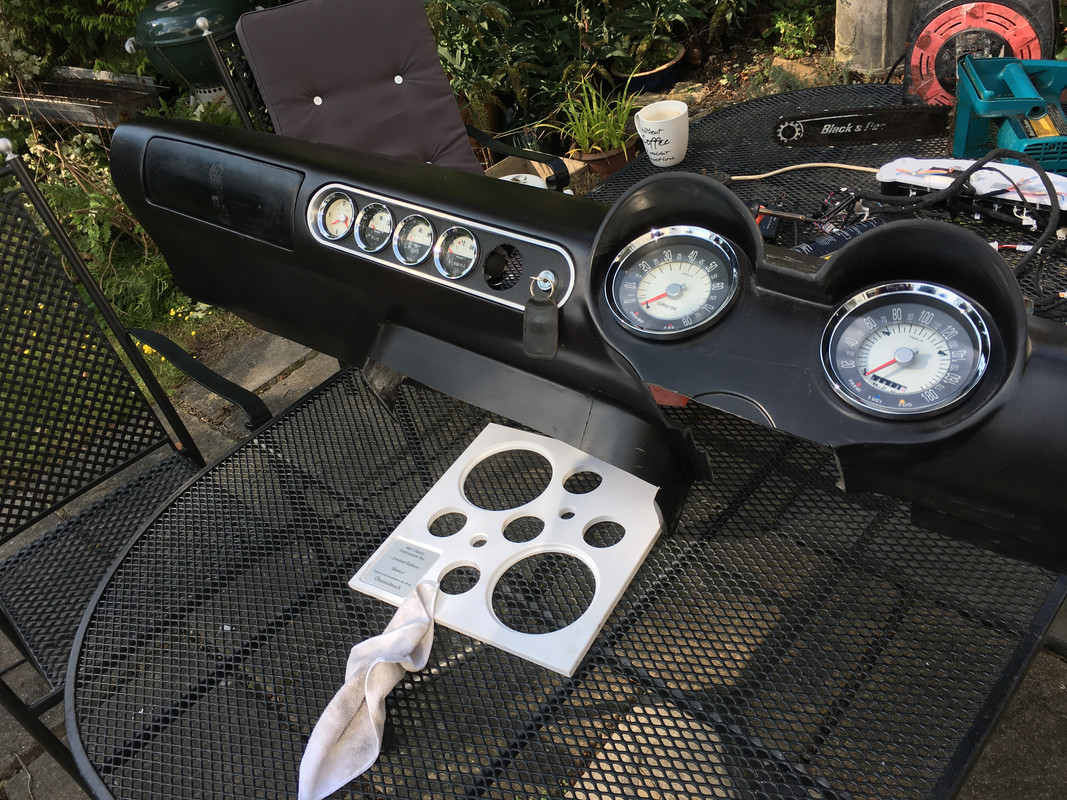
A few pictures of the loosely positioned dashboard, it needs to be leather covered. Hopefully you can see that the cowls over the speedo and rev conter are more vertical than over versions. I always felt they looked as if they were sitting "too flat" 
The dash is partly held in position by the front of the heater cover panel. This extends to the floor on both sides and up to the front bulkhead which makes it all very stable. It also allows you to fit the existing heater controls. The existing rotary controls are a tad short so I 3d printed some which worked but the finish wasn't great so I am working on some alloy ones. 
I have had made an alloy plinth to take the smaller instruments, apart from looking good the advantage is that you can fit the instruments to the plinth first and then install the plinth into the dash assembly in one go, much easier.
Trimming the inside of the alloy plinth with leather proved to be an absolute pain so I had an insert 3d printed, this way you stick the leather to the insert and then trim it, much easier and then the insert is held in by the instruments. I had to make the insert in 2 halves due to the size of my printer. 
I haven't gone into details about removing the dash as I did it ages ago and have forgotten most of it, I have however just been reminded that there are 2 hidden allen screws that are hard to spot and a pain to remove.
Last edited by Jaguartvr; 7th February 2022 at 18:34..
|
14th September 2021, 14:37
|
|
Senior Member
|
|
Join Date: Jan 2014
Location: Egham, Surrey
Posts: 1,780
|
|
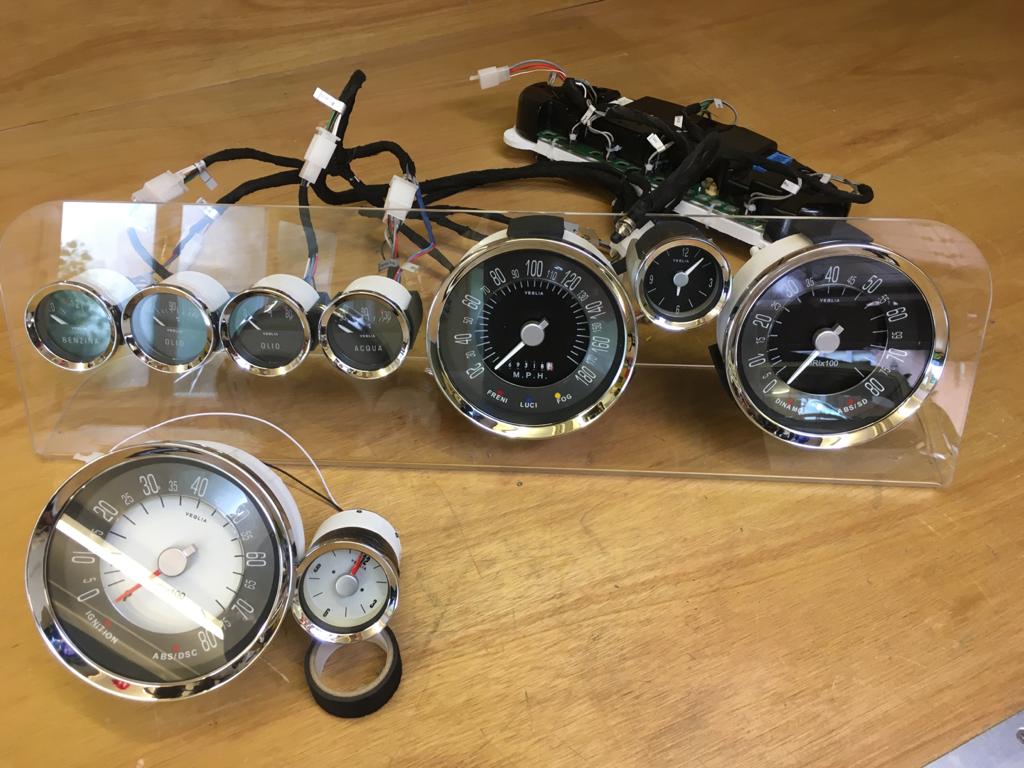
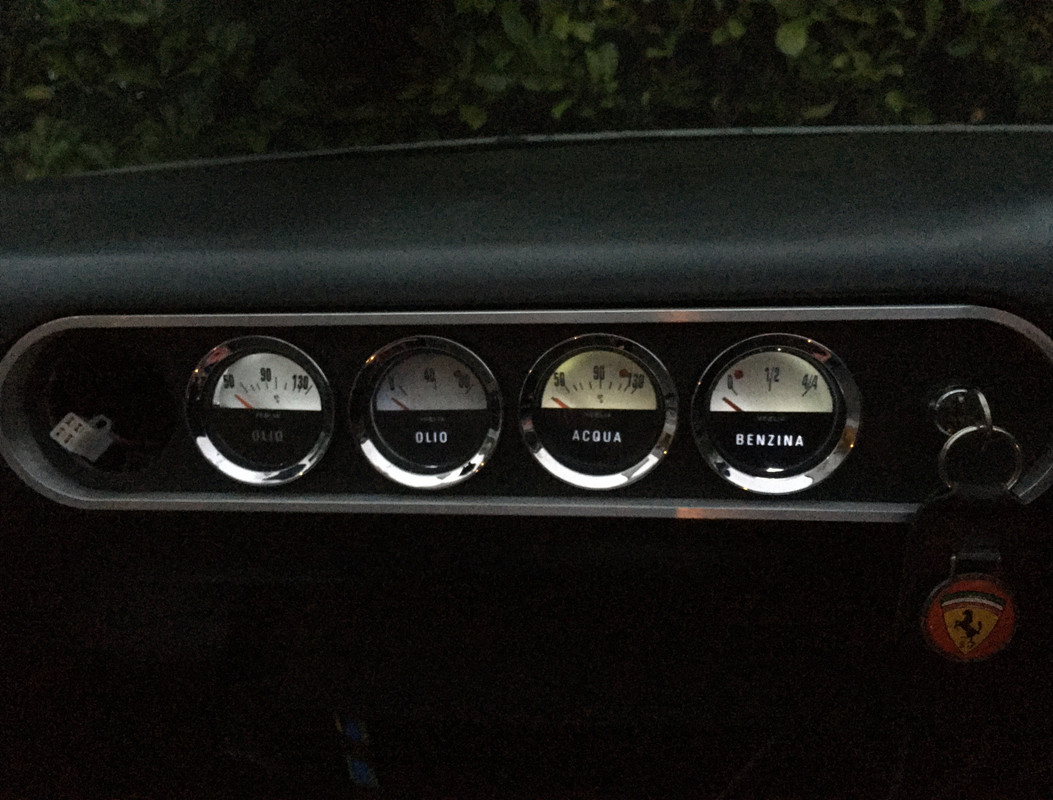
WOW
Instruments have just arrived, beautifully packaged and presented.
Everything is clearly labelled and looks so professionally made. I have fitted ETB gauges but these are in a different league.
I wasn't keen on the original labeling on the speedo and rev counter but this has been changed and looks much better.
Feast your eyes 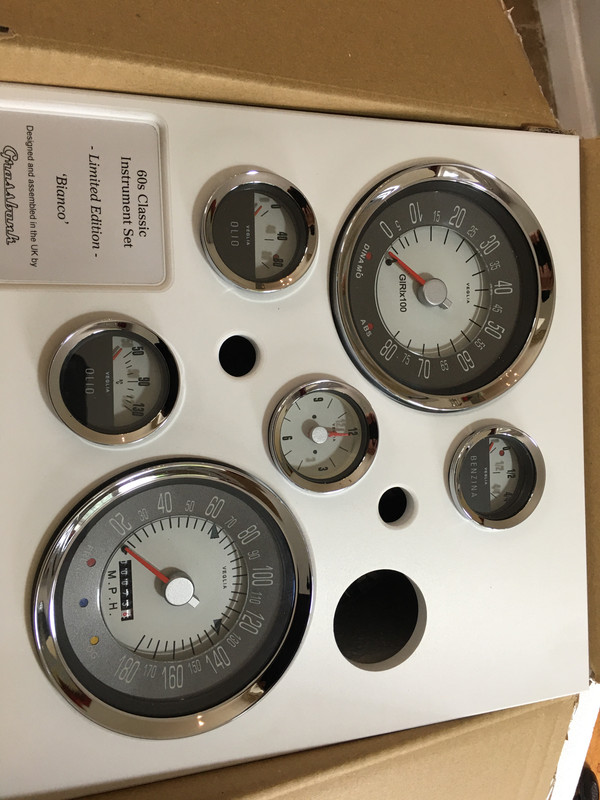 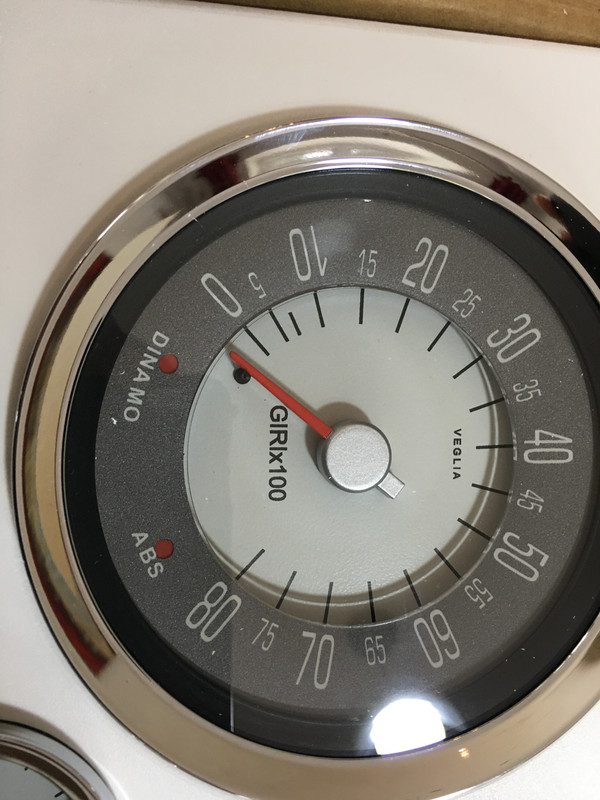
  |
17th September 2021, 14:14
|
|
Senior Member
|
|
Join Date: Jan 2014
Location: Egham, Surrey
Posts: 1,780
|
|
2 wires to solder
On the white dash plug
red/yellow solder to new plug red/yellow
From blue dash plug
violet/yellow to grey new plug
I hate soldering but both plugs (with the dash out) will reach to the bonnet which makes soldering much easier.
Everything plugs together nicely and most of the lights seem to work, can't check the rest yet as the battery is dead flat and there's no petrol in it.
Last edited by Jaguartvr; 17th September 2021 at 15:18..
|
18th September 2021, 12:57
|
|
Senior Member
|
|
Join Date: Jan 2014
Location: Egham, Surrey
Posts: 1,780
|
|
Plugged the instruments in and everything working. This has been a job that I was dreading having known how much work the ETB instruments. were. Piece of piss, solder 2 wires, few plugs and you are done!
They look absolutely superb, Justin at Grassbanks really has outdone himself this time.
I still have to get the dash covered as I'm not keen on the painted Finnish so still a bit of work to finish.
Not part of the dash but I thought I would share my door openers.
Classic Mini door opener mounted on a plate that is screwde to the door, the original door rod is cut and bent and threaded through the door opener hole. The door rod needs to be slightly under tension otherwise there isn't enough "Pull" to open it.
<a href='https://postimg.cc/H82kJb1q' target='_blank'><img src='https://i.postimg.cc/H82kJb1q/IMG-4791.jpg' border='0' alt='IMG-4791'/></a> 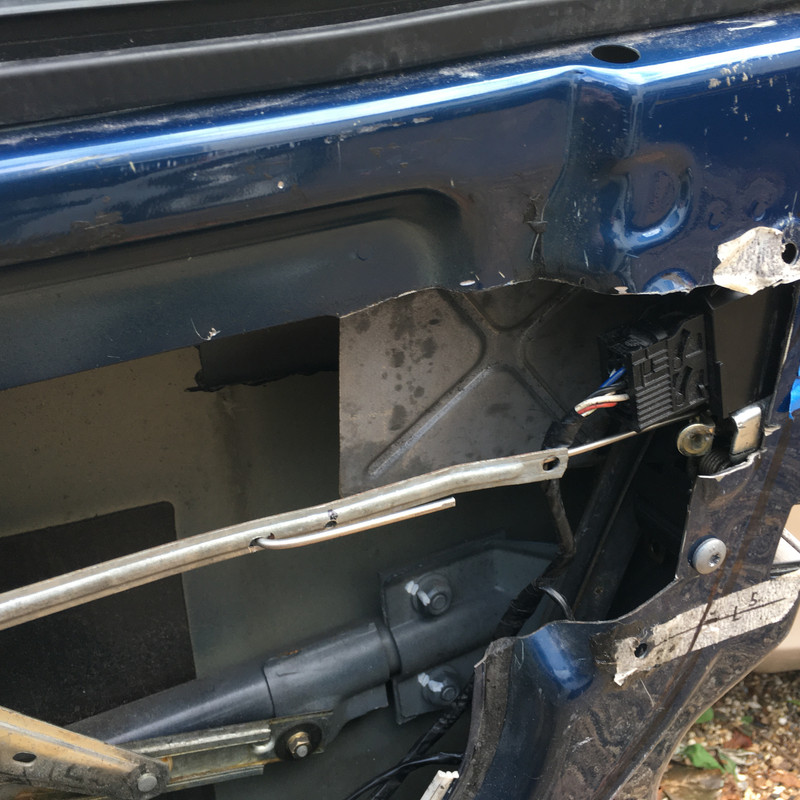 
Last edited by Jaguartvr; 18th September 2021 at 17:59..
|
20th September 2021, 01:47
|
|
Senior Member
|
|
Join Date: Dec 2016
Posts: 174
|
|
Nice! Thanks for posting your progress.
I’m still hoping to follow in your shoes eventually!
|
3rd November 2021, 11:35
|
|
Senior Member
|
|
Join Date: Jan 2014
Location: Egham, Surrey
Posts: 1,780
|
|
Small amount of progress but a few teething problems that were to be expected.
The instruments when viewed at night were too dim and the speedo and rev counter were fine at the top but too dark at the bottom do they went back to Grassbank for some work. They came back with additional bulbs fitted that has made a big difference.
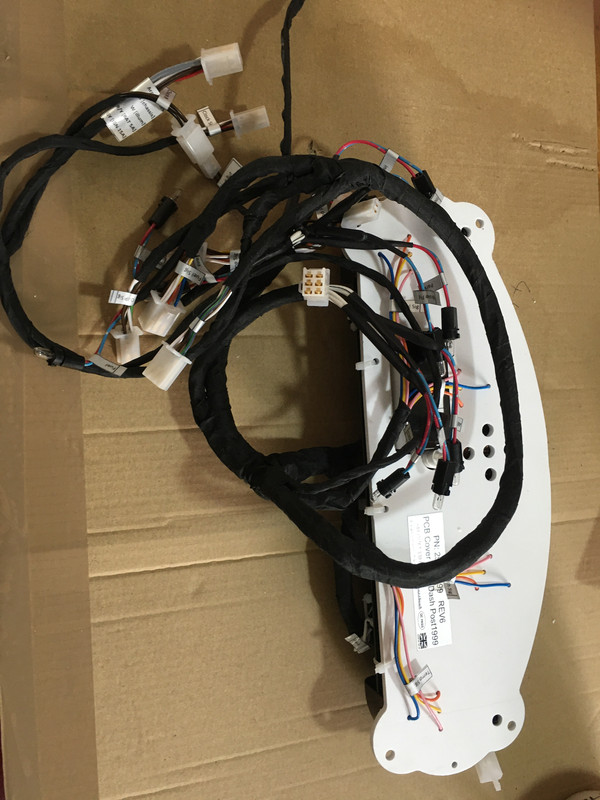
I had fitted the instruments in the car and also in the dash but on the table. Sandy on the Z3roadster forum (he still cannot post on this forum) has reported problems in fitting the original Z3 cluster behind the new dashboard. I couldn't see a problem so decided to show him how it is done (smug grin). However, in trying to fit it all it turns out he was right (smug grin wiped off). The only way to get the Z3 cluster to fit behind the crash bar and under the new dash is to cut the drivers side demist tube, not ideal but I can nake it back in grp matt but 2" shallower. With this done the Z3 dash will lay flat but only gives a few mm of wiggle room. Grassbank has used the Lusso style dash, this sits higher than the Tribute (which Sandy is using) or a modified DNA dash that I am using.
I then cut up a second BMW dash and fitted it without the new dash bonded on to see if I could gain any more room, it is hard to see with the new dash on. The positioning of the Z3 dash is determined by the dash vent tubes, the dash rests on these and they can't be moved or the air will escape inside the dash rendering the demist useless. There is no spare room so cutting the drivers vent tube down to make it thinner us the only answer.

In trying to fit the Z3 cluster, new instruments and new dashboard to the car itself I hit another snag, the new wiring loom just wasn't long enough. When I fitted the instruments and loom to the dash on the table it looked fine. However, because the original Z3 dash can only be fitted in one position the loom is just too short, move it a bit and it is too short in another area. Modifications needed have been marked and returned for a few alterations. After this has been done I am pretty confident that it will fit both the Tribute and DNA dashboards, there will probably be a bit to much loom but better to tuck it away behind the dash than be too short.
The ideal position for the Z3 cluster would be behind the glove box, however the 3 plugs that go into it won't reach so all the wires would have to be lengthened, about 50 wires, this would defeat the object of plug n play so is not an option.
Probably the easiest option will be to fit the Lusso style dash but no pricing on it yet. The panel on this dash has a lift off section just above the speedo and rev counter and is raised. This gives more room for the Z3 cluster, better access for the wiring and makes trimming the top section a job you can do yourself without having to pay to have it trimmed.
Last edited by Jaguartvr; 3rd November 2021 at 11:39..
|
3rd November 2021, 20:31
|
|
Senior Member
|
|
Join Date: Sep 2011
Posts: 1,447
|
|
so what you need is the 3 plugs on a mini loom to extend them in a plug and play style with the appropriate male and female plugs rather than extending individual wires by cutting and soldering
|
4th November 2021, 08:20
|
|
Senior Member
|
|
Join Date: Jan 2014
Location: Egham, Surrey
Posts: 1,780
|
|
That would be ideal but I wouldnt think the sockets to enable you to extend the cable would be available. The extra labour to crimp and solder about 50 wires would I fear be too expensive. Shame because if you could move the Z3 cluster to the passenger side you might be able to position it so the odometer and service lights were visible.
The main point in fitting these instruments is the plug n play factor.
|
14th December 2021, 14:22
|
|
Senior Member
|
|
Join Date: Jan 2014
Location: Egham, Surrey
Posts: 1,780
|
|
I have just got the instruments back from Grassbank, they were returned to have the loom extended as it was impossible to fit them with the supplied loom.
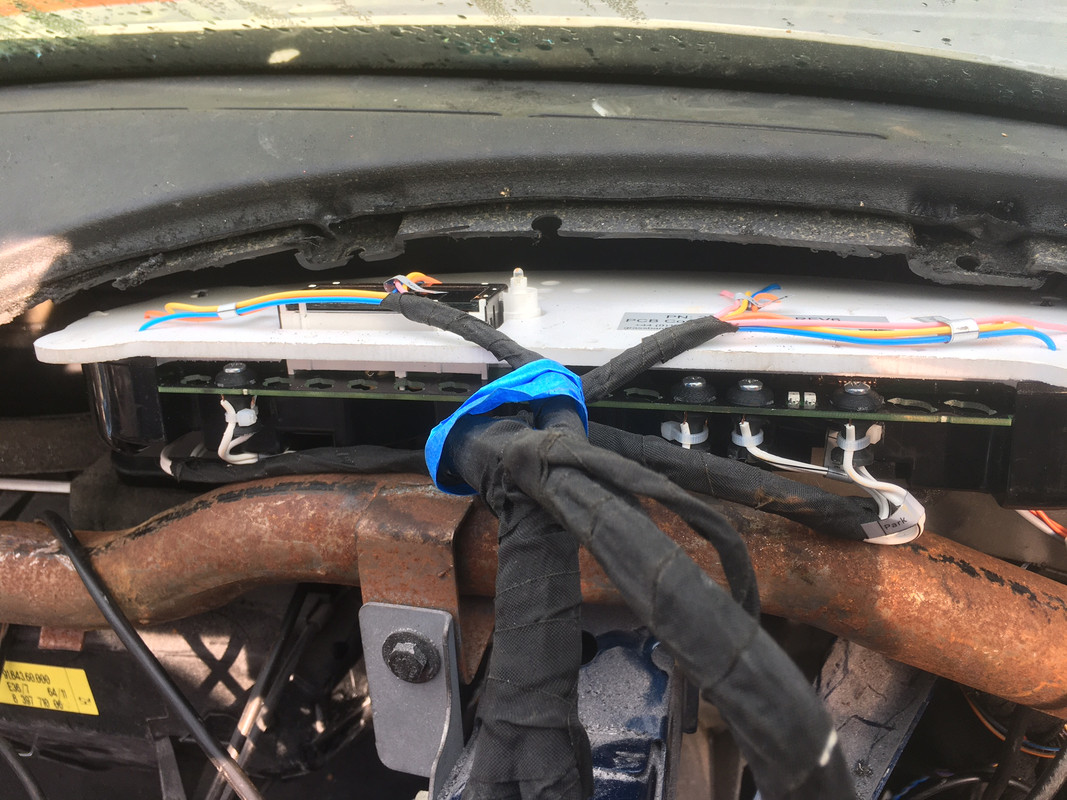
I was advised that they could be fitted under the dash. I have unravelled the loom around the 3 BMW dash plugs so that they now drop below the steering column. There is no way that the BMW PCB (original stripped down instrument cluster) will fit under the dash next to the steering column, there just isn't room. This is a later car that has the accelerator motor fitted here, even without it there still wouldn't be room. I have moved the white control box (not sure what it is) and the light switch but still impossible, so back to plan B. Fitting PCB above the steering column. To get it in I have had to cut down the demister vent tubing over the steering column and I have glassed it back up. Just waiting for it to dry and I will have a go at fitting again tomorrow.
The new loom is much better but the tails on the instruments are disapointing. 250mm on clock,fuel and water guages but only 60mm on the 2 oil guages, speedo and rev counter, the amount you can pull the instruments out to fit all the very fiddly bulbs is limited by the shortest leads, makes the newly lengthened leads pointless. However, all may not be lost as the loom from the PCB has all been extended so hopefully, this will give me enough room.
The illumination originally was woeful, you just couldn't read the instruments, this has been rectified by extra illumination bulbs being fitted. The PCB has a new section of loom with these additional lights on but they are hard wired with no connectors so this limits the room available to get the bulbs in, if you look a the picture you can see how many spaces there are that need to have bulbs fitted.
In future, the extra illumination bulbs need to be wired to the instrument plugs so all the bulbs can be fitted on the bench and then one or two plugs per instrument. If you are thinking of ordering a set I would ask for this and 250mm tails on all instruments. Bear in mind that this is the first set of instruments that Grassbank have sold and I am not using a Grassbank dash. If you were using the Grassbank dash I'm sure that it would be easier but I'm sure that longer tails would be better.
Update tomorrow so long as it doesn't rain.
3 good tails, 2 too short
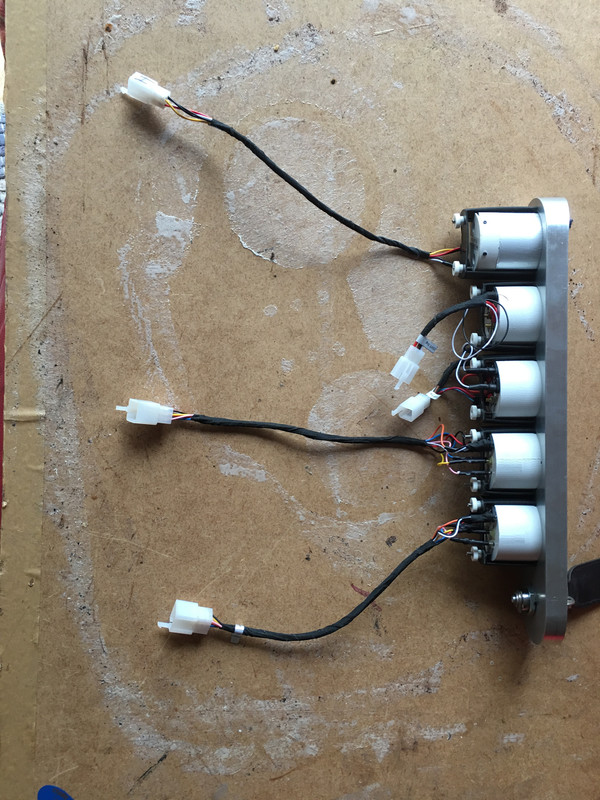
tails too short

16 bulbs to be fitted, hard enough with long tails but with the short tails the ewear box might get a big boost tomorrow. 
|
17th December 2021, 11:53
|
|
Senior Member
|
|
Join Date: Jan 2014
Location: Egham, Surrey
Posts: 1,780
|
|
Got the instruments in, the tails were all long enough but to make it easier the tails need to be longer. It would also help if the illumination to each instrument was in the plugs.
I couldn't get the PCB board to fit on top of the dash so I had to balance it on the steering column, fit the dash and put my hands through the speedo and rev counter hole and then wiggle it into position, it goes but only just. The demister vent has to be trimmed for it to fit.
I now need to fit the brackets to the back of the speedo and rev counter, it is going to be a pain, I need to wiggle the dash forward so that I can fit the 6 brackets and nuts but it will all have to be done blindly which is going to be fun.
Smaller instruments were much easier as they could be fitted to the plate and then the whole plate plugged in. The ignition key is from a filing cabinet which when turned turnd the lever behind that will lock the plate into position.
Still a problem with the illumination, on the oilio temp guage the lettering isn't lighting up, hoping it ids s bulb. On the oiio pressure, the gauge is half the brightness of all the others, I suspect that the oil pressure light has taken the space of the illumination bulb. It is very hard to get a picture of but one dull instrument looks awful so I'm sending them back and hoping that something can be done. It shows up much more in real life than it does in a photo.
 They do look good during the day. Now working on the heater controls and front bulkhead.
All taking longer than I expected but I feel that I'm almost there.
|
17th December 2021, 17:30
|
 |
Senior Member
|
|
Join Date: Jul 2011
Posts: 5,328
|
|
You can see that the illumination isn't as bright in the olio gauge, which is a shame.
Having said that, I've had Fiats and Alfas in the past and they all did that. But that's Italian electrics for you...
|
|
Currently Active Users Viewing This Thread: 1 (0 members and 1 guests)
|
|
|
 Posting Rules
|
You may not post new threads
You may not post replies
You may not post attachments
You may not edit your posts
HTML code is Off
|
|
|
All times are GMT +0. The time now is 13:43.
|


 Linear Mode

