MadaboutKitcars

This is a read-only archive of the old Madabout Kitcars forum. New posts and replies are no longer possible, but every thread is still here to browse and read.

Painting a Tribute Model

24 May 2016, 7:38am
Mark Burton suggested that it might be a good idea to have a thread for this. Setting aside the pros and cons of DIY vs professional, there are loads of things that builders can beneficially gain from having this pulled together, especially those tempted by the less glamorous but cheaper DIY route. I think everyone agrees that a professional finish can be seen to be just that. Not everyone can afford, or will want that standard though.

I have approached a couple of contributors and they have agreed I can cut and paste their input into a common thread. I will be focussing on the "How to" side. I will also put links back to the original threads.

Bear with me as I evolve this over the coming weeks. Other contributions of course will be welcome.
24 May 2016, 8:13am
I have not read every last word in these, but have found something relevant in each. Hopefully we'll get the sense out of all of them into the thread.

http://www.thegoldenbug.com/en/vw_technical_articles/d105/how_to_prepare_fiberglass_for_paint Preparing fibreglass for painting quick step by step guide

http://www.superchevy.com/how-to/corp-1007-prep-paint-guide/ General description on how to approach things

http://www.lotuselan.net/forums/elan-archive-f16/paint-primer-for-fibreglass-t12358.html Lotus forum with various responses to OP, much like here

http://www.rcscalebuilder.com/Tutorials/PrepGlass/PreppingFiberglassForPaint.pdf 5 page guide with pics

http://www.awlgrip.com/support-and-advice/gelcoat-and-fiberglass.aspx Basic supplier guide with link to more detailed guidance

It's a start anyway.
24 May 2016, 12:23pm
This is a great idea. So that we don't have to read every link, can I suggest taking a note from Paul L's book and adding a brief note for each hyperlink explaining their purpose :smile:
24 May 2016, 12:26pm
y cymro wrote:
This is a great idea. So that we don't have to read every link, can I suggest taking a note from Paul L's book and adding a brief note for each hyperlink explaining their purpose :smile:


Good idea, will do. I am "working from home" and was feeling pangs of guilt about the time spent already. :)
24 May 2016, 12:32pm
As Dilbert says "work from home, work naked"

Good luck!
24 May 2016, 12:34pm
No comment!
24 May 2016, 1:39pm
Have you seen the narrowboat video?
24 May 2016, 2:20pm
haha
24 May 2016, 8:12pm
Would be really interested in seeing this thread come to life. I expect to be starting prep in the next 2 weeks or so. I will be paying for the paint job due to working on the drive, but would welcome advice on the stages from that first layer of chopped strand filler through the different stages up to trailering / driving in to the paint shop. Cheers.
24 May 2016, 8:17pm
If other builders can chip in, you may be good. Right now you know more than me.
24 May 2016, 8:35pm
Lol. Doubt it mate. I am a time served mechanic but not a clue about bodywork!!!!!! I am seriously considering just getting it legal, driving it around a couple of body shops for the cheapest quote and the just biting the bullet!!!!!
24 May 2016, 10:19pm
A mate of mine fitted his Kobra body kit , did no prep and took it to a local bodyshop / paint shop. They did an ok job , not perfect in many respects and was charged £2000. He then had to finish it off , ie door shuts , inside the boot and under the bonnet etc etc.
No cheap way really unless you can do the lot yourself.
24 May 2016, 10:23pm
For anyone thinking of prepping, spraying or even paying someone else to spray their fibreglass kit car, and I can fully understand why someone spending a small fortune on a Ferrari replica would want it done professionally, I can offer the following advice based on my own experience as a first-time sprayer.

I'd never even considered spraying a car myself before and had every intention of handing over a modestly sized cheque to the Sammio car company, who charged £800 at the time (2011) to prep and spray your home-built car in a solid colour of your choice.

A couple of things changed that and neither of them were financial. First I really got into the build process. Early on I found that my chassis was rotten and needed quite a bit of welding, but I hadn't been trained as a welder (although I'd qualified with a City and Guilds in Aeronautical Engineering a the age of 17 I was exclusively trained to use hand tools as we were expecting to have to fight a fast moving European theatre war against a vastly numerically superior Eastern Bloc force, so didn't expect to have access to machine-shop facilities and were trained to make-do-and-mend our war machines in the field instead). All the advice I got was that welding wasn't something a beginner could do but I bought myself a £60 Manual Metal Arc (stick) welder and had a go anyway. My welds weren't pretty but they held and are still all solid as an (ugly) rock five years later.

Through this site I also met Phil J, who is now a firm friend, and found that he'd sprayed his own car in a domestic garage, albeit a huge one. I decided that if I could get my car to look even half as good as his did by spraying it myself I'd be as happy as a dog with two d*cks.

So, it became something of a personal challenge to do everything myself (except trimming, I once glued myself to the inside of my beetle trying to do the headlining, and once was enough).

With regard to the paint, I took advice from Phil, but also sought advice from Jawel, who are one of the largest paint suppliers in the West Midlands and supplied the silver cellulose I ended up using, and some people with far more experience of working with fibreglass cars than anyone other than Colin Chapman - Gary Janes and Mike (Miglia).

Mike sprayed this one, btw -
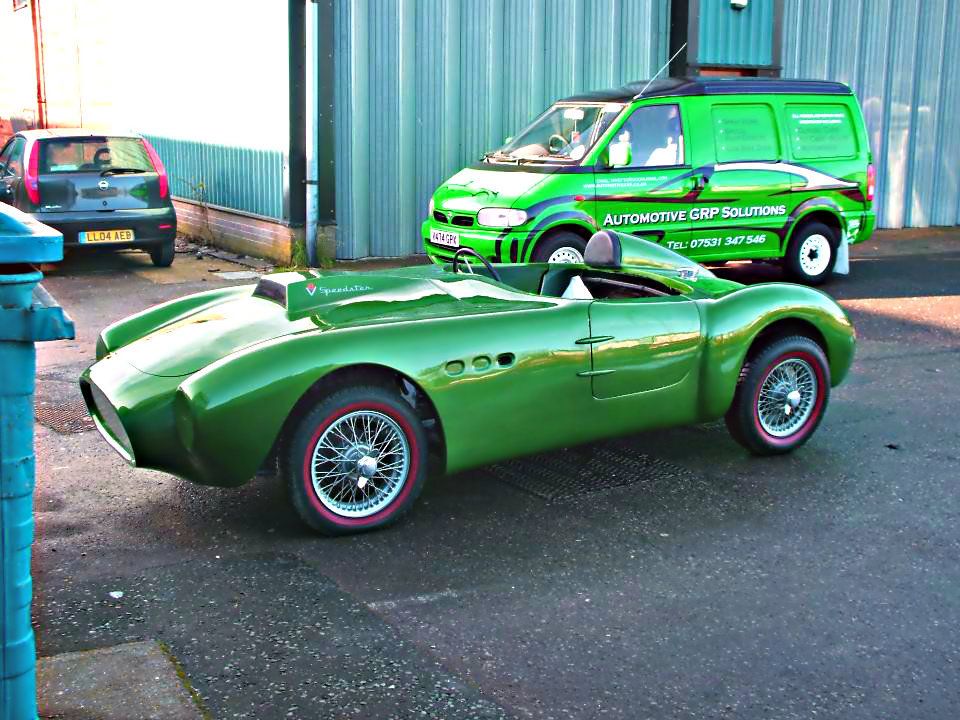


I've attached a link to my original question to Mike about preparing and spraying a fibreglass surface here, because his reply is still a good starting point for anyone who is considering going down the diy route -

http://www.madabout-kitcars.com/forum/showthread.php?t=3864

I ignored part of his advice - I didn't try to dig out any bubbles (can't remember why, think I was just too impatient) and I followed Jawel's advice to use etch primer before the high build primer on fibreglass - but went with most of it as I recall.

So, with no previous experience and no real clue what I was doing, I followed some advice I acquired from strangers on the internet and painted my own car. And the result? Well, I rushed the prep, putting in about twenty hours - I was two years into what was supposed to be a six-month build and just wanted to get it on the road - so there are a few blemishes that I missed. There's a strange phenomenon on the offside rear wing where the paint looks dull under artificial light but is really glossy in the sun (I have no idea what causes that) and there's a bit of dust stuck in the surface low down from my garage floor which I clearly didn't hoover well enough before I started (and there's a whole other debate to be had about whether or not to wet the floor before spraying...)

But, with no experience, no skill, cheap tools and cheap paint sprayed badly onto a cheap car, partially following advice from mostly unknown sources that could've been yanking my chain, this is what I ended up with -
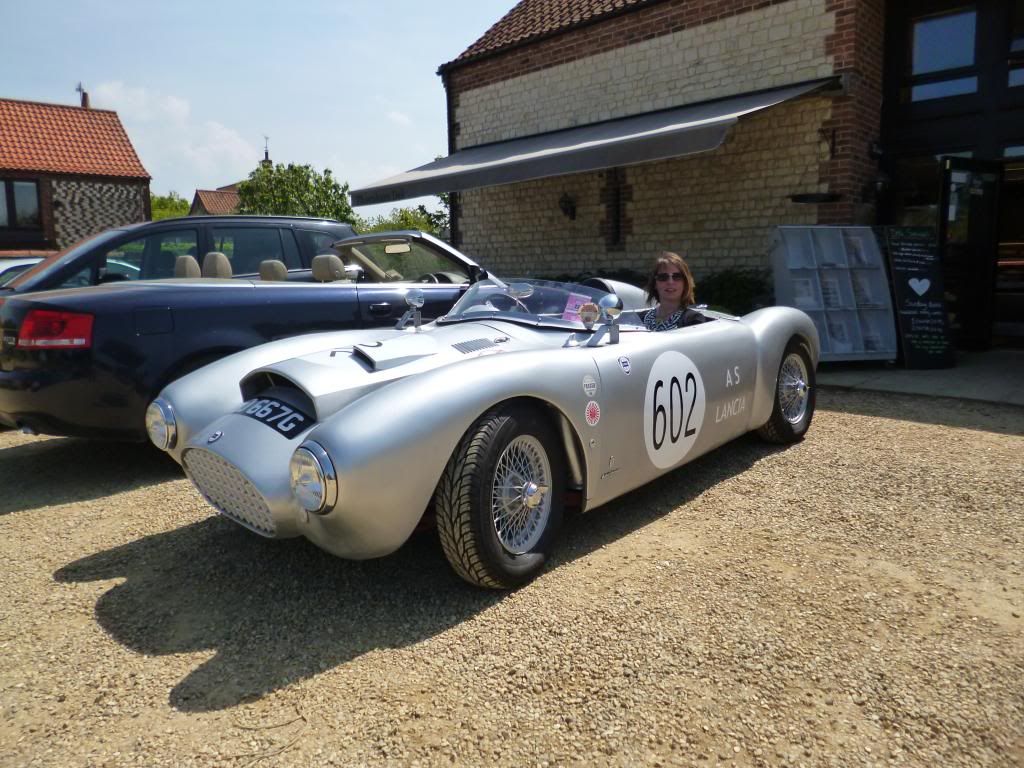


The general reaction it gets is very positive. People often ask me if it's unpainted aluminium and I really like the way it looks. I should have spent more time on the prep. I could have sprayed it more carefully. I could still polish it to a higher gloss, but I rather like its refugee racer sprayed in a hurry in the pits look so I probably never will.

I've made a few mods to the body over the last couple of weeks so I'll be attempting to blend some new paint into the old in a few days, which I'm led to believe is very difficult on 2 pack - something to do with the old paint not dissolving into the new like cellulose does - and that's definitely something to consider when choosing a paint system for a fibreglass car, because of the possibility of settlement/stress cracks, no matter who ends up spraying it.

Good luck to everyone getting the finish you want and I look forward to reading any advice and experiences anyone else can bring to the table. :thumb:
24 May 2016, 10:26pm
Check out this link showing paint defects, causes and fixes. Standox is a professional product, but anyone can go buy it. The defects are relative to any 2k paint, so it is good for general reference. You will all identify some of these defects, professional and amateur alike.

I've got a set of fibreglass race bike fairings I've prepped and started painting, so will show flatting techniques and clear over base application in 2k over the next week. Not quite a Tribute, but will give an idea.

Cellulose has its place (somewhere) and I don't think we are looking at waterbase basecoats here as that needs plenty of airflow and a booth is really needed.

Anyway, if you are balancing the cellulose versus 2k, then the only part of the better (2k) application is for the lacquer or direct gloss which can be just a tack coat followed by a full wet coat if you use a high solid type. It's just as easy to apply as cellulose, you can block any runs out the next day as it cures hard and it can be wet flatted and buffed if your cautious and don't want to risk any sags or runs. Have to be careful not to polish through though!

Regular 2k is generally a Medium Solid paint, which you can add slightly more thinners, which you may need to flow out or achieve a flatter finish.

Don't call a paint sprayer a paint sprayer. They are technically a 'vehicle refinisher' These days. Look at the many cars out there with factory finish being slightly orange peel to high end polished type finishes. These chaps and some ladies have to match that finish and it is done by percentage of thinners used and also speed of the spray gun travelling over the panel, with also fluid tip adjusting. You can't learn this on a one-off, but you should be able to achieve a decent finish.


http://www.standox.com/content/dam/EMEA/Standox/HQ/Public/Documents/English/Standotheks/THK_Paint_Defects_GB.pdf
25 May 2016, 5:25am
Barber - Great idea for a thread. :cool:

So I've added a link to this thread on the last post of the Tribute "sticky" thread.

I've also added a few links below.

Hope it helps,

Paul. :)

- - - - - - - - - - - - - - - - - - - - - - - - - - - - - - -

Barber wrote:
Have you seen the narrowboat video?


Watch someone who clearly knows what they are doing using a roller and "dry" brush. :cool:
( Don't let the start fool you. )

https://youtu.be/E3UCEbGZmz0

- - - - - - - - - - - - - - - - - - - - - - - - - - - - - - -

Tribute MX250 - Dave Lowes' paint thread.

http://www.madabout-kitcars.com/forum/showthread.php?t=4245


- - - - - - - - - - - - - - - - - - - - - - - - - - - - - - -

Ribble Navigator - Viatron's guide to removing the "orange peel" finish he had straight from the gun.
( Note: He also gives a clear explanation of the finish he wanted/expected. )

http://www.madabout-kitcars.com/forum/showpost.php?p=67412&postcount=910


And a guide to the products he used.

http://www.madabout-kitcars.com/forum/showpost.php?p=67413&postcount=911

- - - - - - - - - - - - - - - - - - - - - - - - - - - - - - -

Barber wrote:
…Setting aside the pros and cons of DIY vs professional, there are loads of things that builders can beneficially gain from having this pulled together, especially those tempted by the less glamorous but cheaper DIY route. I think everyone agrees that a professional finish can be seen to be just that. Not everyone can afford, or will want that standard though…


Whilst I know (and certainly don't dispute) that a professional would produce a professional paint job, I still plan to follow the DIY route "next door".

So I really liked this thread about hand painting a car on the Rods 'n' Sods forum.

http://www.rodsnsods.co.uk/forum/tech-features/hand-painting-car-98714

- - - - - - - - - - - - - - - - - - - - - - - - - - - - - - -

Finally, I always liked this 'Before' & 'After' photo, also taken from Rods 'n' Sods.

It is not that the finished painted car is perfect, far from it.

No, it is more about the complete transformation of the previous "patch work" quilt under construction.


This would certainly get you on the road (enjoying your car) until you could afford to get a "proper" paint job.

Total cost, including the brushes = £35! :eek:

- - - - - - - - - - - - - - - - - - - - - - - - - - - - - - -

WorldClassAccident's guide to keeping the new paint on your Tribute looking good.

http://www.madabout-kitcars.com/forum/showthread.php?t=5925

- - - - - - - - - - - - - - - - - - - - - - - - - - - - - - -
25 May 2016, 9:40am
Moving along

Thanks everyone for moving this topic along. Here are some links to relevant bits of Scottie's Tribute A352 build thread:

http://www.madabout-kitcars.com/forum/showthread.php?t=4553&page=66 Trialing the boot painting, problems identified

http://www.madabout-kitcars.com/forum/showthread.php?t=4553&page=67 Mr Towed lends a hand, re the SWB 250 Contemporary thread

http://www.madabout-kitcars.com/forum/showthread.php?t=4553&page=68 The boot re-visited

http://www.madabout-kitcars.com/forum/showthread.php?t=4553&page=69 More boot improvements

http://www.madabout-kitcars.com/forum/showthread.php?t=4553&page=70 It was worth all the effort - now for the rest
25 May 2016, 10:52am
More on Scottie's build

http://www.madabout-kitcars.com/forum/showthread.php?t=4553&page=89 Painting, rubbing back, filling, and again

http://www.madabout-kitcars.com/forum/showthread.php?t=4553&page=104 And more, note the bonnet.

The recurring comment in the whole thread refers to Scotties paying attention to detail - this must be key in the results you see on the paint job, as well as the car overall.

http://www.madabout-kitcars.com/forum/showthread.php?t=4553&page=105 major work prepping the body

http://www.madabout-kitcars.com/forum/showthread.php?t=4553&page=106 Yet more work on the bonnet

http://www.madabout-kitcars.com/forum/showthread.php?t=4553&page=107 Rubbing back, filling and re-painting, repeat, no short cuts it seems

http://www.madabout-kitcars.com/forum/showthread.php?t=4553&page=108 But it is all worth it - Wow. see 109 also.
25 May 2016, 11:32am
Some really good info on here guys. Excellent work. Brilliant tips and advice for a paint virgin such as myself.
15 Jun 2016, 7:33am
Keep reading the Fatbloke thread above, Roadster has posted a useful link. It is going to be fascinating to see what standard of finish will come out of this.

We could have a scale of paint finish, from stock car to concourse. If we could get some examples at different levels, it would be a great way for builders to assess relative value for money depending on the level of finish they are happy with.

I'd be interested to know if you could roll on a lacquer finish, and what the outcome would be like.
15 Jun 2016, 10:54pm
How to paint a car with cellulose paint

This is my guide to painting a grp/fibreglass kit car with cellulose paint (NOT 2 pack which is dangerous and for professional use only). I am NOT an expert, but I have watched plenty of YouTube video’s – and have painted plenty of stuff with cans (including a 7 series BMW outdoors). Remember this is how I think it should be done… so any helpful tips or comments are most welcome.
The one odd thing that I’ve been told is that when dry sanding, it’s the same as double the grade when wet sanding? So for example when I’m using 80,120, 240 & 320 that’s the same as 160, 240, 480, and 640. I’ve also looked into the pro’s and cons of using an acid etch primer versus an epoxy primer – but several people said that it wasn’t necessary – so I’m keeping it simple with a cellulose primer and cellulose top coat (no clear coat).
I won’t be going into too much detail, but hope to post photo’s as I paint my car (on a separate post). So here goes… enjoy:
PREPARATION
1. Buy everything you need… – I used Ebay, classiccarpaintsdirect.com (online and at shows), and Jawel paints for some tinted white primer (I’m aiming for the same colour gel coat, primer and top coat – I know this is a bit unusual/unnecessary , but it’s what I’m doing... so the stone chips don’t show).
2. Always wear goggles/mask/gloves when spraying and sanding! Also make sure you’ve got good lighting and ventilation
3. Remove any trim parts
4. Remove any flash lines
5. Use a heat gun to find any air pockets (dig out and fill with body filler)… possibly tap the body with spanner to find further voids?
6. Use a sanding block with a coarse grit (P80?) over the whole area you are painting to remove the gloss – take care not to go through the gel coat, and sand at different angles (crisscross) to give a good key for filler and paint
7. Blow off the dust with an airline, hoover or mop the floor, and clean the panels with panel wipe – not thinners. Wear gloves – do not touch the panel with your bare hands
8. Apply body filler as needed (before primer) – mixed to the correct ratio and allowed to dry fully. Body filler should never be applied too thickly. If you need a thick area consider using glass fibre impregnated filler like Isopon P40. Also sort out any panel gaps at this stage…
9. Use a long block with P120 to dry sand over the filled areas. Do not use any water at this stage
10. Repeat above steps until you are happy with it!
PRIMER
11. Carefully mask off the car before applying primer
12. Paint with high build primer (mixed 50/50) using cheaper thinners, strain the paint – maybe three coats if you’re not good at filling!
13. Apply a guide coat (any dark spray can you’ve got stashed away will do as long as it’s cellulose) or maybe use a dry powder type guide coat?
14. Allow the guide coat to dry (if spray paint is used), and then hand sand (long block) with 120 (?) grit sand paper (I’m using Mirka gold on a roll). I’ve bought a straight flat sanding block and one of those yellow flexible ones for this. Wear a mask!
15. Repeat step 7 (remove dust, clean floor, panel wipe)
16. Fill any low spots with more body filler where necessary – allow to harden fully
17. Sand down the area’s you’ve just filled. If you’ve got a DA sander, only use it on flat panels
18. Repeat step 7 (remove dust, clean floor, panel wipe)
19. Apply another coat of high build primer
20. Apply stopping filler to any small imperfections and allow to dry
21. Sand the whole area again, this time with 240 grade sandpaper (dry sand and wear a mask)
22. Possibly apply another coat of primer? If you do get any runs in the primer, allow the paint to dry (speed up drying using infrared heater?) then carefully sand down again
23. Repeat Step 7 (remove dust, clean floor, panel wipe)
24. Do a final hand sand of the whole area using 320 grit (equivalent to 640 wet and dry)
25. Repeat step 7, but this time using a tack cloth just before top coat
TOP COAT (Hurrah!)
26. Possibly remove masking and re-mask? (black bin bags are good for tyres)
27. Mix up the top coat 50/50 using good quality thinners (for a better gloss), and strain the paint. Spray on a warm dry day, damp down the floor to suppress dust. Ensure good ventilation. Have a water separator on the airline and a pressure regulator on the gun. Warm the gun and paint. Use a tack cloth just before painting. Practice walking around the car with the spray gun, so that you know the area is clear and the hose won’t get snagged etc. Wear a mask, goggles and gloves – and have decent lighting.
28. Spray at least 4 coats, allowing each coat to flash off before the next coat. Overlap as you go to maintain a ‘wet edge’. Practice on something else first!
29. Apply a final top coat with 75% thinners
30. Carefully remove masking (before the paint is completely dry) – stand back and admire.

COLOUR SANDING AND POLISHING

31. Leave it a month before colour sanding (if you can wait that long, maybe less if it’s really hot)
32. Mask off any area’s you don’t want to get scratched
33. Wet sand using 1200 grade wet and dry. Don’t get carried away and go through the paint! Use a hose or bucket of water with soap to stop the paper from clogging. Be careful with the edges, sanding them very lightly with a finer grade (1500)
34. Repeat using 1500 grade wet and dry – hose down/wash the car
35. Repeat using 2000 grade wet and dry
36. Wash and dry the car
37. Use Farecla G3 with the white mop on a machine with a slow speed. Keep the sponge flat to the surface; don’t stay in one area too long, spray on water every so often. This can be messy!
38. Wash and dry car
39. Use Farecla G10 with the black mop
40. Wash and dry car
41. Use a good polish of your choice – I’ve gone for Autoglym super resin polish
42. Stand back and admire! … Don’t be afraid to get out there and use the car!
15 Jun 2016, 11:02pm
Good guide!
I would use good thinners all the way though.